• There were many reasons for the change of the site software, the biggest was security. The age of the old software also meant no server updates for certain programs. There are many benefits to the new software, one of the biggest is the mobile functionality. Ill fix up some stuff in the coming days, we'll also try to get some of the old addons back or the data imported back into the site like the garage. To create a thread or to reply with a post is basically the same as it was in the prior software. The default style of the site is light colored, but i temporarily added a darker colored style, to change you can find a link at the bottom of the site.

RT 1330 Spark plug changeout. Parts 1 & 2

Thank-you for these articles and pics. I did my and a friends plugs this past weekend using your instructions and although there are some minor differences between your 2014 and our 2016 and 2017 machines, I doubt I could have done this without you.

Much appreciated.

Ray,

Glad it helped you!
 
Did this job last year...good time to give er a GOOD cleaning. FULL service plus cleaning n reassembly was a 3 day investment. Alcohol made the task less painful...
 
These were taken out of my 2015 F3-S at about 35K miles. In my opinion, they needed changing.
 

Attachments

  • 20210710_195458.jpg
    20210710_195458.jpg
    55.7 KB · Views: 31
These were taken out of my 2015 F3-S at about 35K miles. In my opinion, they needed changing.

Honestly, I think they don't look that bad!

I have 34K on my 2020RTL, I'm going to hold off until 50K unless I detect a misfire.

Maybe a mistake, but really do think that 50k miles should work.:dontknow:

:shemademe_smilie:.......Bill
 
Are all thermal pastes the same? Only stuff I'm seeing is - ''Suitable for CPU, chipsets on Mainboard, VGA card, etc''. Whatever the hell that is. :dontknow:
 
Last edited by a moderator:
For my 2018 Spyder RT Limited, removing the frunk DID NOT make removing the airbox assembly any easier. It only added a tremendous amount of work for no benefit to assist in getting the blasted airbox assembly out. However, I did remove the two bolts that hold down the main console to the upper subframe. I then used wedges and wooden blocks to raise the whole main console up vertically as far as it would go due to the steering rod being secured to the power steering box. That gave me an extra 2 to 3 inches of vertical room to get that bloody airbox contraption out and then back in.

With the main console lifted up vertically, I had no trouble using a 3/8" drive socket wrench with a 6" extension to get to the spark plugs.

My machine no longer has any of that stupid noise reducing foam, because after 6 years of being in SouthEast Texas heat, that stuff had degraded to a horrible mess which left black, sticky blobs of goo all over the place. Bad idea on that stuff Bombardier.

Respectfully,
John Gietzen
Oct 22, 2024
 
Last edited by a moderator:
I replaced that foam with new foil lined heat resistant foam when I installed the vent kit. Some goo-gone and elbow grease got all the old stuff off pretty easily. The bike does sound very different after doing this.
What I used: https://a.co/d/954pAH6
 
RT 1330 Spark plug changeout. Part 2

Now remove the intake manifold adapter. Loosen the metal hose clamp and cut the plastic one. I replaced the plastic hose clamps with metal 4" hose clamps.

View attachment 165322

Now you can pull the secondary air box out. It comes out pretty easy. What you'll see then is the top of the engine!

View attachment 165321

I used a short flat blade screwdriver to disconnect the harness connectors from the ignition coils. The screwdriver lifts the lock tab and pushes the connector back. A lot easier than bare hands! Be careful to not drop the screwdriver! I did! It took me a 1/2 hour to recover it from on the bottom belly pan!

View attachment 165318

Make sure the top of the engine is clean! You don't want to take a chance on dropping crud into the cylinder! Remove the ignition coils. There are rubber seals at the top of the coils. One or two may stay stuck in the valve cover so make sure you get them back onto the coils. Anyway, don't lose any of them! Don't lose the screws. You may never find them again!

To remove the plugs I used a 3/8" drive spark plug socket and 2 3" extensions.

View attachment 165319

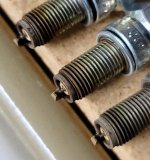
As you can see the plugs are down deep! After getting them loose I took the ratchet off and pulled the plug and tool up a bit and took off the upper extension. The headroom is limited so you aren't going to be able to use a longer extension.

View attachment 165320

When you install the new plugs be sure to use thermal grease on them. Then tighten them to something close to 15 newton-meters of torque. The service manual states 13.5 +/- 1.5 N-m. 15 was easy to see on my torque wrench. The manual refers to the torque as "Retaining Screw Torque". On the NGK web site I found the torque listed at around 10 N-m so I determined retaining screw meant the spark plug thread. Just another glitch in translating from French to English.

Everything goes back together in reverse order of taking it apart!

After you have the harnesses all connected and the air boxes back in you can start the engine. Be ready to be SHOCKED. With all the panels off the 1330 clatters as loudly as a diesel truck engine. I wondered if something was broken, but it wasn't!
Wow!!! Thanks very much for all of the info and pics!!!! I won't do it again in my lifetime!! LOL
 
Back
Top