• There were many reasons for the change of the site software, the biggest was security. The age of the old software also meant no server updates for certain programs. There are many benefits to the new software, one of the biggest is the mobile functionality. Ill fix up some stuff in the coming days, we'll also try to get some of the old addons back or the data imported back into the site like the garage. To create a thread or to reply with a post is basically the same as it was in the prior software. The default style of the site is light colored, but i temporarily added a darker colored style, to change you can find a link at the bottom of the site.

Other exhausts

I checked out their web site and they also make them for the RT 2010 to 2012, Looks like a quality product . They are all 50 state legal and comply with noise regulations. Do you have any sound recordings . I could not find any on their site. I also e-mailed them about whether the pipe will fit with an OEM trailer hitch. Worth checking out! :doorag::thumbup:

There are some you tube clips you can hear. just search for canam spyder yoshimura.:thumbup:
 
HMF on an RT ?

Has anyone used an HMF on an RT? Would it require a custom connector pipe & install?
 
Last edited:
I have the Yoshi stainless pipe on my 2012 RT and coudn't be happier. It has a great sound, louder than the OEM can but quieter than either the Hindle or Two Brothers. Plus it looks classy. It also uses the 2 bolt flange and not a muffler clamp.

And the most important thing is my wife likes the sound and gave it HER approval. :D

Carl
Any chance of seeing a couple of pics of that Yoshi on an RT ?
Thanks,
Jack
 
i opened one up a few months ago when i got a replacement a friend had laying in his garage i cut the weld through at the cat along the seam of the black part and the stainless how much should i chop off the open end of the remainder and reattach ?

or maybe show some measurements where you did the actual cut and what part was removed


it looks like you removed the front part using the original end with can attached


I DID THE LATERAL CUTS TO OPEN up a window so that i could view the entire internal workings of this muffler. Now that i know what's inside, i would NOT do that again... 1st: drill out the retaining rivets that holds the support strap on... then i'd cut circumferencially along the forward end of the forward weld, penetrating no more than 1/8" deep. should you go deeper, you will cut into the 'cat' casting - not a good thing. then the next cut can be accomplished with a chop saw, a big one... depending on what you are looking for - from initial cut at the front end, measure toward the aft end and using the chop saw, cut her in 2... on mine, i removed 9" total, i'll do 12" next time. once you have the muffler parted, you need to remove all the material that is behind your 1st cut. leave or remove the cat - i kept mine in... once you have the forward end cleaned up, you'll need to remove whatever is in the way of reconnecting the now aft end to the forward end. the cat will enfluence what needs to be removed should you decide to retain it. there is no 'given' as to what to remove - it's up to you... once everything is cleaned out, you'll now need to use a die-grinder with a 3" cut-off wheel and go into the openned end of aft end and remove 1/2" deep of the liner, which is just on the inside of the outter shell... this will allow you to butt the outter shell to the housing where the cat is located... if you need to remove more on the liner, do so until you have a snug fit to the cat casting. once you accomplish this 'fit'... it's time to TIG weld the 2 pieces into 1... upon completion, go to Walmarts, buy a can of BBQ GRILL paint (black) and tape off what you don't want 'black' and spray 2 coats... INSTALL... ENJOY....
NOTE: b4 u start any cutting, get a marker and draw 'alignment' marks in no less than 2 places along the muffler, 180 deg. apposed... wear safety equipment when using tools... good luck, let me know how you made out...
Dan P
Easley, SC
SAM_0321.jpg
 
nice write-up dan

that's the ''play by play'' i was talking about. thanks.:thumbup: i like the ''stubby'' look of it all.
 
Last edited:
i opened one up a few months ago when i got a replacement a friend had laying in his garage i cut the weld through at the cat along the seam of the black part and the stainless how much should i chop off the open end of the remainder and reattach ?

or maybe show some measurements where you did the actual cut and what part was removed


it looks like you removed the front part using the original end with can attached

geeeez, i replied, but must have DELETED it versus sending it... let's try again...

1st, i would NOT cut the next muffler from fwd to aft... 1st, drill out the rivets that hold the mounting strap to the muffler... then using a die-grinder with a 3" cut-off wheel, cut behind the fwd weld to a depth of no more than 1/8"... this will allow the casting that holds the 'cat' to maintain it's integrity... then i would measure from this cut back towards the aft end the amount you choose to removed overall. mine was 9", the next one i do, i will remove 12" out of it... what ever you decide to eliminate, measure that distance aft from the primary cut, now using a big chop saw, sever the muffler in half... then start removing everything between these 2 cuts. once this has been accomplished, you'll need to use your die-grinder again, and go inside the aft end and remove 1/2" of the liner which is inside of the outter casing... DO NOT CUT THE CASING AGAIN... look at the picture with my hand in it, that will give you an idea... dependent on whether you leave in the cat or not, you will need to evacuate 'stuff' ie; piping on the inside of the aft end... removal is up to you and what you think is necessary. some hand work will be needed to 'fit' the aft to fwd ends... once this is completed, you are ready to TIG weld the 2 pieces into 1... now go buy a spray can of BBQ GRILL paint at Walmarts... spray on 2 coats... NOTE: prior to cutting, mark the muffler with a marker to re-align the 2 halves after cutting. ALWAYS wear your safety equipment while working. good luck, enjoy... and let me know how you made out....
Dan P
Easley, SC
SAM_0320.jpg

OH,,,,, now i c what happened... there's 2 pages... n i didn't check the 2nd page, duh... sorry...
 
Last edited:
Jack

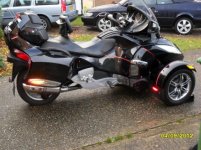
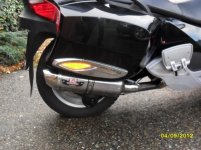
He are some pictures of my Spyder RT-S SE5 2010 Model with the Yoshimura R77 Stainless Steel Exhaust fitted

See also

Spyder RT – Fitting-Yoshimura-R – 77 S Exhaust Slip-On-Exhaust-Muffler-to-a-Spyder-RT

http://www.spyderlovers.com/forums/s...to-a-Spyder-RT


Eddiie Sheppard
Reading UK


That's a very nice looking setup! Does the YOSHI come with the connector pipe for the RT ready to bolt on? No customizing required?
Thanks!
 
That's a very nice looking setup! Does the YOSHI come with the connector pipe for the RT ready to bolt on? No customizing required?
Thanks!

Nothing special is required to mount the Yoshi pipe. I think there was a total of 5 bolts to install.

I'll see about some pictures but then a first hand visit would answer all your questions. :D

Carl
 
Jack

He are some pictures of my Spyder RT-S SE5 2010 Model with the Yoshimura R77 Stainless Steel Exhaust fitted

See also

Spyder RT – Fitting-Yoshimura-R – 77 S Exhaust Slip-On-Exhaust-Muffler-to-a-Spyder-RT

http://www.spyderlovers.com/forums/s...to-a-Spyder-RT


Eddiie Sheppard
Reading UK

View attachment 58287View attachment 58288View attachment 58289 View attachment 58287


HI Eddie

I just came across your posting showing your Yoshi mounted on your Rt. I got an e-mail the other day from Yoshimura Exhaust and the spyder Rt they used to prototype the exhaust did not have OEM trailer hitch so they cannot verify that their exhaust pipe will fit a spyder with a hitch.

If I get a new exhaust it will be the BRP Akcripovic exhaust because I know that the exhaust will fit with a hitch installed.

Thanks again for your PM

Mark Crenna
 
RS-S with Yoshi R-77 Slip On

I have never gone for louder exhausts since I was 17 with a 250 Honda. ;-)

However our new/used RS-S came with a Yoshi R-77 and it is just amazing.

It just cracks from the rider's seat, but is still quite innocuous from the roadside.

Here is how it looks:

DSCF6719j.jpg

It sounds even better. ;-)
 
Aftermarket exhaust

I put the single Two Bros stainless on my 09 GS. Being an X-Harley rider I subscribe to loud pipes save lives. The pipe is fairly loud, but a silencer tip is available. Price point was very good. Another reason I chose it was the Dynojet Power Commander tuner only has preconfigured map sets for the Two Brothers exhaust.
 
Back
Top