• There were many reasons for the change of the site software, the biggest was security. The age of the old software also meant no server updates for certain programs. There are many benefits to the new software, one of the biggest is the mobile functionality. Ill fix up some stuff in the coming days, we'll also try to get some of the old addons back or the data imported back into the site like the garage. To create a thread or to reply with a post is basically the same as it was in the prior software. The default style of the site is light colored, but i temporarily added a darker colored style, to change you can find a link at the bottom of the site.

OK, here goes .....

bmwlarry

New member
Today my Utopia should show up and I am jumping right into the install. I know this has been covered many times before but no flames - please! I would appreciate any must knows, hints and information that would help with the install. I realize that cutting into this limited seat will probably be the hardest part on the job!
Thanks
Larry
 
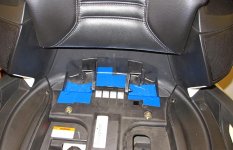
There are some square holes under the saddle by the rear hinge. Cover those holes before starting. They will eat anything you drop in them.

Approach removal of the saddle rear bolts from the top side, not below.

There are metal sleeves or inserts the bolts run through. Don't lose them and do reuse them when you go back together.

Review the pictures and video on this site. It shows a different bike, but the procedures for fitting and cutting are similar enough to make this useful.

http://www.goldwingfacts.com/1800Utopiabackrest2.htm

Relax and take your time. You'll do just fine & realize afterwords, it truly is the best mods for your Spyder!
 
When I removed my seat I took the passenger seat off first. Well ok not first, first I tried it from under the seat, then from the topside, then I removed the passenger seat. You might not HAVE to do it, but it sure made it a lot easier to do.
 
:congrats: :ohyea::yes:
Now... Take the proverbial "Deep Breath"... Read the instructions about seven times... "Alaska" mentioned "Measuring twice and cutting once"; You might want to measure three times just to be sure...
Plug up those :cus: holes! :spyder:
We're waiting to see the glorious results! :thumbup: :bbq:
 
Unplug from the connector (may be tucked in the pan by the battery). Plug it back in after the hinge bolts are back in.
 
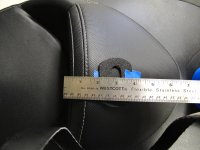
Got it. I have started the instal and when the T-bar is rested on the seat bottom, there is a 0.5 inch gap. Is that the way it should be or do I have the wrong T-Bar?
Larry
 
here is a picIMG_4392web.jpgIMG_4394web.jpg
The three inch make looks way back farther than the install photo. Could some one with it installed please measure how far behind the most posterior seam on the top of the seat is the bar?
 
Last edited:
The Utopia install is done!

Well
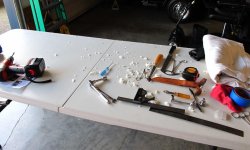
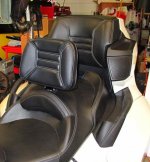
The job is done and I am sure Glad my friend, Key showed up to give me hand. Lining up the holes, pulling out bits of fame and reinstalling the seat were all quite a job but is is done. I permanently took care of the problem of dropping things down the holes. I also included a photo of the remnants of the war and the finished product.
IMG_4395web.jpgIMG_4396web.jpgIMG_4397web.jpg
 
Well
The job is done and I am sure Glad my friend, Key showed up to give me hand. Lining up the holes, pulling out bits of fame and reinstalling the seat were all quite a job but is is done. I permanently took care of the problem of dropping things down the holes. I also included a photo of the remnants of the war and the finished product.

Looks awesome..................nice job!:thumbup:
 
Larry- a little name dropping here.... Mark Lawson was Utopia RT backrest #1.
Nice work.

Phil, Tyler TX- from my iPad3.5 using Tapatalk HD
 
Got it. I have started the instal and when the T-bar is rested on the seat bottom, there is a 0.5 inch gap. Is that the way it should be or do I have the wrong T-Bar?
Larry

The three inch make looks way back farther than the install photo. Could some one with it installed please measure how far behind the most posterior seam on the top of the seat is the bar?

I thought these were good questions, but you never got a (public) answer. Could you now give us the benefit of your experience and answer your own questions?
 
quote_icon.png
Originally Posted by bmwlarry
Got it. I have started the instal and when the T-bar is rested on the seat bottom, there is a 0.5 inch gap. Is that the way it should be or do I have the wrong T-Bar?
Larry

Answer from Bob: Note how the rear of T Bar with Rubber bumper on it, is level with the rear of seat. It will rest on frame that is under seat when you install seat back on the Spyder. Reason for gap is so the foot print of the part with rubber bumper and level with rear of seat is bigger. If I just followed the seat base there wouldn't be any flat area on our bar to rest on the frame of bike. It is correct, the way I designed. We've got 1000s out there, always works. Bob


quote_icon.png
Originally Posted by bmwlarry
The three inch make looks way back farther than the install photo. Could some one with it installed please measure how far behind the most posterior seam on the top of the seat is the bar?
Answer: I ended up not believing the 3 in. and cut a bit in front of the mark and I really should have left it where I marked the 3 in. Trust your measurement!
On mine, the once the bar is in place and tightened, it is exactly 2 inches behind the most posterior white stitching on the factory seatback top.
 
Back
Top