bikerbillone
Well-known member
Good luck Monk, sounds like my frustration with a project on my 2020 RTL. It wasn't a Frunk liner so no need to explain my project.
Monk I’m not going to be much help, other then I tried tonight on my 2020 RT and gave up. I decided I’m going to see if the dealer can install it when I take the Spyder for it’s first service.
What stopped me was the two bolts near the lock (which you should be able to remove to help remove the top of the frunk) just spun when trying to remove them. Looking at the service manual... those bolts have nuts (which you can’t get to unless you remove the whole frunk) and if I read the manual correctly (page 611 of the pdf) once you take the nuts off you have to replace them. The fact that I would have to remove the whole frunk and get replacement parts stoped me from even going forward.
For the time being I removed the two push pins on each side of the frunk bucket and used a thin plastic tool and shoved the liner and Velcro straps between the top of the frunk bucket and bottom then replaced the push pins. I was only able to get most of the sides of the liner under and snap the back of the liner to the single snap. Right now that works for me as I wanted the liner mostly to protect my helmet from scratches when I put it in the frunk.
Sorry I couldn’t be any help... just wanted to let you know you weren’t alone in your frustration.
Since you've already dug into this, does it appear you "should" be able to only remove the (2) large side panels (tupperware) and those (2) spinning bolts in order to remove that top hoop to install the liner? Or did you find there were other bolts that would need to be removed?
I appreciate the help.
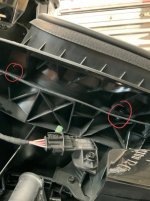
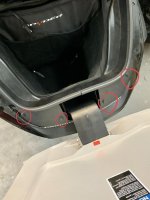
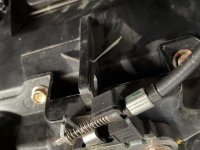
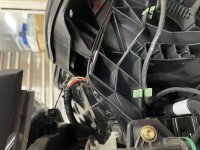
I was hasty in my response before. The two spinning bolts look like the only 2 bolts you need to remove to access the back part. But then there are still the sides and front you have to deal with. There are the 2 push pins for each side. Then there is the true hassle, the front where the lid connects. There are 4 push pins that are holding the top of bumper to the top of the frunk bucket. If you could remove the spinning bolts in back, the side push pins, and those front push pins you might be able to maneuver the top of the bucket off without removing the entire front, but I’m going to assume the front has more bolts or push pins I can’t see under the top of the bumper. I’ll see if I can post some pics
Thinking about it even if you could maneuver the top off, you would still need to get to the Velcro under the top of the bumper.
I’ve attached pics of the spinning bolts, side pin and front pins.
Couple thoughts, here. On the spinning bolts: first, I wonder if there's a way to access the nuts, maybe there's a significant hole left if you remove the latch? Second, I'll bet Lowe's has some replacement nuts/bolts (or maybe just nuts) to replace those. If I can get to the nut (or if mine don't just spin), that might be easy.
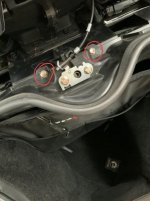
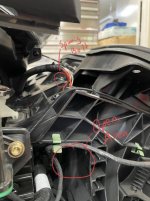
Feeling under the latch feels like it is solid plastic. If you come in from the side you might be able to maneuver around things to get to the bolts... but looks like you’ll need a long extension and trying to find the bolts with the extension very tight maneuvering (more pics attached).
I understand about not wanting to remove the Tupperware. After putting a small gouge in one of the fins I think I’m good with not wanting to take them off again.
Wishing you success. I wish I could be more help.
Thanks. Trying to figure out the perspective for the 2nd pic.
Sorry about that tilt your head to the left. I’ll see if I can fix it.
Also another thought. Maybe the parts page will help. https://www.google.com/url?sa=t&rct...-iframe.html&usg=AOvVaw0a6muRnyW0t7pzSxU2Tq79
It’s not instructions but at least it tells you if it push pins or bolts. I looked under 2020 rt front storage
Hopefully this pic is right side up.
BTW the nuts are Elastic Stop Nut M6 according to the parts page.

I've been long winded but it suits (2) purposes. First, I do better when I can talk my way through a problem and second, maybe you can see something I missed or elaborate on something I said (typed).
Thanks and let's keep at this, sir (I'm assuming).

I believe the service manual shows every bolt or nut on the Spyder that has Loctite on it or is plastic needs to be replaced. I ignore that requirement unless there is a clear potential safety issue with not replacing it. So far I have never had a problem by doing so.Looking at the service manual... those bolts have nuts (which you can’t get to unless you remove the whole frunk) and if I read the manual correctly (page 611 of the pdf) once you take the nuts off you have to replace them. The fact that I would have to remove the whole frunk and get replacement parts stoped me from even going forward.
") Honestly, this sux doing it alone. Not that it can't be done with one person (although some of these pieces are pretty bulky and a 2nd person would be helpful) but I need some "moral support" right now to finish this up.
Honestly, this sux doing it alone. Not that it can't be done with one person (although some of these pieces are pretty bulky and a 2nd person would be helpful) but I need some "moral support" right now to finish this up.Frunk liner is installed and the (2) pieces of the frunk/front cover are back together. Now I just need to attach the front of the bike to the rest of the bike.
More later.
Everything's all back together. I even got an added bonus! TWO fault codes. I started up the bike to run it up on ramps after I had the front end off and everything (what there was) unplugged. The only thing that wasn't a light that I unplugged was some sort of sensor on the right side of the bike. When I started the bike (with it unplugged), the outside temp showed -51* so I'm guessing that's the ambient temp sensor.
Anyway, I got P2228 and P0073. What are these and how do I clear them?
A post on the other code. https://www.spyderlovers.com/forums...s-P0073-Fault-Code-mean&p=1551799#post1551799Everything's all back together. I even got an added bonus! TWO fault codes. I started up the bike to run it up on ramps after I had the front end off and everything (what there was) unplugged. The only thing that wasn't a light that I unplugged was some sort of sensor on the right side of the bike. When I started the bike (with it unplugged), the outside temp showed -51* so I'm guessing that's the ambient temp sensor.
Anyway, I got P2228 and P0073. What are these and how do I clear them?
Here is a post to one of the codes looking up the other one
https://www.spyderlovers.com/forums/archive/index.php/t-45452.html
Thanks, ma'am. I ask because, after much searching, I think the P0073 is because I started the bike with the ambient temp sensor unplugged. No big deal as long as I can reset it. On P2228, per your link (thanks, again), it says, "P2228 = reporting module, ME17; Ambiant pressure sensor short to grd. Possible causes; damaged sensor, circuit wires,connector, ECM pins on connector. Ensure sensor is fully inserted(plugged in).". The only plugs I unhooked for for the ambient temp sensor (nothing about ambient pressure unless it's the same thing) and the wire for the Auxiliary light.
I look forward to your further response so I can call this one done.
EDIT: I didn't see you posting as I was typing. I only unplugged ONE thing that wasn't light related. Assuming both are for the same sending unit, how would I clear them? If they don't come back, I don't care. If they do, I'll rip apart the tupperware again (which I really don't want to do).