• There were many reasons for the change of the site software, the biggest was security. The age of the old software also meant no server updates for certain programs. There are many benefits to the new software, one of the biggest is the mobile functionality. Ill fix up some stuff in the coming days, we'll also try to get some of the old addons back or the data imported back into the site like the garage. To create a thread or to reply with a post is basically the same as it was in the prior software. The default style of the site is light colored, but i temporarily added a darker colored style, to change you can find a link at the bottom of the site.

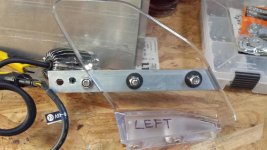
Mounting brackets for driving lights higher up.

A word of caution. If mounting on the A frame bars, don't get wiring to close to the radiators. Installed my lights when the 2014 was new. Two years, and the system had fried. I went to a lighted Bumpskid after that. :yes:
 
Dallas is my neighbor and plows my drive. Great guy. I'm in Hurricane at this time, unfortunately, or I'd take that suggestion and run with it. How do you know Dallas?

His wife and my 1st wife were collage roommates at BYU. I have known them since the day they were married. Thais (1st wife) was Janet's Matron of Honor when they were married.

Small world.
 
I have a simple idea

Hi Pete,

If you haven't solved the mounting problem I have a simple idea:

I'll try to explain-----

With two spacers extending from the two holes that hold the deflectors under the mirrors ------ a 3 and 1/2 inch pc of aluminum strip with 3 holes. One in the center to mount the lights and 2 more ( one near each end ) ------- mounted to the Spyder with longer bolts in the in original holes.


I'll be happy to make the spacers ( they are different lengths) AND the mounting plates. I would leave it to you to get the longer bolts and paint.

Let me know-----

BTW What kind of lights did you get? LED lights?

ANNND: Do the new scoops get in the way of the air deflectors ???

Lew L
 
Last edited:
My mounting idea will NOT work with the scoops. Might they fit inside the scoop after cutting a hole in the grill???

Lew L
 
ADDED LIGHTS

Lew, the lights are dual intensity driving lights from Twisted Throttle http://www.twistedthrottle.com/dena...-with-full-wiring-harness-and-m8-mount-chrome

I've attached two new photos showing the area around the mirrors where I'm thinking I'd like to mount the lights. One possibility is the small deflectors directly behind the windshield. The other is below the mirror but as you can see the lower wind deflector has been co-opted by the air scoops.

View attachment 156645 View attachment 156646
it and the mirror bottom... Pete, looking at pic#2, I don't have the scoops so ---- How sturdy are they annnnnnnnnnd are they firmly mounted to the Spyder ??? .... If sturdy - why not attach a piece of flat stock to the top of the scoop between it and the mirror bottom ...... sticking out far enough so the lamp could be attached to that ????? ................. Any thing is possible if you at it long enough ....... Mike :thumbup:
 
UtahPete, I have been thinking and thinking about this same issue, though I do like the TricLED lights mounted to the inside of the RT's front fender so the driving lights shine where the wheels are pointing, I still would like some switched extreme downrange lights from a higher perspective, I think the upper deflectors (small deflectors directly behind the windshield, as I have a '13 RT with the scoops vs the lower deflectors) would allow a small triangular plate extending out to the sides of the bike that those lights could be mounted to would be excellent positioning, I'm thinking I might hang the light below the plate. Those small deflectors directly behind the windshield bolt holes seem solid enough, and I could route the new wiring behind/under the front dash valance.
Before someone asks, I'm planning several IBA Long Distance rides that will feature lot's of night driving on unfamiliar roads...
 
I was even wondering about fabbing up a small triangular plate that would fit into the socket the upper deflectors mount into, come up the outside of the deflector, then come out flat. The upper deflector bolts would then capture/mount both the deflector and the plate, with the top outboard peak of the plate having the mounting surface for the driving lamps. My bike is away in winter storage right now, so I'm not sure of the clearances, alternatively I'm wondering if those little deflector's really have any benefit (Especially if I get a wide / tall new windshield) and could just be removed using their mounting bolts as the driving light mounting plate mount.
 
I was even wondering about fabbing up a small triangular plate that would fit into the socket the upper deflectors mount into, come up the outside of the deflector, then come out flat. The upper deflector bolts would then capture/mount both the deflector and the plate, with the top outboard peak of the plate having the mounting surface for the driving lamps. My bike is away in winter storage right now, so I'm not sure of the clearances, alternatively I'm wondering if those little deflector's really have any benefit (Especially if I get a wide / tall new windshield) and could just be removed using their mounting bolts as the driving light mounting plate mount.

  • My thoughts exactly. Maybe Lew or Mike could fab those. Might be another 'must have' farkle at some point!
  • My wife's bike has the F4 windshield and the lower deflectors are pretty useless. Unfortunately, it's my bike with the OEM windshield that I want the driving lights for.
  • That gives me another thought; remove the small deflectors from Jane's bike and use them as templates for the light mounting brackets fabrication...except I still don't know how to work with metal other than drilling holes in it....
 
UP, I'm thinking of heading to my storage unit, pulling those upper deflectors, and sending them into work with my wife. Her company refurbishes/recreates Classic Antique aircraft from the '30's and 40's and they have to fab up lots of one off special mounts (it's seems back in the '30's they didn't think to include a GPS antenna mounting plate inside the A/C fuselage...<G> Shoot nobody looks through those deflectors anyway, maybe I could get an all in one deflector/accessory light mount powdercoated black. hmmmm.....
 
Pete, pretty easy, church friend of mine has a large polebarn he's got a spyder also and they're sitting side by side, I'll go after church tomorrow. He and I are planning 10 day 8000 mile trip this summer and I'd like to have the additional lighting on by then.
 
UP, will do, though if you get yours mounted soon, please post pics. I went today but my buddy was out of town (seems its a holiday weekend here that has nothing to do with Spyders).
But I'll see him this week and get the deflectors pulled for the fabricators.
 
UP, sorry it's just been so bitter cold here in MN that I haven't wanted to remove the Windshield fascia to get at those lower deflector mounts.
We're supposed to hit the 40's tomorrow and will likely start my Spring maintenance and farkeling season. A small space heater will help warm up some of the parts just to be safe.
 
Pete (and anyone else mildly interested) I've taken one of your pics and added a nice Red line at where I want the mounting plate to come out, Sorry my 3D drawing skills are .... gone...
But I think the plate could come out at this point, then flare out delta wing shaped with a mounting point for the light just far enough out to clear the deflector and shield.
I do think a small relief trim will have to be done on the Fascia as it's such a fine gap there. Or maybe the plate could have a vertical support that would fit between the
fascia and the mirror and use one of the fascia attachment points as well.
attachment.php
 
Last edited:
Low-tech solution

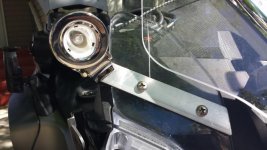
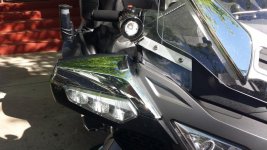
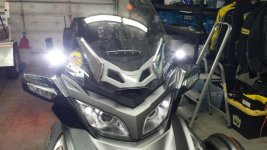
Finally got it done today. 1/8" x 1" bar stock aluminum was easy to work with.

Bracket 2.jpg Bracket 3.jpg Bracket 1.jpg

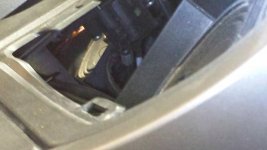
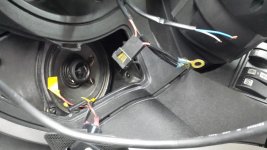
Next step is the electrical connection. For now, I've got the light cable routed through a notch in the speaker grill on each side.
 
That's keeping with the KISS principle. I'm waiting to hear what kinda light throw you're gonna get with them up that high. Looking forward to a night time light shot.
 
Me too..

I was wondering the same, looking for a higher point. I have not got the lamps yet, but I am thinking of the clear plastic wind deflectors - or one of those bolts. Those deflectors are thick and solid. I was thinking maybe getting 6mm threaded rod and replacing one of the bolts with a standoff (from McMastercarr.com) and putting the lights on maybe a 1.5" to 2" standoff.

So the lamp would mount on one end with two nuts clamping the mounting bracket; then slide on the spacer, then screw it into the wind deflector hole. Once tight, loosen the two nuts to adjust the lamp and re-tighten.

Just my two cents!


I've been looking to add more lighting both to be seen and to see. From everything I know about driving lights, the higher they are mounted, the greater effective distance a given lamp will throw the light. Many on here mount them on the A-arms or fenders, but for my purpose that is too low to the ground. So, I'm going to try mounting them up higher using existing strong attachment points and hopefully avoiding modification of the body panels in any way.

I decided on the Denali DR2 lights. Got them on sale at Twisted Throttle (they're 2015 models). Great build quality and heavier than I expected. I want to mount them higher than the A-arms and thinking about two locations (see pics). Has anyone used either of these locations and if so, what did you use for a bracket? My metal fabrication skills are practically nonexistent.


View attachment 156420 View attachment 156421 View attachment 156422
 
Finally got it done today. 1/8" x 1" bar stock aluminum was easy to work with. Next step is the electrical connection. For now, I've got the light cable routed through a notch in the speaker grill on each side.

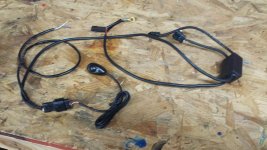
Okay, decided not to try creating my own wiring harness so bought one from Twisted Throttle where I got the D2 driving lights (although now that I've got it, I realize it wouldn't have been that big a deal). This is what it looked like, laid out on the workbench;

20180621_112412.jpg

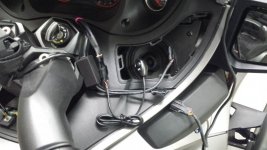
This is what it looked like after tidying it up and attaching wiring connectors. I'll be feeding it through the space between the left and right speaker cavities;

20180621_113744.jpg 20180621_113632.jpg
 
20180621_113822.jpg The wire with yellow tape is the switched power wire I fed up from the Electronic Fuse Block (see that thread). I'll be clipping off the two battery terminals and connecting them to that wire instead.

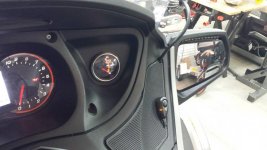
20180621_124827.jpg This is the finished installation on the right side, where I decided to put switch on the speaker grill

20180621_124810.jpg Now I just have to wait until dark to aim them and check out the difference they make over the headlights by themselves. The objective was to be able to throw a lot of targeted light down the road when riding in rural areas at night.
 
Looks good Pete.:thumbup: I may go with a different mount using the two bolts that hold the deflector. I want a different place to mount the switch though.

Lew L
 
Looks good Pete.:thumbup: I may go with a different mount using the two bolts that hold the deflector. I want a different place to mount the switch though. Lew L
Yeah, I'm still considering where I want to mount the switch. Fortunately the provided cable is long enough to bring it out to the right hand grip if I need to.
 
Back
Top