-
There were many reasons for the change of the site software, the biggest was security. The age of the old software also meant no server updates for certain programs. There are many benefits to the new software, one of the biggest is the mobile functionality. Ill fix up some stuff in the coming days, we'll also try to get some of the old addons back or the data imported back into the site like the garage. To create a thread or to reply with a post is basically the same as it was in the prior software. The default style of the site is light colored, but i temporarily added a darker colored style, to change you can find a link at the bottom of the site.
You are using an out of date browser. It may not display this or other websites correctly.
You should upgrade or use an alternative browser.
You should upgrade or use an alternative browser.
Mods to fix heat, pulling out all the plugs
- Thread starter bluestratos
- Start date
 opcorn:
Schnauzer
New member
Can someone explain this to me??[/QUOTE]
Research and Development.:gaah:..
BRP took it from the snow and tried to place it in the sand.. For all of us self-proclaimed engineers, they should sell us a parts box and frame mounted engine, let us use what we feel we need. Harley rider here also.. It only takes 5 wires,Fuel/air, to get you down the road. Not 7 computers.. "Heat issues" anytime you wrap your legs around something that generates temp change during use, will get hot. The more you cover, the hotter it gets.. Maybe they should look at stripping it down instead of sprucing it up. .
bluestratos
New member
Yes, cooler air is the rule of thumb to increase the density and, the air box is an effective muffler for the sound which I am sure I will hate with out it. But, once the air box is remove it actually allows a lot more ambient air to be brought into air cleaner as it eliminates the dam that the old box created. There is a natural low pressure area under the bike which will draw cool air in from the front. Even though the front vents are there to cool the radiators, they also allow a lot of fresh air to pile up under the front A-arms now that the air box is eliminated.
I don't think anyone is really suggesting BRP do anything to compensate me nor do I feel they should. Like Harley, BRP has inherent problems that we must learn to accept, make our own fix or choose to not buy the product. That is why I sold my Harley, it was horrible to ride, vibration, noise, oil leaks, frame cracks and so on.
I like technology and I have no love for antiquity. Some of the last "opinions" serve no one in this thread. If you want to ride something else do so. I choose to ride the future, others ride the past but at the end of the day we are all riding, lol.
So back to the subject, improving the comfort by lowering residual heat.....
bluestratos
New member


Here are some pictures, I will have more soon
OK, I'll admit that the only other motorcycle forums I've been on have been Harley forums. But I was on them for over 6 years and not once did I ever see someone suggest that Harley Davidson should pay for anyone's work, regardless of how successful it was.
What the heck is it with people who buy Spyders that they expect to be reimbursed in some form or fashion for their efforts to resolve what they think are problems???:dontknow::dontknow::dontknow: Is it because they've never owned motorcycles before?? :dontknow::dontknow: Or is it because they think a $20,000+ purchase entitles them to additional consideration?? :dontknow::dontknow:
Can someone explain this to me??
Haha...+1! I was wondering the same.
The feeling of entitlement some people project is quite entertaining, to say the least.
Sent from my iPhone using Tapatalk
finless
New member
View attachment 78912View attachment 78913View attachment 78914View attachment 78915View attachment 78916
Here are some pictures, I will have more soon
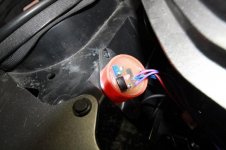
Are those plastic tie wraps? If so, will they hold up to the heat?
Bob
Omcge
New member
For an automatic on-off check out http://www.alliedelec.com/catalog/pf.aspx?fn=539.pdf You will want a close on rise, bottom left on the page maybe a 180 200 or 225 deg. ????? I haven't tried it yet but i'm collecting all the parts to try itAfter 2 1/2 years and many bandaids later I am going for broke. Here is list of what I am doing (pictures to follow):
- Removed cat and replace with wrapped Y Pipe
- Removed header pipes and wrapped
- Removed the fan shroud and built a fan can from a 5 gal plastic bucket by cutting out the bottom 3 inches. Perfect fit around electric rad fan and forces the hot air away vents by the right foot).
- Installed thermal blanketing on all body panels including the left and right engine covers
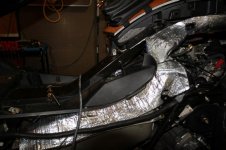
- Installed thermal blanketing up and over the engine and down and under the fuel tank to keep heat way from tank and seat
- Removed all intake plastic and installed ISCI filter/intake
- Blocked off both upper and lower vent openings by right foot
- Installed "Engine Ice" antifreeze to help improve engine cooling
- Installed Magnum Tuner to richen up mix to compensate for other changes and to lower engine temps.
The stock air box blocks off the air getting to cylinder heads and makes maintenance difficult. Removing this really opens up the engine and improves passive cooling. I have been using the block off plate on the upper vent up to now but heat leaks out all around it and of course out the bottom vent. I have eliminated this problem now.
The fan can has already been proven to work based on the commercially unit that is available. My "can" took two hours to build, is light weight and duplicates the function. The hot air is now forced in the opposite direction and down out the bottom. The lower stone guard has been removed and modified to allow for air to be pulled down and under the bike.
Obviously the heat has to escape somewhere and when driving there is a high pressure area in front of the engine and a low pressure area behind the radiator so vacuum pulls the heat away is why I have heat coming through my gas door in the seat and up and around where it fits against the body panels.
Idling will always be a problem and likely will still have issues but the hot air will be controlled around the seat. I know Dave has added a bilge blower to improve circulation at an idle and this may be what I will want to do to keep cool air coming in during idle. If so I will figure out how to have it come automatically once the heat rises much like the rad fan.... Ideas?
The bike is still apart in my garage (the wife's car is outside so I need to buy her something nice, lol). I am taking pictures as I go so once the work is done I can add them.
You might be interested in a mini 300 deg digital thermometer to see whats going on under the tupperware. http://www.mcmaster.com/#catalog/119/608/=pb755c
flybuddy
New member
No, look closely at the connector, they're metal.Are those plastic tie wraps? If so, will they hold up to the heat?
Bob
bluestratos
New member
Well... SUCCESS!!!! Took her for a test ride and my seat stayed cool, no heat from any of the panels and the fuel controller works like a dream. The new air cleaner actually sounds great, makes the Akrapovic exhaust come alive and sound mean, and together has a sound reminiscent of .... a Harley! lol....
She is nice and quite when cruising but hang on when I open the throttle.
No backfiring at all, in fact when I first started the bike and let it warm up I could tell it was actually running rich.. it was loping and lagged a bit when I hit the throttle. One 1/4 turn counter clockwise on the fuel controller and it straightened that out. If I go a 1/4 turn further counter clockwise she starts to pop back in the muffler when decelerating so I think I am where I need to be for now. After some good hard runs I will pull a plug to check how it is burning or, I will buy a gauge to let me check the actual fuel air mixture. By the way, the fuel controller power is switched so you can tell even at an idle when the unit is turn off or on.
I might be running one bar higher on the temp gauge but I will have to do a lot more testing to be sure. (I got up to 5 bars but that was after some hard runs). My $0.00 fan can moves the heat to the left and down under the bike and the insulated panels also muffle the sound of the air cleaner a lot. Day and night difference with the panel off the side.
I will need to do some 0 to 60 runs with a stop watch but she hits my 8 grand shift point so fast I was amazed. Still lags off the line, but that is a nanny thing I am told. That being said, the front end actually lifts off the line now! No air under the rubber but it threw me back against the back rest and gave me a bit of a scare thinking sheit was going for a wheelie. lol.
So,
I started her up in the garage and let the header paint bake off a bit. With the O.H. door open the smoke was not to bad. After my power runs she was smoking pretty good when I got back but it will go away after a few more runs.
All in all I spend 50 hours on the project and close to a grand on the parts to give you an idea. I had an oh crap moment when it came up with a code and no start after I was done, it turned out 2 wires had pulled out from the a terminal block related to the transmission, must have happened when I was wresting with the front header. I pulled the pins out, opened them up, installed the wires and soldered the wire to the pins, reassembled and all was good!")
Yes, they are metal ties by the way.
She is nice and quite when cruising but hang on when I open the throttle.
No backfiring at all, in fact when I first started the bike and let it warm up I could tell it was actually running rich.. it was loping and lagged a bit when I hit the throttle. One 1/4 turn counter clockwise on the fuel controller and it straightened that out. If I go a 1/4 turn further counter clockwise she starts to pop back in the muffler when decelerating so I think I am where I need to be for now. After some good hard runs I will pull a plug to check how it is burning or, I will buy a gauge to let me check the actual fuel air mixture. By the way, the fuel controller power is switched so you can tell even at an idle when the unit is turn off or on.
I might be running one bar higher on the temp gauge but I will have to do a lot more testing to be sure. (I got up to 5 bars but that was after some hard runs). My $0.00 fan can moves the heat to the left and down under the bike and the insulated panels also muffle the sound of the air cleaner a lot. Day and night difference with the panel off the side.
I will need to do some 0 to 60 runs with a stop watch but she hits my 8 grand shift point so fast I was amazed. Still lags off the line, but that is a nanny thing I am told. That being said, the front end actually lifts off the line now! No air under the rubber but it threw me back against the back rest and gave me a bit of a scare thinking sheit was going for a wheelie. lol.
So,
- Free flowing air filter, performance exhaust, eliminating the cat and adding a fuel controller = major power improvement
- Wrapping the pipes, adding a fan can, plugging the upper and lower right side vents and insulating all the panels, over the tank and under the dash = huge temperature reduction and muffles the sound created by the performance air cleaner
- Adding the fuel controller allows fine tuning of the mixture to compensate for leaning out the mix due to 1 above
I started her up in the garage and let the header paint bake off a bit. With the O.H. door open the smoke was not to bad. After my power runs she was smoking pretty good when I got back but it will go away after a few more runs.
All in all I spend 50 hours on the project and close to a grand on the parts to give you an idea. I had an oh crap moment when it came up with a code and no start after I was done, it turned out 2 wires had pulled out from the a terminal block related to the transmission, must have happened when I was wresting with the front header. I pulled the pins out, opened them up, installed the wires and soldered the wire to the pins, reassembled and all was good!
Yes, they are metal ties by the way.
flaggerphil
New member
I'm just glad I've never had the heat problems that some seem to have.
CyncySpyder
Teddys favorite human
CONGRATULATIONS !!! This is GREAT NEWS & You've Done an AWESOME JOB
:thumbup::clap::yes: So Great to hear that ALL of your hard work & effort has paid off :yes::clap::thumbup:
:bowdown:Thank you also for sharing this great information with the community :bowdown:
Would you mind confirming if this is the tuner that you used and which wires it was that you had to hook everything up to, to get it all working correctly? Also, I noticed (at least on the site I have linked) they list this tuner for a Can-Am Spyder Roadster ATV, thinking that doesn't really matter, but just want to make sure this is the same one that you used so we know its compatible :dontknow: Thanks again :bowdown:
[TD="class: newshead"]Choose application Step1
[/TD]
[TD="class: newshead"][/TD]
[TD="class: newshead"]Choose application Step3
[/TD]
:2thumbs: :firstplace:Teddy says you deserve a HI5:firstplace: :2thumbs:

:bowdown:Thank you also for sharing this great information with the community :bowdown:
Would you mind confirming if this is the tuner that you used and which wires it was that you had to hook everything up to, to get it all working correctly? Also, I noticed (at least on the site I have linked) they list this tuner for a Can-Am Spyder Roadster ATV, thinking that doesn't really matter, but just want to make sure this is the same one that you used so we know its compatible :dontknow: Thanks again :bowdown:
[TD="class: newshead"]Choose application Step1
[/TD]
| BombardierCan-Am |
[TD="class: newshead"][/TD]
| EFI xxcSpyder RoadsterSpyder Roadster GS SM5Spyder Roadster ME5Spyder Roadster SE5 |
[TD="class: newshead"]Choose application Step3
[/TD]
| Please selectATV |
:2thumbs: :firstplace:Teddy says you deserve a HI5:firstplace: :2thumbs:
Last edited:
bluestratos
New member
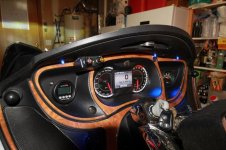
 Yes, that is the one, Dyno-Boost 665, the reference to ATV is a typo. On the oxygen sensors you hook up to the black wires, on the mass airflow sensor on the side of the throttle body you hook up to the black/blue. These colors are on the bike side of the wiring, not the sensor side. I always use automotive grade connectors so I can disconnect everything quickly. Here are some more pictures:
The first pic shows the rocker switch for the controller, look just to the right of the third blue light over, you see a small white dot...
The second shows the fuel controller mounted with Velcro, it is protected by the black access cover but I had it off for testing
The third shows the thermal blankets in place in the engine back, it runs on top of the tank and under
Attachments
Last edited:
bluestratos
New member
By the way, the Magnum Tune has a typo, it says ATV in the description but it is the 665 that you want.
cjackg
New member
When I installed the KewlMetal kit on my 2012 RT, I used a paper filter purchased at Lowes instead of the K&N that came with the kit... The paper filter should give better filtration but also comes with an outer foam sleeve. If you clean & oil the foam sleeve regularly the paper filter should last indefinitely. Here is the filter I used... and a link to the pictures of my RT airbox removal project... http://www.spyderlovers.com/forums/album.php?albumid=2589You can use a paper filter on the KewlMetal intake. Using the K&N is not necessary. There are a few threads on here describing which filters fit.
cjackg
New member
I have been looking for a switch to use with the blower I am using on my RT for cooling the area near the KewlMetal Intake and this one is worth a try. Based on the temps I regularly see on my gauge with sensor near the filter, I would be inclined to have the fan turn on around 100-120 to keep the temp from building up to higher levels.For an automatic on-off check out http://www.alliedelec.com/catalog/pf.aspx?fn=539.pdf You will want a close on rise, bottom left on the page maybe a 180 200 or 225 deg. ????? I haven't tried it yet but i'm collecting all the parts to try it.....

pellcitypete
New member
I would have to guess that having ben harly rider for yrs you must be used to working a lot of the time on them. :thumbup: but spyders are advertised to be more maintaince FREE that being said 6 mo. after I bought mine it was in shop more than w/me now 1&1/2 yrs. latter no heat problems (fixed myself)mainly heat wrap. so we spyders riders are used to trouble free rides an spyders. nojokeHaha...+1! I was wondering the same.
The feeling of entitlement some people project is quite entertaining, to say the least.
Sent from my iPhone using Tapatalk
I would have to guess that having ben harly rider for yrs you must be used to working a lot of the time on them. :thumbup: but spyders are advertised to be more maintaince FREE that being said 6 mo. after I bought mine it was in shop more than w/me now 1&1/2 yrs. latter no heat problems (fixed myself)mainly heat wrap. so we spyders riders are used to trouble free rides an spyders. nojoke
Nope, I don't do Harley's. Never been into them. But to each their own I guess....I'm more into the performance side of things.
Sent from my iPhone using Tapatalk
CruiseRT
New member
I have been looking for a switch to use with the blower I am using on my RT for cooling the area near the KewlMetal Intake and this one is worth a try. Based on the temps I regularly see on my gauge with sensor near the filter, I would be inclined to have the fan turn on around 100-120 to keep the temp from building up to higher levels.
View attachment 79109
Have you thought about something like this, Thermo_switch, They come in different temp. ranges and are cheap to try different ones to find the right one.
bluestratos
New member


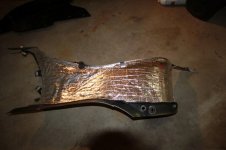
 If you look at post #24 you can see the can in place (painted black) covering the fan. This one is a bit shorter then the first one I made, about 2 1/2" deep side walls. That allows it to clear the rad hose on top. The picture in the center here is the bucket bottom cut to fit the fan with gasket material around the edge. This is before the 2 brackets were made and the left side of the bucket cut away to allow the hot air to escape.
 i would love to see a picture of the fan can you made out of the bucket
Last edited:
Similar threads
- Replies
- 82
- Views
- 3K
- Replies
- 2
- Views
- 864
- Replies
- 29
- Views
- 809
- Replies
- 13
- Views
- 3K