• There were many reasons for the change of the site software, the biggest was security. The age of the old software also meant no server updates for certain programs. There are many benefits to the new software, one of the biggest is the mobile functionality. Ill fix up some stuff in the coming days, we'll also try to get some of the old addons back or the data imported back into the site like the garage. To create a thread or to reply with a post is basically the same as it was in the prior software. The default style of the site is light colored, but i temporarily added a darker colored style, to change you can find a link at the bottom of the site.

Making the 2013 Spyder RT-S "Perfect"

just got my top vent body panels from Veritka Trikes they are out standing fit and primed finish. I dropped them off for hydrographic dipping today but they will force allot of air into the engine compartment and out the bottom past the y pipe.

Do you have pictures you can post? What is the installation procedure?
 
I will but it will be 3 weeks before they will be finished with the hydro graphing and clear coat. this guy I took them too is top notch and really retentive about his work but is also 2 hours south and dropped them off today. but as soon as I pick them up and get them installed I will post pics. They replace the entire upper panel under the mirror.

I am having them doing a boa pattern over black then clear coat over the top the boa pattern is subtle and the lighter actually looks a shade of brown like the trike. If this looks as good as I think then I will be doing some more panels next winter.
 
So I had a little bit of a scare yesterday. I now have everything hooked up (headers, cat bypass, Akrapovic, KewlMetal air filter, PCV, O2 Optimizer and AutoTune. Before I put the bodywork back on, I wanted to make sure it runs. Getting sick of waiting for warmer weather, I decided to pull it out into the driveway. It was 35 degrees, I turned on the ignition, hit the start button and it fired right up. All joy quickly faded when I saw the check engine light come on :(

After letting it run for a little while, I noticed that the temperature reading on the display was bouncing all over the place. It was going from -70 to +50 degrees. It was all over the map. I shut it down and decided to do some research. Come to find out, If the temperature sensor (AAPTS) gives incorrect readings, it will cause the check engine light to come on. I was glad to discover that as it explained what I was seeing. I then opened my shop manual for the Spyder to determine where the temp sensor resides. Much to my surprise, it resides in the frunk. When I saw that, a smile came across my face as I had not put the frunk back on yet, meaning that the temp sensor was disconnected.

Today, I got the frunk out of the basement, brought it to the garage and put it back on the bike. There are 8 connectors that needed to be hooked up and then the wire to pop the lid of the frunk. Once completed, I rolled the Spyder back out to the driveway. Today it was just 15 degrees, but I didn't care as I had to verify that the problem was resolved.

I hit the start button and it fired right up with NO check engine light. It is gone. I stopped and restarted the bike numerous times throughout the day and the light is now gone - as it should be now that the temp sensor is hooked up. I let the bike get a thorough warm up and made sure the fan kicked on. It sounds great and the throttle seems to be much more responsive than before. With the cat, stock air box and stock muffler gone, I'm sure the engine is no longer choked up.

At this point, I am extremely pleased that adding the PCV, O2 Optimizer and AutoTune is working just fine with no issues. That was my biggest fear. I'm now going to proceed with putting the bodywork back on and and getting it ready to ride :)
 
On a raining Sunday, I sat down and read this whole article. Very enjoyable and very imformative.

I am pleased all worked well, after you had that moment :yikes:
 
Last edited:
So I had a little bit of a scare yesterday. I now have everything hooked up (headers, cat bypass, Akrapovic, KewlMetal air filter, PCV, O2 Optimizer and AutoTune. Before I put the bodywork back on, I wanted to make sure it runs. Getting sick of waiting for warmer weather, I decided to pull it out into the driveway. It was 35 degrees, I turned on the ignition, hit the start button and it fired right up. All joy quickly faded when I saw the check engine light come on :(

After letting it run for a little while, I noticed that the temperature reading on the display was bouncing all over the place. It was going from -70 to +50 degrees. It was all over the map. I shut it down and decided to do some research. Come to find out, If the temperature sensor (AAPTS) gives incorrect readings, it will cause the check engine light to come on. I was glad to discover that as it explained what I was seeing. I then opened my shop manual for the Spyder to determine where the temp sensor resides. Much to my surprise, it resides in the frunk. When I saw that, a smile came across my face as I had not put the frunk back on yet, meaning that the temp sensor was disconnected.

Today, I got the frunk out of the basement, brought it to the garage and put it back on the bike. There are 8 connectors that needed to be hooked up and then the wire to pop the lid of the frunk. Once completed, I rolled the Spyder back out to the driveway. Today it was just 15 degrees, but I didn't care as I had to verify that the problem was resolved.

I hit the start button and it fired right up with NO check engine light. It is gone. I stopped and restarted the bike numerous times throughout the day and the light is now gone - as it should be now that the temp sensor is hooked up. I let the bike get a thorough warm up and made sure the fan kicked on. It sounds great and the throttle seems to be much more responsive than before. With the cat, stock air box and stock muffler gone, I'm sure the engine is no longer choked up.

At this point, I am extremely pleased that adding the PCV, O2 Optimizer and AutoTune is working just fine with no issues. That was my biggest fear. I'm now going to proceed with putting the bodywork back on and and getting it ready to ride :)

Thanks for the update let us know when you get few miles on and how things are working out great job on sharing your entire adventure.
 
Most excellent news! I'm glad you quickly pinned it down and have achieved the initial results you were targeting.

Whats next on the agenda?

Jerry
 
Thanks for the update let us know when you get few miles on and how things are working out great job on sharing your entire adventure.

I certainly will report back how things are once I get it out. The weather is not looking good, so it might be another couple of weeks. I gave it a good 20-30 minutes of run time, revved it up a bit and drove it around the driveway in only 1st gear and reverse. Based on all of the PCV changes, I am pretty confident right now that things will be OK. I figure that if something was going to go wrong, it would be with the installation since there is some wire tapping and grounds that need to be done, and that the Spyder would complain at the first startup - like how it did because of the missing temp sensor. Right now, I think I am over the hump.
 
I do have a couple of quick observations:

Evap Canister Removal:
I had the bike in the driveway running numerous times and moved it into the garage afterwards each time with the garage door down. I did not realize it until late in the day that I did not not notice any of the gas fumes that were always emitted from the bike after bringing it into the garage before the evap canister removal. I think this fix is for real as I am not the first one to do it.

Ceramic Coating:
I do not have a heat gun, so my testing is kind of lame, but when I did the thorough warm-up, I placed my finger about an inch off of each header at numerous locations. I could easily keep it there for as long as I wanted. Also, after I shut the bike down, I was able to touch the headers within 5 minutes. Like I said, my testing was not real scientific, but knowing what the ceramic coating is supposed to do, I could easily tell that there is significant heat reduction.
 
So I had a little bit of a scare yesterday. I now have everything hooked up (headers, cat bypass, Akrapovic, KewlMetal air filter, PCV, O2 Optimizer and AutoTune. Before I put the bodywork back on, I wanted to make sure it runs. Getting sick of waiting for warmer weather, I decided to pull it out into the driveway. It was 35 degrees, I turned on the ignition, hit the start button and it fired right up. All joy quickly faded when I saw the check engine light come on :(

After letting it run for a little while, I noticed that the temperature reading on the display was bouncing all over the place. It was going from -70 to +50 degrees. It was all over the map. I shut it down and decided to do some research. Come to find out, If the temperature sensor (AAPTS) gives incorrect readings, it will cause the check engine light to come on. I was glad to discover that as it explained what I was seeing. I then opened my shop manual for the Spyder to determine where the temp sensor resides. Much to my surprise, it resides in the frunk. When I saw that, a smile came across my face as I had not put the frunk back on yet, meaning that the temp sensor was disconnected.

Today, I got the frunk out of the basement, brought it to the garage and put it back on the bike. There are 8 connectors that needed to be hooked up and then the wire to pop the lid of the frunk. Once completed, I rolled the Spyder back out to the driveway. Today it was just 15 degrees, but I didn't care as I had to verify that the problem was resolved.

I hit the start button and it fired right up with NO check engine light. It is gone. I stopped and restarted the bike numerous times throughout the day and the light is now gone - as it should be now that the temp sensor is hooked up. I let the bike get a thorough warm up and made sure the fan kicked on. It sounds great and the throttle seems to be much more responsive than before. With the cat, stock air box and stock muffler gone, I'm sure the engine is no longer choked up.

At this point, I am extremely pleased that adding the PCV, O2 Optimizer and AutoTune is working just fine with no issues. That was my biggest fear. I'm now going to proceed with putting the bodywork back on and and getting it ready to ride :)
The air temp sensor unplugged will cause a MAP sensor code because the sensor is part of the ground loop needed to complete the system.
Who made your cat bypass??
 
The air temp sensor unplugged will cause a MAP sensor code because the sensor is part of the ground loop needed to complete the system.

Thanks for the explanation. It makes me even more confident that the check engine light had nothing to do with the PCV.

Who made your cat bypass??

Spyder1Attitude. Unless you build your own, I think they are still the only option out there. I saw that Lamont might be selling one though.
 
I do have a couple of quick observations:

Evap Canister Removal:
I had the bike in the driveway running numerous times and moved it into the garage afterwards each time with the garage door down. I did not realize it until late in the day that I did not not notice any of the gas fumes that were always emitted from the bike after bringing it into the garage before the evap canister removal. I think this fix is for real as I am not the first one to do it.

Ceramic Coating:
I do not have a heat gun, so my testing is kind of lame, but when I did the thorough warm-up, I placed my finger about an inch off of each header at numerous locations. I could easily keep it there for as long as I wanted. Also, after I shut the bike down, I was able to touch the headers within 5 minutes. Like I said, my testing was not real scientific, but knowing what the ceramic coating is supposed to do, I could easily tell that there is significant heat reduction.


I will tell you that if you got that close then you are managing the heat well my heat gun showed the back header after idle of 10 minutes of over 450 deg F by the factory O2 sensor. I will shoot it again after the heat shield is installed.
 
Get close when you use the IR gun, it makes a little difference. If you take the measurement of your hand at different differences, you'll see what I mean. If possible, measure the distance so the same measurement is taken again when you test something else.

Jerry
 
I will tell you that if you got that close then you are managing the heat well my heat gun showed the back header after idle of 10 minutes of over 450 deg F by the factory O2 sensor. I will shoot it again after the heat shield is installed.

Get close when you use the IR gun, it makes a little difference. If you take the measurement of your hand at different differences, you'll see what I mean. If possible, measure the distance so the same measurement is taken again when you test something else.

Jerry

Another thing worth emphasizing as well is that was only 15 degrees out when I did this, so the results probably won't be as good in the warmer weather, but we did have cold days like this in the fall before I tore the bike apart where I did the same test and there is a definite improvement.
 
Stewart I would like to say this, this has to be honestly one of the best threads on Spyderlovers. The amount of detail you have invested in your pictures and explanations is nothing short of amazing. I have not posted anything here in quite a while, last time I did I had my Ass chewed out for some thing I had said. I read a lot of threads on here but this one you have compiled is great. Because of this I am going to be removing my cat and add Baha Rons plugs and wires. I will also add a kewl metal air intake. Thank you for taking some serious time to document all this great work....oh and just a note im a big fan of ceramic coating.
 
Stewart I would like to say this, this has to be honestly one of the best threads on Spyderlovers. The amount of detail you have invested in your pictures and explanations is nothing short of amazing. I have not posted anything here in quite a while, last time I did I had my Ass chewed out for some thing I had said. I read a lot of threads on here but this one you have compiled is great. Because of this I am going to be removing my cat and add Baha Rons plugs and wires. I will also add a kewl metal air intake. Thank you for taking some serious time to document all this great work....oh and just a note im a big fan of ceramic coating.


Thank you. I appreciate the feedback and am glad that this thread has helped you. I've owned more bikes than I can count over the last 25+ years and I always fine tune each bike and make it as good as it can be - and that is what this thread is all about. I try to be as thorough as I can so that others who might be a little apprehensive of attempting some of these updates might feel a little more confident about taking them on. Also, they can always ask for help as well.

As you get into the work on your bike, feel free to post back here as I'm sure there are others that can benefit from your changes as well.
 
I was originally planning to NOT re-install the left and right skid plates thinking that it would allow more air to flow from the bottom of the engine compartment up through the top. However, there are a number of exposed wires down there on both sides that could be damaged from debris getting kicked up. Since my wife and I go on some pretty long day and weekend trips, I decided that it wasn't worth the risk.

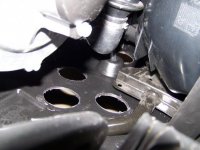
What I decided to do instead was go out and buy a hole saw for the drill. As you can see, there are some spots where you can open up the skid plate that have nothing around them that they are actually protecting. This picture shows the right skid plate from the back side of the engine looking forward. These are the 4 spots that I decided to drill. I used a 2-1/4" hole saw.

The left side belly pan is a little different as BRP has a couple of vents on that side that actually direct the air up into the engine compartment. On that side, I ended up only drilling a single hole at the very front. I am pretty pleased how it came out as I don't believe I have compromised anything and it will certainly allow for better air flow.

Belly Pan - Hole Saw.jpg
 
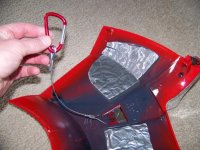
I want to thank my friend spyderyderjim for this next enhancement. They just showed up in my mailbox last weekend and Jim said that I need them. I have never seen these before but they are a great addition. Basically, they are tethers for the side panels. The side panels just pop on and off and are not secured with a bolt. I know that people lose these things every year and they aren't cheap to replace. I actually lost one on my 1986 Honda VF500F way back in the day and it was the same style side panel.

On each side panel, I just looped the wire on the inside, opposite of where the can-am logo is. I then crimped the connector on to wire.

Tether - 1.jpg

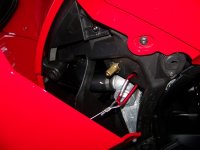
Here is the right side panel. I just clipped it to the open hole next to the high beam adjuster.

Tether - 2.jpg

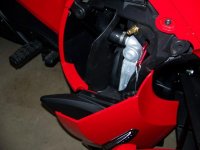
If the panel pops off, then it will just hang off the bike as follows and you won't lose it.

Tether - 3.jpg

Jim - please chime in with some of the details so that others can get these installed as well. I'm not sure if you bought them or made them.
 
Ace hardware carries all the parts to build the tethers for sidepanels

I want to thank my friend spyderyderjim for this next enhancement. They just showed up in my mailbox last weekend and Jim said that I need them. I have never seen these before but they are a great addition. Basically, they are tethers for the side panels. The side panels just pop on and off and are not secured with a bolt. I know that people lose these things every year and they aren't cheap to replace. I actually lost one on my 1986 Honda VF500F way back in the day and it was the same style side panel.

On each side panel, I just looped the wire on the inside, opposite of where the can-am logo is. I then crimped the connector on to wire.

View attachment 84988

Here is the right side panel. I just clipped it to the open hole next to the high beam adjuster.

View attachment 84989

If the panel pops off, then it will just hang off the bike as follows and you won't lose it.

View attachment 84990

Jim - please chime in with some of the details so that others can get these installed as well. I'm not sure if you bought them or made them.

It is 1/16" stainless steel 1 foot long cables, (2 each).
Two Cable protectors, 4 crimps, 2 quick disconnect key holders in your choice of color.
Loop cable around protector, crimp, hook up key holder.
Loop cable threw inside can-am logo, crimp cable with vise grips.
All parts are from Ace Hardware store.
I built them for myself & friends.
Enjoy side panel safety.
Jim K
 
Here are some final shots before all of the bodywork goes back on.

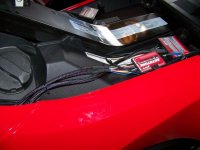
Under the seat, I've got the PCV and AutoTune on the left. The left side panel actually fits snug to where they are placed, so the best way to route the cables is up by the gas cap. It is there where a gap opens up and the wires can run down from there without fear of getting pinched. On the right side is the O2 Optimizer and that side pretty much has a gap the whole length of the side panel, so you can tuck that wire in just about wherever you want with no fear of pinching it.

ReAssembly - 4.jpg

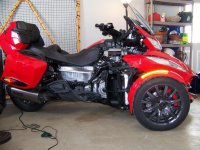
Here's a good view of the front. Notice how I have the O2 sensor for the AutoTune run on the rear header pipe. If going with the AT-300, then that is literally the only place you can put it. The way it is angled, the side panel will go on without coming in contact with the sensor.

ReAssembly - 3.jpg

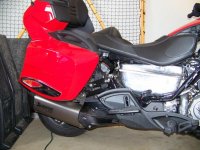
This just shows the Akrapovic. I've already had it running and the bike sounds so much better. It actually has a growl to it now instead of a sewing machine sound. With the Akrapovic and the cat removed, I am still a little concerned about how much louder it will be. In the driveway, it did not sound a whole lot louder, even when I revved it up. I won't really know for sure until I take it out and flog it. If it is too loud, then I might consider putting the stock muffler back on.

ReAssembly - 2.jpg

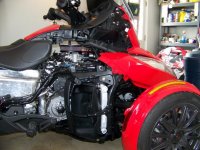
What I really like about this picture is how much open space there is now around the engine with the stock airbox, resonator and evap canister removed.

ReAssembly - 1.jpg
 
Back
Top