Bagger
New member
Got my RIP boards last week. Opened them today, but no instructions.
Went to Lamont's site and he has a vid, but is not thorough enough for a non-wrench such as myself.
Soooo .... if anyone's installed these guys ... see if you can help me out. Lamont's place isn't open until Monday, and I'm chomping at the bit to get these puppies installed this weekend.
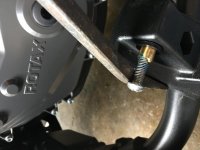
I know about the heat to the oem peg bolts. Got that done and bolts out.
Now, there is a brass oem bushing with "ears" held by rubber grommets. How do I get this brass deal out without screwing up the rubber deals?
Anything else you can add that will make this easier for me would be appreciated as well.
TIA
Went to Lamont's site and he has a vid, but is not thorough enough for a non-wrench such as myself.
Soooo .... if anyone's installed these guys ... see if you can help me out. Lamont's place isn't open until Monday, and I'm chomping at the bit to get these puppies installed this weekend.
I know about the heat to the oem peg bolts. Got that done and bolts out.
Now, there is a brass oem bushing with "ears" held by rubber grommets. How do I get this brass deal out without screwing up the rubber deals?
Anything else you can add that will make this easier for me would be appreciated as well.
TIA
 pps:
pps:")