• There were many reasons for the change of the site software, the biggest was security. The age of the old software also meant no server updates for certain programs. There are many benefits to the new software, one of the biggest is the mobile functionality. Ill fix up some stuff in the coming days, we'll also try to get some of the old addons back or the data imported back into the site like the garage. To create a thread or to reply with a post is basically the same as it was in the prior software. The default style of the site is light colored, but i temporarily added a darker colored style, to change you can find a link at the bottom of the site.

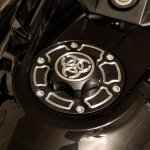
Lamonster keyless fuel cap

Reacher68

New member
I thought these looked pretty cool and my fuel cap is tough to get closed. I tried to do the install tonight and didn't get very far. The "beauty" screws didn't fit into the cap. It's almost like the cap was machined for smaller screws. I tried being careful to make sure no cross-threading was happening. I can only get the screws in about half way before they just lock up. Maybe it's the wrong threading in the cap? Anyone have experience with this?
 
Call them

Call Lamonster. You may have to leave a message, but someone will get back to you quite quickly. They stand by their products and I'm confident will help you. FYI we got the cap for Jacque's F3S. Lamont installed it and the installation was rather straight forward and she loves it. Good luck.

Rob

Anyone have experience with this?
 
I thought these looked pretty cool and my fuel cap is tough to get closed. I tried to do the install tonight and didn't get very far. The "beauty" screws didn't fit into the cap. It's almost like the cap was machined for smaller screws. I tried being careful to make sure no cross-threading was happening. I can only get the screws in about half way before they just lock up. Maybe it's the wrong threading in the cap? Anyone have experience with this?

Reacher, I have installed one of these on my 16 F3-T with no issues (apart from unscrewing that bloody bolt):shocked:. I have a vague recollection (memory isn’t what it was), that there are two different lengths of screws.....only 3 screws fasten the cap to the body, and the other three are effectively decoration. Make sure you are using the right length screws in the right holes.

Pete
 
I got it figured out. I tried a little soap on the threads and then used Vaseline. I worked the screws in and out of the cap until I dug the threads deep enough to get the screws flush. I still couldn't seat them all the way, but you wouldn't know it by looking at it. I am wondering if they used the wrong tap on my fuel cap. The threads just didn't fit right. Getting the beauty screws in was, by far, the hardest part. I was able to get to the nut and fish the wire through without too much problem at all. The mounting screws fit perfectly and I am very happy with the result!

Lamonster cap.jpg
 
Last edited:
I got it figured out. I tried a little soap on the threads and then used Vaseline. I worked the screws in and out of the cap until I dug the threads deep enough to get the screws flush. I still couldn't seat them all the way, but you wouldn't know it by looking at it. I am wondering if they used the wrong tap on my fuel cap. The threads just didn't fit right. Getting the beauty screws in was, by far, the hardest part. I was able to get to the nut and fish the wire through without too much problem at all. The mounting screws fit perfectly and I am very happy with the result!

How odd. I had no issues like that. It might be worth letting Lamont know, just in case there is a manufacturing glitch. Great to hear you got it sorted.:thumbup:

Pete
 
Ahh well....

What the heck is the beauty screw and what bloody bolt????

They are screws that do not have a function other than looking good...many of these style fuel covers , cars and trucks as well, have only a few screws that hold the cover onto the vehicle the rest just look good...:thumbup:
 
I got it figured out. I tried a little soap on the threads and then used Vaseline. I worked the screws in and out of the cap until I dug the threads deep enough to get the screws flush. I still couldn't seat them all the way, but you wouldn't know it by looking at it. I am wondering if they used the wrong tap on my fuel cap. The threads just didn't fit right. Getting the beauty screws in was, by far, the hardest part. I was able to get to the nut and fish the wire through without too much problem at all. The mounting screws fit perfectly and I am very happy with the result!

View attachment 164528

I got your message and called you but it went to voicemail. We chase all the threads before they leave here but I guess it's possible that one didn't get chased. There is no chance it's the wrong size tapped holes. The anodizing can cause a buildup and that's why we chase the threads. It's a M5 by 0.8 tap. Sorry about that.
 
Just watched the video posted at Lamonster Garage. I can truly say that bloody bolt and bloody wire fishing is just bloody hard.:roflblack::roflblack::roflblack:
 
I've found that it has a lot to do with the way you hold your tongue. ;)

Yeah......I’m surprised you didn’t hear me cursing you all the way from Australia, Lamont.:D:D
........and then.....I held my tongue the right way......presto :yes: .......and worth every effort, I must say:thumbup:

Pete
 
I got your message and called you but it went to voicemail. We chase all the threads before they leave here but I guess it's possible that one didn't get chased. There is no chance it's the wrong size tapped holes. The anodizing can cause a buildup and that's why we chase the threads. It's a M5 by 0.8 tap. Sorry about that.

Thanks for the call this morning. I'm glad we talked. I think what you said is correct and that you just didn't chase the threads on mine. I think it's ironic that the easy part took me a couple of hours and the hard part took about 10 minutes. Getting the tool on the square nut and fishing the wire through was much faster and easier than I expected.

Again, thanks for the quick response. I'm going to install the "Bright Ryder" tonight if I can figure out how to get the pins out of the trunk without damaging anything. ;)

If you use a small, flat screwdriver, you can lever the pins right out without touching any bodywork, Reacher. You can then get your fingernail under the base and just lift it right out. Lamont doesn’t bother putting the pins back in, and neither do I. The frunk insert stays perfectly in place without them.

Pete
I used a channel lock to grip the pin and then the sleeve came right out. I messed up a little though because I used 91% isopropol to clean the strip where the light is installed and it actually ate into my clear coat a little. I had to follow behind with just water on a rag. After that, the install went just fine. I don't seem to have as much play in the stock wires as Lamont does in his video, but i'm getting it done. The Bright Ryder is installed!

And I didn't put the pins back in either. It seems plenty secure without them.
 
Back
Top