• There were many reasons for the change of the site software, the biggest was security. The age of the old software also meant no server updates for certain programs. There are many benefits to the new software, one of the biggest is the mobile functionality. Ill fix up some stuff in the coming days, we'll also try to get some of the old addons back or the data imported back into the site like the garage. To create a thread or to reply with a post is basically the same as it was in the prior software. The default style of the site is light colored, but i temporarily added a darker colored style, to change you can find a link at the bottom of the site.

Just need confirmation before I use my tools ! Air compressor bypass.

NorwegianRT

Active member
Just did 2796 miles from Norway to Austria and back on my 2012 RT.
Second day home my compressor gave up, so kind of luck on the timing.
To bypass the compressor, do I just need to disconnect the power on the compressor itself and the hub where all the tubes are connected ?

I have marked what I mean with arrows on this picture.
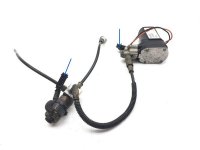
Air pump.jpg
 
Okay, I just looked at mine which is undergoing some repairs. If I wanted to disconnect the compressor and minimize cost I would do the following: Disconnect the hose from hub to the air bag at the hub end. Disconnect the hose from the Schrader valve to the hub at the hub end. Remove the non-return valve from the compressor and use it to connect the two hose ends. Into the air bag but not out. Or you can use an 1/8 inch NPT female coupling to connect the hoses. But these may not be easy to find in Norway. Put Teflon tape or pipe dope on each fitting. I don't know if this will upset Nanny.
 
Thank you for input Chip !

I will try find a shop that might sell me what couplings I need.

Not sure about the nanny myself.
I'm sure someone will tell us.
 
When you disconnect the wiring you will get an orange flag that drops down on the left side of the dash saying suspension fault. It will go and come. You will get an exclamation mark showing on the lower left side that will stay until you shut the bike off. It will come back as you ride again. I have not seen that it upsets the nanny.
 
I would just unhook the dump valve, go to an auto supply shop or a shop that may have big truck supplies and get about a foot of 1/4" air line for air brakes and a coupling for the air line. Then you unhook the line from the air bag where it goes into the dump valve; put your coupling on that end of the line; then unhook the Shrader valve from the system; and put the new line that is in that coupling to the end of your Shrader. Be careful when you pump it up, the bag's only good for 90 psi max, and it don't take long to get there; I use 60-70 psi in mine for two up riding! If you have some soapy water, I would check my connections for leaks; if it's tight, you shouldn't need to check it much. Good Luck! PS; by just unhooking the dump valve you shouldn't get lights or codes, I don't.
 
Last edited by a moderator:
I would just unhook the dump valve, go to an auto supply shop or a shop that may have big truck supplies and get about a foot of 1/4" air line for air brakes and a coupling for the air line. Then you unhook the line from the air bag where it goes into the dump valve; put your coupling on that end of the line; then unhook the Shrader valve from the system; and put the new line that is in that coupling to the end of your Shrader. Be careful when you pump it up, the bag's only good for 90 psi max, and it don't take long to get there; I use 60-70 psi in mine for two up riding! If you have some soapy water, I would check my connections for leaks; if it's tight, you shouldn't need to check it much. Good Luck! PS; by just unhooking the dump valve you shouldn't get lights or codes, I don't.

Thank you Mikey for a very good explanation:thumbup:
Have to go to town today anyway, so I will try find a supplier for the needed parts.
I think I have all the info I need for now and will get back to you all when I have hopefully resolved the issue !

Many thanks to all who replied :2thumbs:
 
Update !

After watching a youtube video on how to replace the compressor, I saw that a different type was put in than the original.
From what I could see, it was a "Viair 097 compressor".
JB Tools had this at a nice price, so now it is ordered. All I have to do is replace the wire connectors with new ones as it comes with different solution.

Said to be here in 5-8 days, so "I'll be back" ;)

You might also hafta 'clock' the outlet on the compressor so that it sticks out towards the back of the Spyder rather than needing a hole cut in the RHS tupperware for it to stick out of; but IIRC, it's no biggie - just undo the (4?) screws holding the compressor head on, turn the head thru 90° (in the right direction :p ) and then put the screws back in. :thumbup:

Oh, and the bits of rubber that hold the OEM compressor in are shaped to hold that specific odd flattened oval OEM shape, so they don't exactly fit the round Viair compressor quite so neatly - but they DO grip it firmly enough to hold it in place despite not being an exact fit, as many can now attest! :ohyea:
 
FYI- The Viair 97 was known to blow fuse due to higher (13) amperage. The Viair 95C (silver) or 94 (Stealth Black) draws same (10) amps as the OEM. You just need to drill and tap new holes to change direction of check valve.
 
Update!

I canceled the Viair I ordered from JBTools today, could not get an approximate delivery date, so looked elsewhere.
A Google search led me to a used original with hoses - valves and connections included. :thumbup:
The price was good as well, and it will be here much quicker than the Viair (that I suspect they order from China/Aliexpress maybe)
Also found an airscoop kit for my 2012 RTS and that will be here around the same time as the compressor!:2thumbs:
 
Last edited by a moderator:
You might also hafta 'clock' the outlet on the compressor so that it sticks out towards the back of the Spyder rather than needing a hole cut in the RHS tupperware for it to stick out of; but IIRC, it's no biggie - just undo the (4?) screws holding the compressor head on, turn the head thru 90° (in the right direction :p ) and then put the screws back in. :thumbup:

Oh, and the bits of rubber that hold the OEM compressor in are shaped to hold that specific odd flattened oval OEM shape, so they don't exactly fit the round Viair compressor quite so neatly - but they DO grip it firmly enough to hold it in place despite not being an exact fit, as many can now attest! :ohyea:

Hi and thanks Peter !
oi oi oi ;)
Posted an update here today.
 
Last edited by a moderator:
FYI- The Viair 97 was known to blow fuse due to higher (13) amperage. The Viair 95C (silver) or 94 (Stealth Black) draws same (10) amps as the OEM. You just need to drill and tap new holes to change direction of check valve.

Hi Taxmyzer !

Thanks for the info and advice.
Posted an update today.
 
Update !

Just got notice from JB Tools, my order is shipped !
Just a few hrs after I wrote to cancel the order :dontknow:
So now I will have a new Viair and also a used original compressor !:gaah:
I reckon I will mount the original one first as it is quicker and I get the RT on the road the soonest.
And I will have a new compressor ready if/when the used one gives in.
 
Another update friends!

The Viair compressor from JB Tools was dropped at my door today and I jumped in my work clothes and headed for the garage.
Some tinkering to get it lined up without laying against the hoses coming from the brake fluid reservoir, but I found a nice position for it.
I cut the wires from the old compressor to get use of the connection plug and soldered it to the new compressor wires and I remembered to put shrinking tube on before I soldered. ;)

All the tupperware put back on and I fired it up - put it in gear and handbrake off............... Compressor is alive and pumping :2thumbs:

But now I have a "brake failure" message on the display.
Changed the brake fluid while waiting for the compressor and not sure what goes on now :dontknow:
I have read that they are sensitive to the amount of fluid in the reservoir.
I think I will call my local dealer and have them do a complete service on the brakes. They have the proper tools for the abs pump as well.

The RT runs great tho and it was good to have the wheels back on the ground again.

Have a wonderful weekend all and safe rides!
 
Last edited by a moderator:
Ya, you have to have that fluid right up in the bottom of the filler neck some times, only a cap full will put that light put! But if your not comfortable working with the brakes your doing the right thing. I will say that speed bleeders, are a wonderful thing to have, makes bleeding a lot easier.
 
Ya, you have to have that fluid right up in the bottom of the filler neck some times, only a cap full will put that light put! But if your not comfortable working with the brakes your doing the right thing. I will say that speed bleeders, are a wonderful thing to have, makes bleeding a lot easier.

Hi Mike and ty for feedback !
I googeled "speed bleeders" and I think I will have to make a new order from the US as I can not find them over here !
 
Hi again friends!

Final update!
I pulled the C1282 (low pressure) code from my RT.
Brakes felt fine and working perfectly, but still this brake failure on the display.
Found a post concerning this code and found a way to reset it. :ohyea:

Ignition on
Hit mode button and put good weight on the brake pedal and hold it.
Turn off the ignition and continue to hold the pressure on the pedal until computer shuts down.

Stepped off the pedal and did a normal startup.
And yayyyyyyy, the display is free of the fault message, and all is great!

Now I hope to ride faultlessly for the rest of the season! :2thumbs:
 
Last edited by a moderator:
Or get aftermarket shocks and there no need for the air compressor. I got the M2 shocks and they hold up the rear end fine. Compressor has not turned on yet since they been installed.
 
Or get aftermarket shocks and there no need for the air compressor. I got the M2 shocks and they hold up the rear end fine. Compressor has not turned on yet since they been installed.

That is also an option of course, but I like the abilty to change softnes/hardnes by just a push on a button.
I reckon it depends on how long this new alternate airpump lasts.
Time will tell.
 
Back
Top