kevorama
MOgang Member & Pyro-Man
I purchased this from Reggy @ TricLED last year when I was going bonkers on external lighting and other electrical wants. To make a long story short, I took out the custom RGB under lighting that I made since I'm replacing it with Reggy's Halo system. I have several items that I want to install and the only way to do it was to finally bite the bullet and install the Fuze Block. I've been avoiding this since I knew that I had to make room for it. The Steibel Air Horn sleeps in the same room as the FZ-1 and the soon to be Rx for my Halo lighting. I think we're going to have bunk beds in here to make it work.
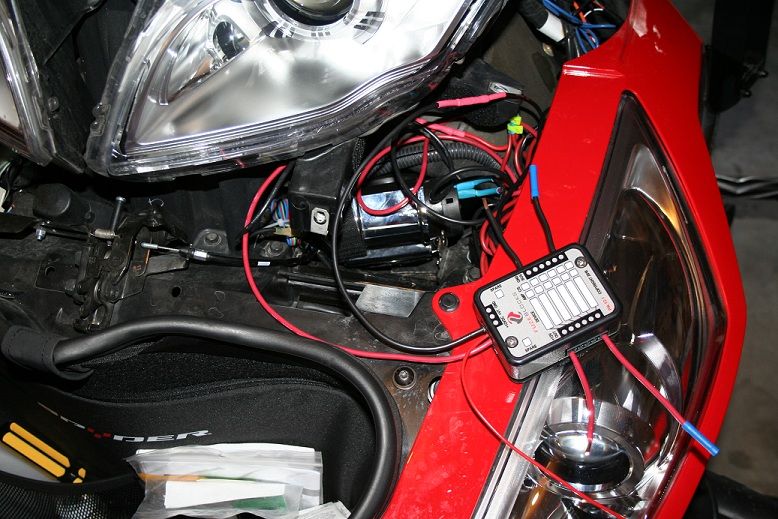
Anyway, after removing my previous Rx from another Co. I was able to move my Steibel down a little bit further. That gave me room to install the FZ-1... just barely. It cleared all panels when all the Tupperware was back on. I'm not the best wiring guru in town, so I wired up the FZ-1 while it was outside of it's cradle. I had the + and - lines already run to that area. My main concern was finding an easy +12 switched on wire to tap into. I used the non black wire on the fender tip light under the A- arm. In my case it was an orangish/red color. It has to be a + connection when the key is on.
In the pic below, you'll see two red leads and two black leads sticking out from the Fuze Block. The red and black leads that are bare on the ends are the switched on +12v and the red and black leads with the blue caps on them are the always on 12v leads. I capped them in the event that the block fell into the cavity and shorted out on the frame. I used an old strip of LED's to test my wiring.
Lucky me, I got it right the first time around. It is now housed firmly in place by Velcro and it's awaiting the goodies that are going to be attached to it.