• There were many reasons for the change of the site software, the biggest was security. The age of the old software also meant no server updates for certain programs. There are many benefits to the new software, one of the biggest is the mobile functionality. Ill fix up some stuff in the coming days, we'll also try to get some of the old addons back or the data imported back into the site like the garage. To create a thread or to reply with a post is basically the same as it was in the prior software. The default style of the site is light colored, but i temporarily added a darker colored style, to change you can find a link at the bottom of the site.

How To Properly and Stylishly Mount Mutazu Bags To An F3S - with pics

Aligning The Hangers

Only two brackets need to be cut or shortened for each side, and two extra holes also need to be drilled for each side. I will give details as we go, including how to finish the holes and the cuts and prepare them for painting.

The next part, the slight twisting of the hangers, is best done in a vise. If you don't have one you can do it like I did, on the bike.

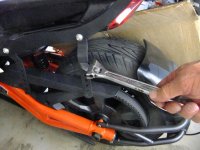
Tighten up both hangers. They now need to be twisted slightly to help align them with the frame that the bags mount to.

Use an adjustable wrench (shifting spanner or "shifter" in Oz) to grip the hanger above the first hole in each case, The handle needs to be pointing towards the rear of the bike.
DSCF2207.jpg

The hanger will be oriented in line with the angle of the grab rail, so to straighten it, to make it more in line with the wheel or direction of travel, you pull the handle towards you. Not too much, mind you.

Hold the bottom of the hanger with one hand while you do this, so that you don't also bend it outwards. You don't need to twist it so that it is perfectly parallel with the bike, just a little, enough to start it, and to make it easier to connect and tighten the bag frame.
 
Adding Stabilisers To The Hangers

Each hanger has an additional piece bolted to it, to allow the saddlebag frame to sit at the right height, and to stabilize the bags so that they don't bend inwards and bounce up and down.

By now you should have modified the front hanger before installing it, by cutting it off 3/16" below the lowest mounting hole.

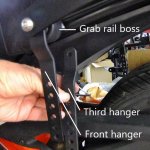
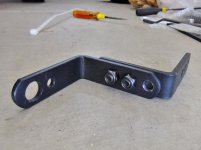
Now take the third hanger and hold it on the inside of the front one, making sure that the offset section is disposed inwards towards the tyre. The photo shows the correct orientation.

Front hangers.jpg

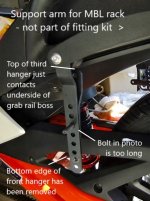
The top of the offset will sit just under the boss on the grab rail, when you fit it correctly. Take a 25mm bolt, place a washer on it, and insert it from the inside (the tyre side) into the top hole of the third hanger, then into the third hole on the original, front hanger.

Front and third hanger bolt.jpg

Once again, check the photo. Attach a nut but only tighten it with your fingers about 1 1/2 turns.

When mounting the third hanger you might find that once you insert the bolt the hanger will not sit under the boss.

Loosen the bolt on the front hanger, which also mounts the grab rail, and then insert the mounting bolt for connecting the third hanger
to the front hanger.

Gradually tighten both bolts and make sure that the front hanger is not being bent outwards at the bottom. If it is, you might need to slightly relieve the top edge of the third hanger, where it contacts the underside of the grab rail boss, with a half-round file. Don't rush into doing this, however.

Note that all hangers point straight down. The photos sometimes suggest that they might be slanted because of perspective distortion.

When you insert the bolt which connects the two hangers leave the nut on loosely - the saddlebag frame also connects to this bolt, but we only attach that later
 
Last edited:
Closeup Detail Of Front and Third Hanger Mounting

Let's review the mounting of the front and third hangers.

Note that the third hanger is not just to stop the bags from wobbling inwards under the weight of their load or road surface irregularities.


The third hanger actually extends the length of the front hanger to allow the bags to be mounted at the correct height, so that they allow good clearance to other fixtures.

front hanger detail.jpg

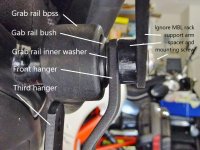
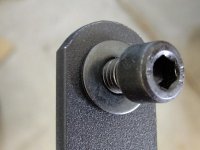
There is an alternative way to deal with the bush Can Am provide in their original grab rail mounting. If you reverse it you won't need to use a washer between it and the hanger - the inside edge is flat, not recessed like the outside edge.

If you don't have an MBL rack, then here is the way the mounting screw and washer attach the hanger to the grab rail components.

DSCF2447.jpg

Behind the hanger is the black washer retrieved from inside the grab rail mounting, then the bush, then the grab rail.

I don't have photos but the alternative mounting under the hanger is to not use a washer and turn the oem Can Am grab rail bush back to front so that the recess is inside and the flat edge is to the outside.
 
attachment.php

:2thumbs: Real nice set-up.
 
Extending The Rear Hanger

We have to extend the rear hanger as well, in order to mount the saddlebag frame at the correct height. We do that by attaching one of the two extended right angle support arms supplied in the fitting kit.

Just as the extension on the front hanger per
forms a double duty the extension on the rear forms the basis for the virtual triangulated support system which stops the bags from wobbling up and down and in and out.

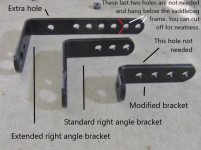
We have to drill one extra hole in the longer side of this bracket, two holes closer to the bend. You will see the position of the extra hole in the photo. Counting from the bottom of the bracket it would be the eighth hole - the seventh hole is not drilled.


For neatness, you might also want to remove the last two holes on the long end of this bracket. I didn't, and you can see this excess length hanging down below the saddlebag frame, either when looking from the rear, or when you have the bags removed. You c
an see this in some of the pictures.

right angle brackets.jpg
 
Drilling The Extra Holes

Here is how I bolted two brackets together to make sure I got the position of the extra hole just right. The brackets shown are ones we use later, but the idea is the same.

DSCF2215.jpg


All of the hanger and right angle brackets have the same hole spacing, so it doesn't matter which bracket you bolt up to the one you want to drill. It's easier, and only one bolt operation is needed, if you bolt the two identical brackets back to back, with the right spacing.

Look at the picture in the previous comment to make sure.

Use a small drill, such as 3mm or 1/8" to make a pilot hole, then use the 8mm or 5/16" drill to complete. Drill slowly when using the large bit. It's easier using a bench or pedestal drill, but I made do with a hand drill.

Once you finish drilling these holes use a larger drill bit to de-burr the holes. Do this by hand and do it neatly so that there is no metal sticking up to prevent a good, surface to surface contact when bolting up tightly. Proper preparation ensures you have a tightly bolted together frame which won't flex or wobble.

NB When drilling the smaller right angle brackets (equal length sides) later on there are two things to note:

1) The small right angle bracket with the large hole is not drilled - only the small right angle brackets (x2) with 3 holes on each leg have one extra hole added.

2) The original holes are not drilled equidistant from the bend - one side's holes are closer to the bend than the other.

3) The extra hole is always added on the side with the holes slightly closer to the bend.
 
Last edited:
Preparing The Mounting Frame

Before we mount the extended right angle bracket with its extra hole to the rear hanger we need to prepare the mounting frame.

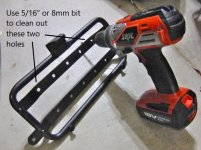
Two of the bolt holes that we want to use on the mounting frame are right where they bent that part of the bracket to make t
he frame. During the bending the holes become slightly distorted.

Run a 5/16" or 8mm drill bit through them and rotate the drill in a conical shape as you do so to clean to the edges.

clean frame.jpg
 
Last edited:
Protect That Expensive Muffler!

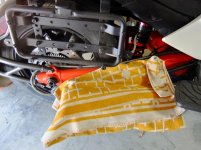
Just a reminder to cover that lovely Akrapovic or whatever with a thickly folded towel or similar, to protect against the things you drop from time to time.
1f609.png


DSCF2450.jpg


If you can't install the bags from reading these instructions, I suggest you purchase a back pack and forget luggage.
Everything you need to know is here.
 
Fitting The Extended Right Angle Bracket To The Rear Hanger

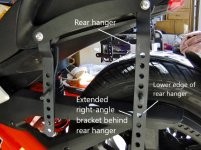
Attach the extended right angle bracket to the back of the rear hanger, with the shorter arm pointing towards the tyre.

Use a 25mm round head bolt with a washer under its head, pushed through from the back.


The bolt passes through the top hole in the long edge of the bracket (the extra one drilled earlier) and continues into the second hole from the bottom on the rear hanger.

rear hanger extended.jpg

No need to attach a nut just yet, because the saddlebag frame goes on next.

If you are not sure how this all looks, because the photo does not show the back of the brackets, look at the photo in the next step before proceeding.

Each hanger has a bolt (actually too long in this photo for the application) which is suspending the bracket mounted behind it. The bolts are in their correct positions, if you count the holes down.
 
Rear View Of Rear Hanger Detail, Saddlebag Frame Mounting

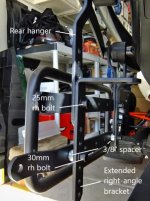
Here is the rear view of the rear hanger with the extended right angle bracket attached.

Fit the mounting frame to the upper front hanger bolt and add the nut to hold it in place, then do the same with the rear hanger and bolt.

Now add the lower bolts and washers for the mounting frame - use the 30mm bolts purchased separately. Add the 3/8" spacer between the hanger and the frame so that the frame sits vertically and not at some crazy angle.

Tighten all four nuts connecting the mounting frame to the hangers, after ensuring that the hangers are vertical. Tighten the round head bolts which secure the hangers to the grab rail mounting points.

The extended right angle bracket on the rear hanger sticks down lower than the third hanger behind the front hanger. You might want to cut this extra length off before mounting it fully.

rear hanger extended rrear view.jpg
 
If you can't install the bags from reading these instructions, I suggest you purchase a back pack and forget luggage.
Everything you need to know is here.

I'm all thumbs, but if I needed bags, I'd be asking for Trevor to post his install $$ rate and an address in Glendale!
 
Stabilising The Brackets - Under Tail Light

Stabilising The Brackets

We need to stop the bags flexing inwards - BRP have conveniently provided attachment points at the rear that we will use.


Because the mounting frame and hangers are so stiff and strong we only need to fully stabilise at the front or the back, and the back is much easier. The front is already stabilised and prevented from bending inwards by the top part of the third hanger

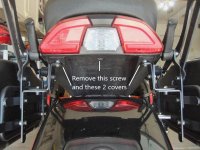
1) Under the tail light assembly:

remove two covers.jpg

Remove the three screws and two covers uindicated - #25 Torx. The middle screw will be re-used/replaced, but the two outer screws will not be re-used.

The two covers will be refitted later.
 
after you have finished your install of the bags following trevor's comprehensive instructions you will be a happy traveler.
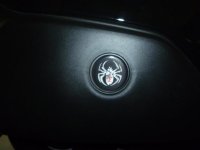
To cap off the install and make a bit of a Spyder statement you can replace the Matazu emblems with some more suitable to your ride.
Like these:P1020026.jpg
from Ebay as no sponsor here sells them
 
Stabilising The Brackets - Under The Seat

Stabilising The Brackets - Under The Seat

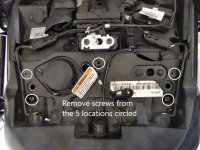
2) Remove the seat, and the 5 screws indicated. This will allow you to lift this panel and access the 2 x 6mm T nuts which are used to hold those two small covers underneath, in place.


Remove screws.jpg


The picture is taken looking forwa
rds from behind the tail light.
 
Last edited:
SPYDER EMBLEM

after you have finished your install of the bags following trevor's comprehensive instructions you will be a happy traveler.
To cap off the install and make a bit of a Spyder statement you can replace the Matazu emblems with some more suitable to your ride.
Like these:View attachment 159856
from Ebay as no sponsor here sells them
:clap:.......do you happen to have the item , number for that ......Thanks ...Mike :thumbup:
 
Back
Top