-
There were many reasons for the change of the site software, the biggest was security. The age of the old software also meant no server updates for certain programs. There are many benefits to the new software, one of the biggest is the mobile functionality. Ill fix up some stuff in the coming days, we'll also try to get some of the old addons back or the data imported back into the site like the garage. To create a thread or to reply with a post is basically the same as it was in the prior software. The default style of the site is light colored, but i temporarily added a darker colored style, to change you can find a link at the bottom of the site.
You are using an out of date browser. It may not display this or other websites correctly.
You should upgrade or use an alternative browser.
You should upgrade or use an alternative browser.
How do I disassemble the RT mirror housings?
- Thread starter DR Buck
- Start date


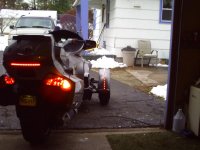
I installed mirror LEDs yesterday
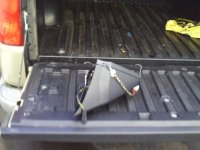
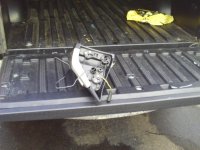
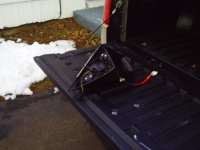
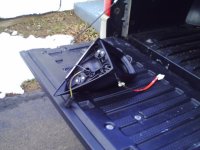
I took a few minutes to look at the surface of the housing that meets with the main body of my RTS. There are 3 clip areas. These clips look like half arrow heads. One for the coloured piece and two for the lower black. I used a screwdriver to release the clip for the coloured piece, then just pulled (folded away from) the main body.
The lower (black) part, I undid the two clips and pulled (folded or hinged) that part away.
Then I undid the three screws that held the front LED unit in place. No need to disassemble further.
Turn the unit around (look at the mirror side) and you will notice an existing hole in the plastic underneath the outer edge of the mirror. This is where I ran the wires for my new LEDs. On the Spyder the black wire is the ground and the non-black or striped is the hot.
Hope my description helps.
Bob Denman
New member
Even prying them apart; there's a lot of room in the process for breaking off the tabs... :shocked: Please proceed with great care and caution. Lots of patience will win the day! :thumbup:
You shouldn't have to drill any holes, there is a large hole on the inside mirror housing that you can run the wires through. Once you get the covers off then you can separate the mirror housing and the mirror will move back about an inch, then run your led strip on the mold line.
 ray:
ray: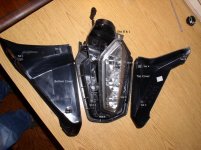
Bob Denman
New member
Thanks for the excellent picture! :2thumbs: :firstplace: :bowdown:
GeoffCee
New member
It is probably very satisfying being on the mirror assembly line at BRP.
Click, click, click and there, the mirror is quickly assembled.
For the owner, though, pulling them apart again is sort of counter-intuitive in the way you have to poke around blind with a screwdriver and prise the thing apart like a stubborn shellfish. Breaking off those unforgiving tabs is way too easy. You will never be ready for that to happen but chances are it will. I speak from experience, of course.
Opening them up can be achieved if you have a lot of time on your hands and you are overloaded with the patience of the Man in the Moon but in my view it would have made a much easier and quicker job to have had some neat little screws to undo instead of fiddling about with those pesky break-off tabs.
Just saying...
Phil
Mod Monster
Phil, Where did you find these instructions and pictures? I've looked through a large portion of the service manual and can't find them. I also looked through the operator manual without any luck.
I bought the chrome accents for the mirrors and those are from the sheet that came in the package. I know, I cheated
")
Phil, Tyler TX- from my iPad3.5 using Tapatalk HD
sinkhole
New member
screw it...
The best thing BRP could have done on the RT would have been to screw the mirrors on. Those crazy loose fitting pins, and vibrating mirrors drive me cwazy. :gaah:It is probably very satisfying being on the mirror assembly line at BRP.
Click, click, click and there, the mirror is quickly assembled.
For the owner, though, pulling them apart again is sort of counter-intuitive in the way you have to poke around blind with a screwdriver and prise the thing apart like a stubborn shellfish. Breaking off those unforgiving tabs is way too easy. You will never be ready for that to happen but chances are it will. I speak from experience, of course.
Opening them up can be achieved if you have a lot of time on your hands and you are overloaded with the patience of the Man in the Moon but in my view it would have made a much easier and quicker job to have had some neat little screws to undo instead of fiddling about with those pesky break-off tabs.
Just saying...
Bob Denman
New member
Well if anybody busts them up; I've got a spare set in Blue that somebody can have if they need them...
ulflyer
Active member
I got mine apart the other day to wire LED strips that I attached to the lower part of the mirror. Can't even begin to tell anyone how to do it. I was lucky and didn't break any tabs and its great seeing the LED's light up when the signals are one. Much nicer than squinting at little green dot in panel to see if I turned the sig off or switched it accidently to other side.
DR Buck
New member
Well the clips on the chrome covers break real easy. :banghead: Velcro used to put it back together.
Got the 2nd side done without incident. :bowdown:
JJW SpyderRider
New member
You don't need to disassemble the mirror - just drill a small hole for the LED wires and fish them down through the assembly. There are a couple of threads on here that explain it.
I did mine that way and it was pretty easy ...
This is what I did Saturday. I drilled the top corner then fished the wire to the bike side of the housing. I added the < and > indicators. Warning: The plastic cover is not held on very well. I used liquid black tape to seal the light and hold the cover on better.
ulflyer
Active member
It is probably very satisfying being on the mirror assembly line at BRP.
Click, click, click and there, the mirror is quickly assembled.
For the owner, though, pulling them apart again is sort of counter-intuitive in the way you have to poke around blind with a screwdriver and prise the thing apart like a stubborn shellfish. Breaking off those unforgiving tabs is way too easy. You will never be ready for that to happen but chances are it will. I speak from experience, of course.
Opening them up can be achieved if you have a lot of time on your hands and you are overloaded with the patience of the Man in the Moon but in my view it would have made a much easier and quicker job to have had some neat little screws to undo instead of fiddling about with those pesky break-off tabs.
Just saying...
+1. I did mine, but it was a real SOB. I wouldn't do it again knowing what I know now.
bmwlarry
New member
Sarge707
Active member
No Need to take mirror apart- Drill hole-Get wire to lower clip opening-Drill small holes through walls on the inside.
Attachments
Similar threads
- Replies
- 4
- Views
- 363
- Replies
- 3
- Views
- 427
- Replies
- 3
- Views
- 973
- Replies
- 8
- Views
- 1K