• There were many reasons for the change of the site software, the biggest was security. The age of the old software also meant no server updates for certain programs. There are many benefits to the new software, one of the biggest is the mobile functionality. Ill fix up some stuff in the coming days, we'll also try to get some of the old addons back or the data imported back into the site like the garage. To create a thread or to reply with a post is basically the same as it was in the prior software. The default style of the site is light colored, but i temporarily added a darker colored style, to change you can find a link at the bottom of the site.

Heated Gear - need advice/video/detailed instructions on where/how to wire?

carolanivey

New member
Sorry, I know this has been asked before, but I'm not electrically inclined and I need more detailed into. :)

2016 RTS, SE6. I'd like to run my heated jacket liner from the battery to some accessible point where I can pull it out from under the seat and plug in, tuck it back under the seat when not in use. I'd prefer not to have to drill any holes, if possible. Where under the tupperware are good/safe points to zip tie the wire so it's not flopping around under there? My controller is wireless so that won't be an issue - I'll just velcro it somewhere I can each it. A link to detailed instructions or a video would be appreciated. Thank you!

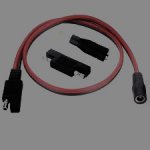
Very simple. Run a long battery tender type fused lead directly off the battery, under the tupperware, and up to and under the seat. Make it long enough to attach to your heated clothing lead. I can run two sets of head clothing off of my battery lead. Works great and stores away under the seat when you don't need it. I also have a splitter connector in mine to charge our Sena intercoms when their batteries run low. Very easy to install and very inexpensive. Your local Cycle Gear will have all the parts you need to make the installation. Good luck.
 
I recommend against the 2dogs solution "directly off the battery" because carolanivey is "I'm not electrically inclined". It's a satisfactory solution for someone with the inclination, tools and experience needed to access the battery terminals buried in the frunk of an RT-S. I believe a more appropriate solution would be to tap into the positive lead of the horn. Easy to access, already fused, plenty of reserve power, and the terminal is a simple push-on spade connector. The most complicated part is choosing a ground point. But to be sure we really need to know more about the components of the heating system (there are at least three).
 
I've always connected electric clothing directly to the battery. Now with an F3-T I'm wondering if the accessory connection under the seat can be used? Probably not enough power for an old Gerbing Jacket and gloves?

OOPS. Better change my signature - Got a 2019 F3-T this past July.
 
Last edited:
In line fused for sure -check gear manufacturers recommend size. Barrel or SAE connections, dash or under seat avoiding pinch points & wind fluttering. Some heated gear offers rechargeable battery & can avoid connections to bike completely:popcorn: no forgetting & getting snatched back or damaging cord :shocked: https://anseris.com/products/torch-coat-heater (*haven't tried, just interested)

A665A5E7-4262-4A83-A900-AA43D3CDE81E.jpeg
 
Last edited by a moderator:
As instructed by the heated clothing manufacturer, directly to the battery. On my 2015 RTL, I installed a fuse at the battery, zip ties the lines to the frame bar back to the seat, coiled the wird up, velcroed them into a tight bunch and velcroed them to the plastic in a void under the seat so they didnt bounce around.
Has worked for 7 years.

I have seen people plug into the battery tender connection for the heated gear, and then unplug and reconnect for the trnder over the winter.

I hesitate tapping into any part of the system direct, there are too many very costly parts that could be dammaged if done wrong. Be safe and run stright to the battery.

Precisely and exactly correct.

I've done the same, so I now have four (4) direct connections to the battery.
1) The Spyder
2) Driver heated gear: fused connection to a barrel connector.
3) SWMBO heated gear: fused connection to a barrel connector.
4) Battery Tender: fused connection to an SAE connector.

One additional point not mentioned:
All the connections are capped when not in use just to make double extra sure that something doesn't get into the connector and cause a short.

As always, my free advice comes with a double your money back guarantee.
 
Thanks to all three of you. I'll connect to the battery. What path did you use to route the wire from the frunk to the left side of the Spyder? (Left side for me to enter my Aerostitch.)
 
Thanks to all three of you. I'll connect to the battery. What path did you use to route the wire from the frunk to the left side of the Spyder? (Left side for me to enter my Aerostitch.)

Not sure about the exact routing for an F3. I can tell you the technique I used.
Open up the battery compartment in the front trunk.
I had to remove the battery in order to gain access to the clear space behind the battery.
You may need to remove some of the left side body panels.
I ran the wires under my RT Seat.
On the RT it's very easy because you need to lift the seat to access the fuel.
On the F3, you may want to use a different point to access the wire for your heated gear.
I used a plastic "fish" to guide the wires to the battery compartment from the seat.
One small point of caution:
When you reconnect the wires to the battery, make sure you use a star, or a split washer so the connections don't vibrate loose.
Spyders are very sensitive to loose battery connections.
If the battery terminals are loose, all kinds of fun ensues.
DAMHIKT.

Keep us posted so we know how you make out.
 
.....
When you reconnect the wires to the battery, make sure you use a star, or a split washer so the connections don't vibrate loose.
Spyders are very sensitive to loose battery connections.
.....


While my RT was under warranty I was about 110 miles from home and got into limp mode. Back then there was a notorious key-antenna problem and lots of suggestions. I tried all my known incantations and finally limped home at low speed and no cruise control.

Turned out to be a loose battery connection.

Thanks.
 
Last edited by a moderator:
Match the solution to the specific situation not an abstract scenario

If you have the tools, skills and experience then a fused connection to the battery is best.

But if, like the OP, you don't then my solution is good enough.

Match the solution to the specific situation not an abstract scenario.

Still waiting for more information from OP.
 
Back
Top