• There were many reasons for the change of the site software, the biggest was security. The age of the old software also meant no server updates for certain programs. There are many benefits to the new software, one of the biggest is the mobile functionality. Ill fix up some stuff in the coming days, we'll also try to get some of the old addons back or the data imported back into the site like the garage. To create a thread or to reply with a post is basically the same as it was in the prior software. The default style of the site is light colored, but i temporarily added a darker colored style, to change you can find a link at the bottom of the site.

H M FLOORBOARDS

coz

Active member
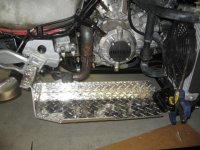
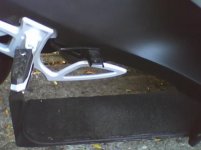
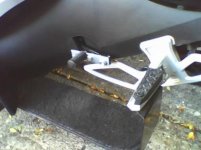
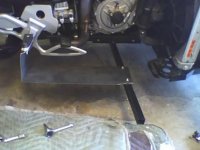
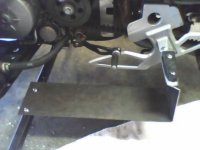
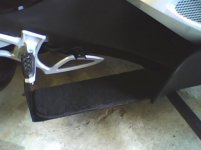
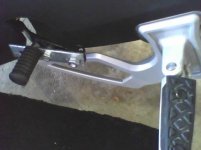
here i go again, with homemade floorboards. it's looking like about 40 bucks, maybe 50 when it's all done. bolted 3/4 inch angle to frame using factory splashguard bolt holes. bolted1'' square tube to angle. got sheet steel for free[thanks queen city steel products] out of scrap bin.[they said i could have it]square tube supports front of board, stock footpegs support rear of boards.just need to figure out brake pedal extention and shifter, but i can still ride it as is.i would like it to be much stronger, but with the spyder frame such as it is, one tube down the middle, makes it pretty tough. thanks to all the brains that i picked on this site, for there information. these are still ''raw'', they should look pretty good after paint and some kind of non-skid treatment. outer few inches of tube will serve as highway peg,theoretically. will post finished pics. these boards would be ideal for a se5 with a hand brake, as modding the shifter and brake pedal , to keep feet down on floorboards, is proving to be very difficult.
 

Attachments

  • _Preview_(23).jpg
    _Preview_(23).jpg
    19.2 KB · Views: 679
  • _Preview_(24).jpg
    _Preview_(24).jpg
    17.9 KB · Views: 585
  • _Preview_(26).jpg
    _Preview_(26).jpg
    17.5 KB · Views: 528
  • _Preview_(27).jpg
    _Preview_(27).jpg
    17.7 KB · Views: 362
Last edited:
Ideas that may help

Do you have access to a metal brake to bend some angles on the long side of your floorboards? This really adds a lot of extra strength. I had some floorboards made out of aluminum diamond plate that bolt directly to the front frame supports and the rear pegs. I had the bends turned upward along the longest sides of the floorboard. The outer edge is about 1/2 inch and helps keep my foot from sliding off in corners, etc. The inner edge is about 1 3/4 inches so I can run a bolt into the foot peg supports for extra stability. The picture may show that more clearly.
 

Attachments

  • IMG_1319.jpg
    IMG_1319.jpg
    52.8 KB · Views: 561
nice floorboards

i like your design.i don't have access to a break, so i'm going to have another layer[scrap] welded to the bottom to stiffen things up. i wish i would have ran them farther forward to bolt to radiator and oil tank supports, and tubing, but they are pretty strong as is. i stood on them [250+]and nothing broke so i guess im on the right track. i made relief cuts in the metal with a grinder to make nice bends. are you going to mod your brake and shifter?Appreciate any other tips, thanks,,,,,,,,,,coz
 
Last edited:
No mod needed to brake, not sure about the shifter

I have the SE5 so did not have to worry about the clutch side. Wish I could give a better answer, but no manual shift Spyders around locally for me to compare. The brake side works just like it did before I added the floor boards. I am thinking about remaking my floorboards slightly so may be interested in selling these. I can stand on these with no flex or bending at all (210 lbs.).

The only change I plan is to have extend the floorboard back and come over the back of the peg instead of the front. This would give me a little more room to move my feet around. My 10 1/2 shoe fits just fine, but there are time I would like to move my feet around a little more. I have about two spare inches of fore and aft movement with my feet flat on the floorboards. You may have noticed that my floorboards also wrap over the top of the peg instead of being supported underneath by the bolts only. Figured that the pegs were engineered to handle a full body weight so may as well incorporate that strength into the design.

Diamond plate aluminum 3/16 inch plate is a lot more expensive than your excellent deal on the free steel, but will never rust plus already has the frame mount holes drilled. Let me know if you are interested and we may work out a deal. I would need to have $225 to cover my cost plus shipping. This would include the polished stainless steel bolts I used to mount.
 
h m floorboards

still haven't messed with shifter or brake yet. been trying to ride instead of work on it. after a couple of months of use, these boards are o k in that i can rest toes on the floorboard and heels on the pegs as normal riding pos. on the open road i can put feet down flat. pretty comfortable. it definately was worth doing. actually i have messed with the shifter a little. see pic , i bolted a steel plate to the shifter[ after removing the stock shifter peg] that i drilled to accept a h d threaded shifter peg. i was able to locate shifter peg about 2 inches forward, while still attached to stock shifter arm, which allows for heel on peg, toes on floorboard. i will revisit the whole brake pedal, shifter extensions situation soon, as riding season is winding down.:thumbup:
 

Attachments

  • _Preview_(47).jpg
    _Preview_(47).jpg
    17.9 KB · Views: 238
  • _Preview_(48).jpg
    _Preview_(48).jpg
    19.1 KB · Views: 233
Last edited:
Look Great--How about details on how you built them

I like the looks of your floorboards. Looks like a Cobra floorboard mounted on your own support. How did you attach to the peg mounts and frame? Will they support your full weight without flexing. More details and photos would be appreciated.
 
Home Made Floorboards

Nicely done. I recently completed my own home build floor boards. Mine are 1/8" diamond plate aluminum. Local shop that sells and fabricates cut and bent them for me. They are very strong. You can see my project in this forum under the heading "Doing It Myself". I completed my boards last weekend.
 
Last edited:
Photo 003.jpgPhoto 004.jpgPhoto 001.jpgPhoto 002.jpg
I like the looks of your floorboards. Looks like a Cobra floorboard mounted on your own support. How did you attach to the peg mounts and frame? Will they support your full weight without flexing. More details and photos would be appreciated.

You are right: they are Cobra floorboards that are welded to an HSS 1" by 1" bracket that
I made and bolted to the peg mount and the front footrest, as you can see. On the 3rd picture what your see is the shape of the right bracket. I weigh 200 pounds, the system has been tested!! :2thumbs:
 
New florboards for rt

Not happy with the looks of the floorboards out ther. Being a welder for over 45years ive desinged new booards for my rt looks great simple to install yes pics comming. Also working on boards for handycap riders, one of my riding buds and his wife met this profile she is blind and he is a small person, thy ride a rs. Foot placement is a big deal for some people even with a hand break and a paddle shifter, comes ballance and weight shifting. I will offer these boards forsale at som point. Wish you all a happy new year and safe riding, jgride hear.
 
Last edited:
Very nice

View attachment 38248View attachment 38249View attachment 38250View attachment 38251

You are right: they are Cobra floorboards that are welded to an HSS 1" by 1" bracket that
I made and bolted to the peg mount and the front footrest, as you can see. On the 3rd picture what your see is the shape of the right bracket. I weigh 200 pounds, the system has been tested!! :2thumbs:

Hi I really like your floorboards. I know its an old post but where did you get the floorboards. I can fabricate the brackets but not sure what to do for the boards. Also where did you bolt the back part to.
Thanks
 
Hi I really like your floorboards. I know its an old post but where did you get the floorboards. I can fabricate the brackets but not sure what to do for the boards. Also where did you bolt the back part to.
Thanks

Ist easy take off de pin a the rear pegs et put a small stanless steel bolt ..look the picture no 4 ....
 
Back
Top