• There were many reasons for the change of the site software, the biggest was security. The age of the old software also meant no server updates for certain programs. There are many benefits to the new software, one of the biggest is the mobile functionality. Ill fix up some stuff in the coming days, we'll also try to get some of the old addons back or the data imported back into the site like the garage. To create a thread or to reply with a post is basically the same as it was in the prior software. The default style of the site is light colored, but i temporarily added a darker colored style, to change you can find a link at the bottom of the site.

GREASING REVISITED

namknight

New member
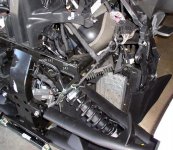
Tried to grease the arms on the RT. i have the right angle attachment and the longer hose. could only get on one fitting.
I tried jacking up the front hoping the arms would drop down. They did a little. The one in the top arm in front is touching a wiring harness or a hose of some kind that won't move. So it looks like I will have to put a 90 deg. fitting.
So the next question is has anyone taken the nose off and how much of a job is it? Or is there a trick that I am missing that makes it easier?
 
Last edited:
Tried to grease the arms on the RT. i have the right angle attachment and the longer hose. could only get on one fitting.
I tried jacking up the front hoping the arms would drop down. They did a little. The one in the top arm in front is touching a wiring harness or a hose of some kind that won't move. So it looks like I will have to put a 90 deg. fitting.
So the next question is has anyone taken the nose off and how much of a job is it? Or is there a trick that I am missing that makes it easier?
You'll need to remove some of the front tupperware that abuts the frunk assembly. After that, it's 4 bolt on top, two under the belly pan, and several electrical connections. It pays to have a helping hand to unlatch, and remove the assembly.
While you have the frunk off, be sure to inspect the lateral engine mount sway bar and attaching nut for proper clearance.
 
Last edited:
You'll need to remove some of the front tupperware that abuts the frunk assembly. After that, it's 4 bolt on top, two under the belly pan, and several electrical connections. It pays to have a helping hand to unlatch, and remove the assembly.
While you have the frunk off, be sure to inspect the lateral engine mount sway bar and attaching nut for proper clearance.
Do you by any chance have any pictures or diagrams for the removal of the frunk?(I would also like to replace those grease zirks with 90 degree over the winter months.)
 
Damn, we had one of those adapters where I worked for some pumps that had hard to get to zerks. Dosesn't do me any good now right? thanks for the info.
 
Do you by any chance have any pictures or diagrams for the removal of the frunk?(I would also like to replace those grease zirks with 90 degree over the winter months.)
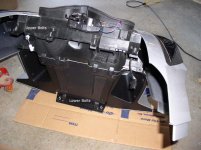
The maintenance manual covers the removal of the front cargo module in detail. You basically have to remove any abuting panels, disconect the hood release latch cable and several electrical cables, and remove the four upper, and two lower retaining bolts. You can safely remove all bolts as the module is held in place by two latch/hooks on the upper mount rail. With the hood removed, and adequate blocking under the module, one person can lift the unit about a half inch and disengage it from the hooks. Several of the electrical are easy to find near the top, but two lower ones are easier to get to after the module is unhooked and slid forward a bit. It's not a dificult job... just a little time consuming.Upper mounts.jpg
 

Attachments

  • Mounting Points.jpg
    Mounting Points.jpg
    65.2 KB · Views: 78
The maintenance manual covers the removal of the front cargo module in detail. You basically have to remove any abuting panels, disconect the hood release latch cable and several electrical cables, and remove the four upper, and two lower retaining bolts. You can safely remove all bolts as the module is held in place by two latch/hooks on the upper mount rail. With the hood removed, and adequate blocking under the module, one person can lift the unit about a half inch and disengage it from the hooks. Several of the electrical are easy to find near the top, but two lower ones are easier to get to after the module is unhooked and slid forward a bit. It's not a dificult job... just a little time consuming.View attachment 37027

Thank you for the help
 
Back
Top