• There were many reasons for the change of the site software, the biggest was security. The age of the old software also meant no server updates for certain programs. There are many benefits to the new software, one of the biggest is the mobile functionality. Ill fix up some stuff in the coming days, we'll also try to get some of the old addons back or the data imported back into the site like the garage. To create a thread or to reply with a post is basically the same as it was in the prior software. The default style of the site is light colored, but i temporarily added a darker colored style, to change you can find a link at the bottom of the site.

Fuel Door DIY

finished sort of DYI Fuel Door Modification RTS2016

21728081_10212073165162044_3562070770656671612_n.jpg

two screws need to be shorter two on left side top...fix tomorrow, not scratching but close enough to cause me concern. Thank you for the advice. The hardest part was picking up the hole saw and committing to cut my seat. Get powdered coated black if you do it...the paint is already coming off around screw hole, I will touch up. With plether pulled back attached door drilled holes, removed door put plether back used ice pic inside to outside for screwhole placement through plether.

21739956_10212072997037841_38044605188954970_n.jpg
 
Last edited:
What tools did you use to cut the hole?

thanks but I cut 4.5 in.hole tonight, perfect placement, just need long countersunk 1/4 -20 screws with nylon self locking nuts
havent figured out how long yet...drilled 2 holes and quit, got too hot to do anymore at 108deg
hardest part was mentally deciding to cut a hole in a $ 700 seat
What tools did you use to cut the hole.
 
Fuel Door

What tools did you use to cut the hole.
4.5 inch hole saw with arbor. Do a starter hole first
hole size dependent on inside diameter of the fuel door purchased.
the fuel door inside diameter are all different depending on model purchased.
the link for hole saw and fuel door are in this thread
you also need, for better word, a drill adapter. I bought from Lowe

I cut with seat up, outside to inside with neighbor holding seat for me.
My friend cut his seat inside to outside
your choice
 
Last edited:
I am considering doing the same thing. Love the hot nail suggestion for the screw holes. I found this guys site when I googled before finding this thread, just another example, and it has a link to the billet door on amazon, $20. http://www.spyderrt.info/u-do-it

The text below is straight from 'Inspector Gadget' website. I intend to follow that pretty closely, with some slight changes suggested by BlueKnight911

---------------------------------------------------------------------------------------------------------------------


Fuel Door --- Price of Project <$80.00

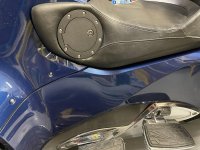
Installing this Bully GD-301P Billet Aluminum Fuel Door was a bit of a challenge, but once I determined the exact location it worked out well.

1. After positioning it on the seat where indicated I used an Awl to punch holes where the bolts would go and then drill with a small (1/16") bit.

2. Then from the inside carefully drill 1/4" out through just the seat pan.

3. Now you can place the 1/8" aluminum backing ring that you have cut, drilled, and tapped to 1/4 X 20 and mark out for the pan cut out.

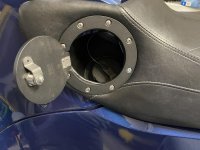
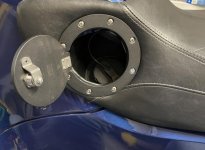
4. I used a demal with a wheel on it to cut the hole (see photo for size) in the seat pan and then cut the foam with a knife, being careful no to cut into the seat vinyl

5. Carefully cut the vinyl seat covering from the center making several pie shaped pieces, but do NOT cut all the way out to the hole edge, but just enough to make the vinyl roll over to the inside.

6. Using a stapler, pull the vinyl to the inside of the hole and fasten securely as shown in the photo.

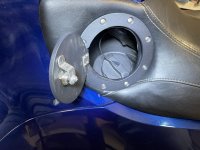
7. Insert the bolts through the Fuel Door-through the seat pan, and now thread into the inside backing ring and tighten. Note the 1 long bolt and lock nut placement in the photo.

8. Made sure you cut the bolts just past flush with the backing ring so they will not protrude to far in or they will hit and scratch the tupperware when closing the seat.

Click on any photo to get a larger view. (Note from UtahPete go to his website http://www.spyderrt.info/u-do-it for the pics....too much trouble trying to post them here)

Fuel Door Update: I really love the fuel door for its convenience and looks, but I found that the fuel door itself gets rather hot either from the engine heat or from the black color drawing in heat from the sun----so much so that at times it really burns the inside of my leg. Not wanting to give up my fuel door I fabricated a pot holder (for the lack of a better name) and it works very well. As you can see in the photos I can still access the fuel door by flipping the pot holder and placing it under the glove box lit. It is just slid in between the seat and tupperware and can be removed easily when I don't want it to be seen. It is covered with the same material that the seat is made from, but you could use just about anything to provide a different decoration as long as you use some batting material for the insulation. I used 4 layers of quilt batting.
 
Hi Pete I was wondering how you were coming on that project. Glad you got it done. I used tee nuts to hold mine in place instead of making a ring. Post a pix when you can. Good job DIY.
 
Hi Pete I was wondering how you were coming on that project. Glad you got it done. I used tee nuts to hold mine in place instead of making a ring. Post a pix when you can. Good job DIY.

Yep " T " nuts are the way to go ..... the following year after this thread I began doing the Fuel Door as a vendor .... I had to come up with a much simpler method for doing them and I did...... There are other posts for my " streamlined method " on how I learned to do it easier. Using " T " nuts was one of them. .... I also decided to make the first two holes by positioning the door RING against the seat and using the HOT nail to start the top an bottom holes ... then they could be safely drilled .... Then using 1 1/2 x 1/4 in. bolts to COMPRESS the Ring onto the seat .... this makes doing the rest of the holes much easier and accurate, and while using the " T " nuts , you can use your final short bolts to assemble the finished product. Those " T " nuts surface are only 1/32 nd of an inch thick so scratching the paint won't happen ...... good luck .... Mike :thumbup:
 
Hi Pete I was wondering how you were coming on that project. Glad you got it done. I used tee nuts to hold mine in place instead of making a ring. Post a pix when you can. Good job DIY.

Paul, my post was just my way of resurrecting that old thread. I have started on the project and when I'm done will start a new D-I-Y thread showing the steps involved.

Mike, I like your idea of melting the holes in the foam and fabric so they don't get torn up by the drill bit. I'll probably use my soldering iron for that.

I did finish installing the billet arm on Jane's bike. I could do a write up on that, too, at some point. And the dual WOLO horns on my bike and the new lighted bumpskid on Jane's. I don't know if you saw the one I did about installing solar power on the Lees-Ure Lite trailer. I feel like a teenager customizing his first car. Fun!
 
I spaced I had already seen this. Thank you for the reminder.
Better save some projects for Yuma this winter>;)
 
After several long trips with a bag strapped to the passenger seat, where it's very hard to raise the seat enough to gas up, I decided it was time to add a fuel access door. Following the example of UtahPete and Blueknight911, I was able to get one installed. I would like to thank Blueknight911 in particular for answering all my PM questions.
Thank you Mike.
 

Attachments

  • Fuel Door 1.jpg
    Fuel Door 1.jpg
    73.8 KB · Views: 53
  • Fuel Door 2.jpg
    Fuel Door 2.jpg
    64.6 KB · Views: 49
  • Fuel Door 3.jpg
    Fuel Door 3.jpg
    65.4 KB · Views: 46
  • Screen Shot 2021-07-29 at 7.30.29 PM.jpg
    Screen Shot 2021-07-29 at 7.30.29 PM.jpg
    63.8 KB · Views: 42
After several long trips with a bag strapped to the passenger seat, where it's very hard to raise the seat enough to gas up, I decided it was time to add a fuel access door. Following the example of UtahPete and Blueknight911, I was able to get one installed. I would like to thank Blueknight911 in particular for answering all my PM questions.
Thank you Mike.
:thumbup::thumbup:.... nice job, I knew you could do it:clap: ..... If you want to change where the hinge is so it will stay closed without the lock just rotate it one hole..... the rest will line up correctly ...... Thanks for the Thanks ...... Mike :thumbup:
 
Aside from a vanity project does this serve any purpose whatever?

Well I go shopping with my RT, and sometimes buy things to large to put in the Frunk and for various reasons I might not want to Fuel up until the end of my ride. So when I do stop to get Gas I won't have to un-tie my item ..... Soooooooooo I don't think it's a Vanity thing ..... Also some passengers have a difficult time mounting and dis-mounting, so for them it's convenient .... PS: I feel 90% of most Farkles are NOT necessary but a huge amount of folks here have them ..... JMHO .... Mike :thumbup:
 
Last edited by a moderator:
Not vanity as far as this Spyder is concerned. Especially when I travel I carry a lot of very necessary gear that wont fit in the bags so it gets piled on the the seat. Of course then the seatbecomes difficult to raise and to get to stay up. I don't concern myself with that anymore. Hardest part was making that 1st cut.
 
If the raising of the seat is something that is to be avoided due to passenger or gear, I can understand wanting a fuel door.
but if they came with one from the factory you can be sure that there would be someone designing a way to cover it up.
Bob, your installation looks good.
Did anyone mention that there is a screw missing? lol

After I did Bob's DOOR, we discussed the missing bolt ( ie screw ) .... I didn't have one long enough at the time.... I later came up with a fix for this issue .... Since the Ring only needs FOUR bolts, for the two that are really long I just used FAKE ones ..... Mike :thumbup:
 
Back
Top