• There were many reasons for the change of the site software, the biggest was security. The age of the old software also meant no server updates for certain programs. There are many benefits to the new software, one of the biggest is the mobile functionality. Ill fix up some stuff in the coming days, we'll also try to get some of the old addons back or the data imported back into the site like the garage. To create a thread or to reply with a post is basically the same as it was in the prior software. The default style of the site is light colored, but i temporarily added a darker colored style, to change you can find a link at the bottom of the site.

Finally! Volt Gauge Installed

HedonismBot

New member
After a misfire on my first gauge being too long, I opted for the EVO Digital series from Prosportgauges (http://prosportgauges.com/evo-series-Red-and-Blue.aspx) because it's actually shorter than the replaced BRP gauge. So, I knew it'd fit no problem. Two wires to the existing accessory power line for the old gauge via positap and a wire to the black ground via tap and I was done in 30 minutes (I'm slow). It does the initial full sweep and has an adjustable dimmer on the back with included tool to adjust it. I found my default brightness to be perfect for day or night time. I opted to wire it red rather than blue since my ryde is red. It looks pretty great at night :doorag:

The picture below is with the Spyder on but not started. When running it'll read 13.4 or so depending upon what's going on.
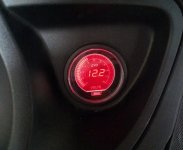
2013-09-20.jpg
 
After a misfire on my first gauge being too long, I opted for the EVO Digital series from Prosportgauges (http://prosportgauges.com/evo-series-Red-and-Blue.aspx) because it's actually shorter than the replaced BRP gauge. So, I knew it'd fit no problem. Two wires to the existing accessory power line for the old gauge via positap and a wire to the black ground via tap and I was done in 30 minutes (I'm slow). It does the initial full sweep and has an adjustable dimmer on the back with included tool to adjust it. I found my default brightness to be perfect for day or night time. I opted to wire it red rather than blue since my ryde is red. It looks pretty great at night :doorag:

The picture below is with the Spyder on but not started. When running it'll read 13.4 or so depending upon what's going on.

View attachment 76562

Mine used to do the same thing: 12.2 or 12.4 and then 13.4 with engine running. I still have my original gauges on my '13, but I might re-install the EVO gauge in the near future...
 
Congrats..!!

knew you could do it..not a race taking your time makes for less omitted steps or wrong connections..:thumbup:
 
Looks good. Any pics of the wires after the job was done?

I didn't think to do that. The gauge itself take a plugs with the 4 wires (included). All the wires had the ends cut (but plastic still on the wire) at the perfect length to work in the positaps. I just slid off the insulation at the ends of the 3 wires I needed and wrapped the unused one with electrical tape at the end. The total length of the wires was way more than needed. I suppose I could have cut the wires shorter but went with what I was given and used a velcro strap for networking cable to bunch up the excess and unused wire for easy stuffing into the dash. Clipping the wires shorter would have been easier in hindsight. ;)
 
knew you could do it..not a race taking your time makes for less omitted steps or wrong connections..:thumbup:

only wired it wrong once haha the positap didn't get a good connection to the existing BRP gauge's wire. once i figured out that was my problem and not a bad gauge, all was well :-)
 
Back
Top