• There were many reasons for the change of the site software, the biggest was security. The age of the old software also meant no server updates for certain programs. There are many benefits to the new software, one of the biggest is the mobile functionality. Ill fix up some stuff in the coming days, we'll also try to get some of the old addons back or the data imported back into the site like the garage. To create a thread or to reply with a post is basically the same as it was in the prior software. The default style of the site is light colored, but i temporarily added a darker colored style, to change you can find a link at the bottom of the site.

Exhaust Pipe Springs

Dray

New member
Is there a secret method to removing/reinstalling the three springs that holds the header
pipe to the cat? I am trying to determine what is involved in upgrading the exhaust system
and got to thinking that I would be ahead of the game to ask the experienced experts
on here before I got in over my head. So feel free to offer advice, suggestions and opinions.

Thanks in advance

Dray :banghead::banghead::banghead:
 
I use a headlight spring tool to remove and reinstall.
Z


Some people use heavy string looped around a screwdriver handle. I prefer the tool.
 
Is there a secret method to removing/reinstalling the three springs that holds the header
pipe to the cat? I am trying to determine what is involved in upgrading the exhaust system
and got to thinking that I would be ahead of the game to ask the experienced experts
on here before I got in over my head. So feel free to offer advice, suggestions and opinions.

Thanks in advance

Dray :banghead::banghead::banghead:
On my '14 RTL, I loosened the pipe connection that is right at the frame below the engine. This will allow movement that will let you take the springs out without any tools. You do not need to take the pipe completely off at the connection, just loosen it. This is the the easiest way to do it if you are working alone.
 
exhaust springs

Along with questions about the springs I should have asked do I need to change the gaskets? Scoot has 2500 miles on it.Thanks in advance.Dray
 
I went to Auto Zone and bought a simple exhaust spring tool. It was like $5. It has a T handle and a small hook at the end. This with a little muscle will get the springs back on. I thought it wasn't that difficult, and I'm no mechanic.
 
You don't say if you have a 1330 or 998. There are no gaskets on the 1330 but there are on the 998 and they should be replaced.
 
You don't say if you have a 1330 or 998. There are no gaskets on the 1330 but there are on the 998 and they should be replaced.


There is a metal gasket on the 1330 as well. I just installed the Two Brothers Racing pipe on my F3-S this week. I reused the gasket since my bike only has 500 miles on it.

As far as the springs, the tool that came with my kit was great. Same as described above: T handle with a hook on the end. This worked great for 2 of the 3 springs. On the top most spring, the tool didn't work so well due to clearance issues (And me having huge mitts for hands) So I took some heave gauge speaker wire (12 ga) and use that in my left hand, tool in the right hand. That last spring was the most difficult part of the job. Other than that, it was a 30 minute job start to finish.
 
Well, I finally decided to take a serious jab at messing with the cat on my 2015 F3S.
Got the springs off with no problem and the muffler removed. The rubber hanger for
the cat came as a surprise. With everything apart. I put three 1/2" holes in the cat
material (should have done more) and put everything back together. Seat of pants
dyno says I got a little more power about 500 rpm higher up the scale. That top
spring really did try my patience. The sound is a little deeper with a nice burble when
coming off the gas. I will run it this way for awhile to see how I like it.
Thanks for all the input

Dray :yes::yes::yes::yes:
 
spring removal and replacement tips

Is there a secret method to removing/reinstalling the three springs that holds the header
pipe to the cat? I am trying to determine what is involved in upgrading the exhaust system
and got to thinking that I would be ahead of the game to ask the experienced experts
on here before I got in over my head. So feel free to offer advice, suggestions and opinions.

Thanks in advance

Dray :banghead::banghead::banghead:
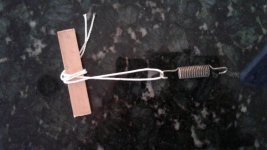
I've just put my exhaust on and off a couple of times and then installed a two bros (doing measurements etc), so got pretty good at removing and replacing the springs. As others have said, it helps to have a removal tool (T handle with hook). The issue with the top spring is that clearance is tight so it binds up on the exhaust flange as you try to pull it back. The trick here is to place a small putty knife under the spring so it won't hang on the exhaust flange lip as you pull on it. Once installed, pull out the putty knife. Works like a charm.

cheers
 
Well, I finally decided to take a serious jab at messing with the cat on my 2015 F3S.
Got the springs off with no problem and the muffler removed. The rubber hanger for
the cat came as a surprise. With everything apart. I put three 1/2" holes in the cat
material (should have done more) and put everything back together. Seat of pants
dyno says I got a little more power about 500 rpm higher up the scale. That top
spring really did try my patience. The sound is a little deeper with a nice burble when
coming off the gas. I will run it this way for awhile to see how I like it.
Thanks for all the input

Dray :yes::yes::yes::yes:
How did you put the holes in the cat baffle - 1/2" drill bit?
 
Same problem with the top spring each time muffler was removed and replaced with aftermarket (two brothers racing muffler). Had purchased a 15 1/2 inch long needle nose pliers with 90 degree angle on end of nose portion from harbor freight for another project I was working on earlier. Got tired of using the little tool that came with the exhaust, long story short, the 15 1/2 inch LONG NEEDLE NOSE pliers worked like a charm so now a tedious job now takes only a few seconds to remove and re-install the springs.
 
Back
Top