-
There were many reasons for the change of the site software, the biggest was security. The age of the old software also meant no server updates for certain programs. There are many benefits to the new software, one of the biggest is the mobile functionality. Ill fix up some stuff in the coming days, we'll also try to get some of the old addons back or the data imported back into the site like the garage. To create a thread or to reply with a post is basically the same as it was in the prior software. The default style of the site is light colored, but i temporarily added a darker colored style, to change you can find a link at the bottom of the site.
You are using an out of date browser. It may not display this or other websites correctly.
You should upgrade or use an alternative browser.
You should upgrade or use an alternative browser.
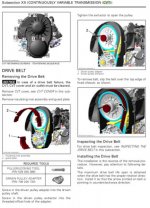
Cvt Belt Replacement
- Thread starter canamryder
- Start date
SportsterDoc
Member
It is rather basic.
Opening up one sheave, for the belt to go closer to center, allows the belt to slide over the edge of the other.
Sheaves are supposed to be cleaned and checked for smoothness, versus ridges.
Opening up one sheave, for the belt to go closer to center, allows the belt to slide over the edge of the other.
Sheaves are supposed to be cleaned and checked for smoothness, versus ridges.
canamryder
New member
It is rather basic.
Opening up one sheave allows the belt to slide over the edge of the other.
Sheaves are supposed to be cleaned and checked for smoothness, versus ridges.
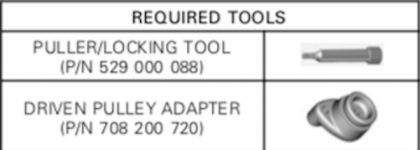
I wonder how much those special tools cost....most likely cheaper than the labor costs. Luckily I'm not close to needing them yet.
SportsterDoc
Member
Both together about $40
I prefer to do things myself...not just for cost consideration but tinkering is part of the ownership enjoyment...as well as getting better acquainted...and staying busy in retirement.
My dad retired early at age 58 (his dad only lived to 66) and often commented that he did not know how he found time to do everything he wanted before retirement. He lived to 91.
For a simple engine oil change, would a Can Am mechanic take the time to clean the magnetic drain plugs as thoroughly?
Greven
New member
Both together about $40
Very nice! That is less than I would have guessed
")
SportsterDoc
Member
Example
https://parts.adrenalinecycles.com/ProductDetails.aspx?WID=10928
This is on a Can AM Meverick, but same tool
https://www.youtube.com/watch?v=M3slSbzq4nQ
This video is what lead me to think that only the 8 mm bolt (8mm x 1.25 pitch x 50 mm + length) would be needed...but appears that hub is different.
https://www.youtube.com/watch?v=xR838ZLGCuU
See 3:10
Still looking for video for Ryker
canamryder
New member
Example
https://parts.adrenalinecycles.com/ProductDetails.aspx?WID=10928
This is on a Can AM Meverick, but same tool
https://www.youtube.com/watch?v=M3slSbzq4nQ
This video is what lead me to think that only the 8 mm bolt (8mm x 1.25 pitch x 50 mm + length) would be needed...but appears that hub is different.
https://www.youtube.com/watch?v=xR838ZLGCuU
See 3:10
Still looking for video for Ryker
Practice raising the clam shell 1st. Ride your Ryker to real low fuel also. It's not tough, but plan on taking your time.
https://www.youtube.com/watch?v=Mkt...I1hvd-wB6E9TZvnu44ANHPIbtBclxnWUA4u8X8iDP-qLY
And thanks for posting info....specially on price on where to buy the tools...I might do that soon.
SportsterDoc
Member
Watched the clam shell lift video. Saw it once before, but did not remember where to find it.
Took notes for each step, but not sure I captured all.
Previously removed engine filter box, hood and glove box (not necessary without locking parking lever).
After that,
3 pins for each lower (kick) panels
Loosen pivot screw (T30) each side
8 screws to separate from frame:
1 each side behind pivot screw
2 more each side towards rear
2 under seat - do not lift by seat
Disconnect air hose by CVT filter, above funnel
What did I miss?
And, yes, best to not lift 40 pounds of fuel!
Did not like to see prop against front of rear fender.
Be good to know max prop length, to be able to precut 2x4.
canamryder
New member
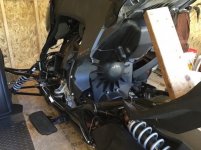
The 2 X 4 in picture is 14" long. I used a 16" board the 1st time but that just moved the bracing point back further. On missing anything, you'll find that out while practicing. There is a way to tilt the shell higher, but I hope that is not needed to get to the belt. It involves loosening the steering column clamp, securing (strapping) the fuel tank, and keeping an eye on the fuel lines. I forgot about the fuel in the tank in this picture (until I went to lift it:gaahWatched the clam shell lift video. Saw it once before, but did not remember where to find it.
Took notes for each step, but not sure I captured all.
Previously removed engine filter box, hood and glove box (not necessary without locking parking lever).
After that,
3 pins for each lower (kick) panels
Loosen pivot screw (T30) each side
8 screws to separate from frame:
1 each side behind pivot screw
2 more each side towards rear
2 under seat - do not lift by seat
Disconnect air hose by CVT filter, above funnel
What did I miss?
And, yes, best to not lift 40 pounds of fuel!
Did not like to see prop against front of rear fender.
Be good to know max prop length, to be able to precut 2x4.
so I think the 16" board did tilt it a little higher. Oh, don't forget the 2 x T30 down in front under radiator.Attachments
SportsterDoc
Member
Is the 14 or 16" 2x4 against the seat platform?
And yes, I missed the two T30 under the radiator facia.
And yes, I missed the two T30 under the radiator facia.
canamryder
New member
Is the 14 or 16" 2x4 against the seat platform?
And yes, I missed the two T30 under the radiator facia.
I can't recall but it was solid.
oregoncoast
New member
Thanks for the info, I have a belt and over 17,000 miles and know I am going to have to change it it soon. I also thought it could be done with just the 8mm bolt so it's good to know before hand.
SportsterDoc
Member
Thanks for the info, I have a belt and over 17,000 miles and know I am going to have to change it it soon. I also thought it could be done with just the 8mm bolt so it's good to know before hand.
Very interested to learn of belt condition (particularly width) when you do change it.
Also, what type of riding? I would expect much longer belt life cruising, compared to a lot of city start and stop.
Photos encouraged!
Very interested to learn of belt condition (particularly width) when you do change it.
Also, what type of riding? I would expect much longer belt life cruising, compared to a lot of city start and stop.
Photos encouraged!
Ditto's :thumbup:
canamryder
New member
Thanks for the info, I have a belt and over 17,000 miles and know I am going to have to change it it soon. I also thought it could be done with just the 8mm bolt so it's good to know before hand.
It would be a real bummer to tear into the project, lifting the clam shell etc. Then finding out that you need a couple special tools also. What looks like a bolt with end turned down has a spline on it also. I ordered the tools yesterday. I won't need them for awhile though.
oregoncoast
New member
I would say well over 90 percent of my miles are freeway speeds. Another thing it is very cool where I live, we have only hit 65 degrees once this year so far. But I do admit I get a little nervous about the long trips I take, most are 200 miles or more.
SportsterDoc
Member
It would be a real bummer to tear into the project, lifting the clam shell etc. Then finding out that you need a couple special tools also. What looks like a bolt with end turned down has a spline on it also. I ordered the tools yesterday. I won't need them for awhile though.
Yes, prep is a large percentage of a project.
From the video clip, I cannot figure out why the 8 mm, 1.25 pitch bolt has the special tip.
It appears to go against the aluminum hub, with something to protect the hub, such as a coin.
I may buy that at a hardware store and then buy BRP for the other part.
SportsterDoc
Member
I would say well over 90 percent of my miles are freeway speeds. Another thing it is very cool where I live, we have only hit 65 degrees once this year so far. But I do admit I get a little nervous about the long trips I take, most are 200 miles or more.
Sportster belt changes can be done relatively easily on the road, but I would not be pleased to change the CVT belt on the road.
With cooler weather and longer rides, I would not be surprised if your belt could go 20,000 miles or more.
SportsterDoc
Member
It appears that the 708 200 720 "driven pully adapter" should be the same price at a Can Am dealer as on-line sources: $26.99.
My closest dealer (Rancho Powersports) stocks it for $30.33.
The dealer where I purchased the Ryker stocks it for $30.71 including taxes (~$28.37 without)
Lookiing at this PDF of a Can Am CVT manual, which is NOT our transmission, but nonetheless quite informative, I see no reason to not use a standard 8 mm, 1.25 pitch bolt, at least 50 mm long. Somewhere I read 80 mm, so I will go for longer.
https://static1.squarespace.com/sta...6d20001947c17/1567027939785/clutch+manual.pdf
Similar threads
- Replies
- 2
- Views
- 884
- Replies
- 6
- Views
- 1K
- Replies
- 6
- Views
- 1K
- Replies
- 8
- Views
- 1K
- Replies
- 5
- Views
- 318