-
There were many reasons for the change of the site software, the biggest was security. The age of the old software also meant no server updates for certain programs. There are many benefits to the new software, one of the biggest is the mobile functionality. Ill fix up some stuff in the coming days, we'll also try to get some of the old addons back or the data imported back into the site like the garage. To create a thread or to reply with a post is basically the same as it was in the prior software. The default style of the site is light colored, but i temporarily added a darker colored style, to change you can find a link at the bottom of the site.
You are using an out of date browser. It may not display this or other websites correctly.
You should upgrade or use an alternative browser.
You should upgrade or use an alternative browser.
Canister-Ectomy - 2008-2016 SM5/SE5
- Thread starter BajaRon
- Start date
Bangorbob
Active member
The extra mileage is a good reason for me to do this. I hate having to figure fuel mileage out in the middle of death valley. Anyway, I ask what size the hoses, fittings, and fuel filter was for a 2012. I assume (bad word to use) that they are the same on a 2016 rt? I have not seen any sizes or parts needed in any post.
Thanks, Bob
Thanks, Bob
There is a small slot just below the threads on the upper side of the fill tube. This is designed to vent air as you fill the tank. But it is too small. You just want to enlarge this hole to at least 1/4". If you do it with a drill, go slow and use a magnet to catch shavings. Or, some have used a strong flat blade screwdriver to widen the hole. Though you have to be careful not to deform the fill tube in the threaded area. I'll attach a picture if I get time.
Ron,
Thanks for the speedy reply. I just went out to my bike, took a photo of the fill tube, drew a circle around the slot I think you're talking about, and attached it here. Is this what you're talking about? Is that where to drill the 1/4" hole (or would a pair, side-by-side be best?)?
Regards, PatrickH
Attachments
BajaRon
Well-known member
Ron,
Thanks for the speedy reply. I just went out to my bike, took a photo of the fill tube, drew a circle around the slot I think you're talking about, and attached it here. Is this what you're talking about? Is that where to drill the 1/4" hole (or would a pair, side-by-side be best?)?
Regards, PatrickH
That is it.
....... You just want to enlarge this hole to at least 1/4". If you do it with a drill, go slow and use a magnet to catch shavings. Or, some have used a strong flat blade screwdriver to widen the hole. Though you have to be careful not to deform the fill tube .....
In lieu of a using a magnet to catch any shavings (it can be a tad difficult to find one of the right size & shape to fit near enough to the drill bit so that it can catch all the swarf/shavings as you drill) you could try liberating an old metal teaspoon from the kitchen; bending it's handle enough to give you a secure grip and also angle the bowl to let it fit in thru the filler hole of the tank & 'cup' underneath the area where you are going to drill; then remove it again; smear the teaspoon bowl liberally with a light but sticky grease or petroleum jelly etc; re-insert & drill away, safe in the knowledge that all the shavings will be caught in the grease!
 hyea:
hyea:Hello BlueKnight911,
I found your Gas Smell Fix photo. Thanks for posting it.
I'm trying to figure out how to do this procedure to my 1330cc 2014 RT LTD. What year/model bike is your Gas Smell Photo?
Looking at my service manual, it appears to me as though I'd have to remove the seat, the trunk, and saddlebags just to get to the plumbing you worked on for my 2014 RT. Do you know (or anyone else reading this) know whether I'm reading my manual correctly? Does anyone know of photos for a canister-ectomy for a 1330cc RT?
Regards, Patrick
BLUEKNIGHT911
Sadly Passed Oct 2024 - RIP
Hello BlueKnight911,
I found your Gas Smell Fix photo. Thanks for posting it.
I'm trying to figure out how to do this procedure to my 1330cc 2014 RT LTD. What year/model bike is your Gas Smell Photo?
Looking at my service manual, it appears to me as though I'd have to remove the seat, the trunk, and saddlebags just to get to the plumbing you worked on for my 2014 RT. Do you know (or anyone else reading this) know whether I'm reading my manual correctly? Does anyone know of photos for a canister-ectomy for a 1330cc RT?
Regards, Patrick
GAS smell foto was on my 08 GS and then I did the same for my 2012 RSS both had the V-twin engine .....Hi, I also have a 14 RT .... I have never had any gas odor even on 100 F day ...... BRP did a major re-route of those lines for the 1330 models and I don't remember reading of them being an issue for them on this forum ..... Mike :thumbup: ..
Bangorbob
Active member
I know this is kinda of old thread, but I thought I would add/bring it up again. Took a 50 mile ride to and from Las Vegas. Parked in the garage and left the door open for about 15 minutes. Checked the oil level (pita). Anyway the wife opened up the garage door again because of gas smell. I have NOT done the mod yet. I assume it is time.
Secondly I ain't never seen the triangle on the gauge and can't seem to get the tank full.
Secondly I ain't never seen the triangle on the gauge and can't seem to get the tank full.
BajaRon
Well-known member
Bob,
What is your year/model Spyder? What's PITA, besides animal lovers? - If you do the mod, I'd love to see your pictures.
Patrick
 opcorn:
Bangorbob
Active member
PatrickH. Haze got it correct. PITA (pain in the A$$). I have a 2016 RTS, se6. Put in about 3 gallons today to see if the digital guage went to full and hoping I would see the magic triangle. Nada, bars only went orange til the last bar which was empty. Never got to full. The PO had the instrument panel replaced once. Can't remember why though.
Thanks to Baja Ron for starting this thread. I just completed this job--toughest part was the fastener at the very front of the two halves of the black tupperware which covers the top of the tank.
Rather than routing the tank vent to the back as Ron suggested, I joined the the two tubes #23 and and #24 since 23 was the original vent which exits in front, away from the engine. Here are the three hoses, 24, 23 and the bottom of 19 plugged with a screw, after cannister was removed. I simply cut the hoses off.
.jpg")
To join 23 and 24, I used this. Only used one hose clamp on the larger one (23) since this is not under pressure.
.jpg")
Finished product. I cut off the curved part of 23 and still has lots of tubing. Zip tied tubing to frame in which cannister formerly resided. This does not incorporate the fuel filter but the exit tube is vertical and a long ways away from the tank. Hope it's ok.
.jpg")
Rather than routing the tank vent to the back as Ron suggested, I joined the the two tubes #23 and and #24 since 23 was the original vent which exits in front, away from the engine. Here are the three hoses, 24, 23 and the bottom of 19 plugged with a screw, after cannister was removed. I simply cut the hoses off.
To join 23 and 24, I used this. Only used one hose clamp on the larger one (23) since this is not under pressure.
Finished product. I cut off the curved part of 23 and still has lots of tubing. Zip tied tubing to frame in which cannister formerly resided. This does not incorporate the fuel filter but the exit tube is vertical and a long ways away from the tank. Hope it's ok.
Last edited by a moderator:
RangerRick
Active member
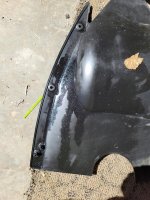
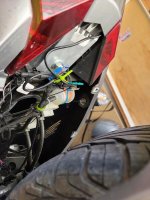
I did the Canister-Ectomy a while back. I ran the hose up high under the console where the switches are mounted under the steering wheel, then back along the frame to the rear under the tail lights, put a filter element on the end. It still puts an oily like coating on this cover over the back wheel, then weeps down the rear shock. :hun: So I added a hose on the other end of the filter and ran it clear down to the bottom of the rear shock mount, the damn thing can just leave its deposit on the ground.  In the pictures you can see where the filter is under the rear and then the oily deposits from it on the cover that's underneath.
In the pictures you can see where the filter is under the rear and then the oily deposits from it on the cover that's underneath.Attachments
Last edited:
Ron, Couldn’t hose #24 just be disconnected from the canister and routed to the back with a filter and just leave the canister intact in the bike with hose #19 still attached and undisturbed? With that approach in mind, I have two questions:
a) Would it work?
b) Would it be necessary to install a rubber cap over
the nipple on the canister where #24 was?
My thought here is that those who live in states that inspect emissions can then easily just pop #24 off the coupling and back onto the canister before inspecting, then switch it back afterwards.
BajaRon
Well-known member
Ron, Couldn’t hose #24 just be disconnected from the canister and routed to the back with a filter and just leave the canister intact in the bike with hose #19 still attached and undisturbed? With that approach in mind, I have two questions:
a) Would it work?
b) Would it be necessary to install a rubber cap over
the nipple on the canister where #24 was?
My thought here is that those who live in states that inspect emissions can then easily just pop #24 off the coupling and back onto the canister before inspecting, then switch it back afterwards.
Yes, that would work. You still have the potential of PCV valve issues. But that is not a huge deal. You'll still get gas fumes for quite some time if the medium is soaked with liquid, as many are.
I WOULDN'T be drilling with an ELECTRIC drill in that area...Even with an air drill, all you'd need is a spark and you and the bike could be GONE...
Trim a dry kitchen sponge to a circle to fit. Then get it wet and wring it out as much as you can with your hands and stick it down in. It will catch any shavings and block fumes.
BajaRon
Well-known member
I WOULDN'T be drilling with an ELECTRIC drill in that area...Even with an air drill, all you'd need is a spark and you and the bike could be GONE...
Where is your sense of adventure? Life can be so much more exciting if you just work at it a bit!

I've done several without issue. Use a very slow speed and a very sharp bit. A cold day helps to keep the vapors down. A full tank also helps.
Some have used a punch to open the hole up. But that tends to deform the filler.
But don't do it if you don't feel comfortable.
Thanks to Baja Ron for starting this thread. I just completed this job--toughest part was the fastener at the very front of the two halves of the black tupperware which covers the top of the tank.
Rather than routing the tank vent to the back as Ron suggested, I joined the the two tubes #23 and and #24 since 23 was the original vent which exits in front, away from the engine. Here are the three hoses, 24, 23 and the bottom of 19 plugged with a screw, after cannister was removed. I simply cut the hoses off.
View attachment 192051
To join 23 and 24, I used this. Only used one hose clamp on the larger one (23) since this is not under pressure.
View attachment 192052
Finished product. I cut off the curved part of 23 and still has lots of tubing. Zip tied tubing to frame in which cannister formerly resided. This does not incorporate the fuel filter but the exit tube is vertical and a long ways away from the tank. Hope it's ok.
View attachment 192053
But how do keep raw gas from spilling out every time it sloshes in the tank? Ron’s method keeps the tank vent ABOVE the tank to prevent that. It only drops below the tank at the very end.
Similar threads
- Replies
- 3
- Views
- 412
- Replies
- 4
- Views
- 905
- Replies
- 15
- Views
- 2K
- Replies
- 28
- Views
- 5K
- Replies
- 30
- Views
- 4K