-
There were many reasons for the change of the site software, the biggest was security. The age of the old software also meant no server updates for certain programs. There are many benefits to the new software, one of the biggest is the mobile functionality. Ill fix up some stuff in the coming days, we'll also try to get some of the old addons back or the data imported back into the site like the garage. To create a thread or to reply with a post is basically the same as it was in the prior software. The default style of the site is light colored, but i temporarily added a darker colored style, to change you can find a link at the bottom of the site.
You are using an out of date browser. It may not display this or other websites correctly.
You should upgrade or use an alternative browser.
You should upgrade or use an alternative browser.
Bump Skid installation disaster
- Thread starter Pat Clark
- Start date
SpyderAnn01
Active member
Oh that sucks! I hope to put on a bumpskid on my F3 this weekend. I'll be extra careful. Thanks.
Whatever you do don't skip the drilling of these holes. Because a bumpskid installed without the holes in the frame will cause you more trouble than not having a bumpskid at all.
Cruzr Joe
New member
Honestly, I fail to see the need for a bump skid. After over 4,000 miles on my F3, I haven't bumped anything or skid on anything.
Famous last words, you just put the HEX on your ryde.
Cruzr Joe
Whatever you do don't skip the drilling of these holes. Because a bumpskid installed without the holes in the frame will cause you more trouble than not having a bumpskid at all.
Just starting install. I have mounted the skid plate with the alignment bolts. Looking at the holes that are supposed to be drilled into the frame it seems they are outside the centre frame rail? It is hard to tell with the pan on if the frame sort of "T's" out? Also is the pan difficult to remove? I noticed there is a bolt or other fastner inside the pan rattling in there :-(
jcthorne
Well-known member
Just starting install. I have mounted the skid plate with the alignment bolts. Looking at the holes that are supposed to be drilled into the frame it seems they are outside the centre frame rail? It is hard to tell with the pan on if the frame sort of "T's" out? Also is the pan difficult to remove? I noticed there is a bolt or other fastner inside the pan rattling in there :-(
You need to remove the bottom covers so you can see what you are drilling. A screw and a few push pins on each one.
armyspydervet
Member
All my best stories start with, "hold my beer, watch this!" :yes:Why not?
Some of the best stories often start with:
"You're not gonna believe what just happened..." :clap:
Rattlebars
New member
Step one: Drilling plastic, don't use a conventional drill bit, it will run on you.
Step two: Use a step drill. >CLICK ME<

Step two: Use a step drill. >CLICK ME<
Bob Denman
New member
All my best stories start with, "hold my beer, watch this!" :yes:

Which covers?
this is the first I have heard to remove any covers? Do you mean the two either side if the main frame or the one under the frunk?
You need to remove the bottom covers so you can see what you are drilling. A screw and a few push pins on each one.
this is the first I have heard to remove any covers? Do you mean the two either side if the main frame or the one under the frunk?
Sccar
Member
this is the first I have heard to remove any covers? Do you mean the two either side if the main frame or the one under the frunk?
Does this thing not come with directions?
Directions
Yes there are directions but it does NOT say to remove any of the bottom pans. The pictures just say you need to drill into the frame but the predrilled holes in the skid plate appear to be outside the center frame thus the reason for my question. I can't find any online photos of the bottom of the frame with pans removed to tell if the bottom center frame t's out as I asked in my question above. I need someone to confirm 1) I don't need to remove the pans that are on the side of the center frame 2) is there any tricks to remove the pan below the frunk and 3) my primary question can someone confirm that the predrilled holes in the bumpskid that are to go into the frame seem to be outside the center frame but that the frame does in fact t out
Does this thing not come with directions?
Yes there are directions but it does NOT say to remove any of the bottom pans. The pictures just say you need to drill into the frame but the predrilled holes in the skid plate appear to be outside the center frame thus the reason for my question. I can't find any online photos of the bottom of the frame with pans removed to tell if the bottom center frame t's out as I asked in my question above. I need someone to confirm 1) I don't need to remove the pans that are on the side of the center frame 2) is there any tricks to remove the pan below the frunk and 3) my primary question can someone confirm that the predrilled holes in the bumpskid that are to go into the frame seem to be outside the center frame but that the frame does in fact t out
Pat Clark
New member
skid plate
No panels need to be removed on the F3. All but two of the holes are drilled through the plastic nose piece. The two most rearward holes have to be drilled into the frame. This frame is light gage steel.
As the instructions say, you must remove the two bolts shown and use the kits two long bolts to hold the skid up to use as a template to drill all the rest of the holes. Then remove the SKID and place the clips on the bike where you drilled the holes and re-install the skid plate..... BE CAREFUL WHEN DRILLING THE HOLES ON THE OUTSIDE EDGE SO AS NOT TO NICK THE RADIATOR. Make sure you drill perfectly straight. The higher you can get the bike in the air the easier this will be. I used my ramps and a right angle drill.
Pat
Yes there are directions but it does NOT say to remove any of the bottom pans. The pictures just say you need to drill into the frame but the predrilled holes in the skid plate appear to be outside the center frame thus the reason for my question. I can't find any online photos of the bottom of the frame with pans removed to tell if the bottom center frame t's out as I asked in my question above. I need someone to confirm 1) I don't need to remove the pans that are on the side of the center frame 2) is there any tricks to remove the pan below the frunk and 3) my primary question can someone confirm that the predrilled holes in the bumpskid that are to go into the frame seem to be outside the center frame but that the frame does in fact t out
No panels need to be removed on the F3. All but two of the holes are drilled through the plastic nose piece. The two most rearward holes have to be drilled into the frame. This frame is light gage steel.
As the instructions say, you must remove the two bolts shown and use the kits two long bolts to hold the skid up to use as a template to drill all the rest of the holes. Then remove the SKID and place the clips on the bike where you drilled the holes and re-install the skid plate..... BE CAREFUL WHEN DRILLING THE HOLES ON THE OUTSIDE EDGE SO AS NOT TO NICK THE RADIATOR. Make sure you drill perfectly straight. The higher you can get the bike in the air the easier this will be. I used my ramps and a right angle drill.
Pat
deer30084
New member
So if I hit something with my bumpskid, it will be pushed back, not only ruining the bumpskid, but pushing back all the bolts, ruining the holes I drilled and ruining the frame. Then to fix everything, I have to remove the bumpskid, the damaged bolts and the damaged parts I drilled into. After that, I view the damaged, enlarged bolt holes, scratch my head and take it to a shop because the repair job is too big for me.:banghead:
Highwayman2013
New member
So if I hit something with my bumpskid, it will be pushed back, not only ruining the bumpskid, but pushing back all the bolts, ruining the holes I drilled and ruining the frame. Then to fix everything, I have to remove the bumpskid, the damaged bolts and the damaged parts I drilled into. After that, I view the damaged, enlarged bolt holes, scratch my head and take it to a shop because the repair job is too big for me.:banghead:
Or you could just hit something with the frunk and see how much damage that causes.
Skid plate install
Thanks Pat. It seems the existing skid plate will make it difficult to get the clips on? Any hints you have on the front?No panels need to be removed on the F3. All but two of the holes are drilled through the plastic nose piece. The two most rearward holes have to be drilled into the frame. This frame is light gage steel.
As the instructions say, you must remove the two bolts shown and use the kits two long bolts to hold the skid up to use as a template to drill all the rest of the holes. Then remove the SKID and place the clips on the bike where you drilled the holes and re-install the skid plate..... BE CAREFUL WHEN DRILLING THE HOLES ON THE OUTSIDE EDGE SO AS NOT TO NICK THE RADIATOR. Make sure you drill perfectly straight. The higher you can get the bike in the air the easier this will be. I used my ramps and a right angle drill.
Pat
JKMSPYDER
Well-known member
BUMPSKID
While installing the bump skid on my F3 last year I found it easier to remove the two plastic panels under the trunk before installation. I had to really get under the Spyder while on ramps to find all the push pins and screws that needed to come out. Once that was done the holes in the frame were already there for the two farthest rear holes on the bump skid. The only drilling I had to do was thru the remaining holes on the skid as a template.
While installing the bump skid on my F3 last year I found it easier to remove the two plastic panels under the trunk before installation. I had to really get under the Spyder while on ramps to find all the push pins and screws that needed to come out. Once that was done the holes in the frame were already there for the two farthest rear holes on the bump skid. The only drilling I had to do was thru the remaining holes on the skid as a template.
Pat Clark
New member
Clips
Putting the clips on wasn't a problem. There is enough flex on the plastic that they just slide on. Use a phillips screw driver or a punch to align them with the holes. Put the skid up with the same two long bolts you used in the begining and start all the screws before you tighten any of them. You probably will need to clamp up the front with your fingers to get some of the front screws to start.
If I hadn't been a boob and nicked my radiator the whole thing would have taken an hour.
Pat
Thanks Pat. It seems the existing skid plate will make it difficult to get the clips on? Any hints you have on the front?
Putting the clips on wasn't a problem. There is enough flex on the plastic that they just slide on. Use a phillips screw driver or a punch to align them with the holes. Put the skid up with the same two long bolts you used in the begining and start all the screws before you tighten any of them. You probably will need to clamp up the front with your fingers to get some of the front screws to start.
If I hadn't been a boob and nicked my radiator the whole thing would have taken an hour.
Pat
Drilling into frame
Are you saying you didn't have to drill thru the frame?
While installing the bump skid on my F3 last year I found it easier to remove the two plastic panels under the trunk before installation. I had to really get under the Spyder while on ramps to find all the push pins and screws that needed to come out. Once that was done the holes in the frame were already there for the two farthest rear holes on the bump skid. The only drilling I had to do was thru the remaining holes on the skid as a template.
Are you saying you didn't have to drill thru the frame?
cyclelover63
Member
Really? I hit the nose on the driveway of the gas station the second time we had ours out.
We had ours installed at Spyderfest in 2013,left Spyderpops and hit one of those big steel lids at the gas station they use to fill their tanks..I know I would have hurt something if it wasn't on there.
Honestly, I fail to see the need for a bump skid. After over 4,000 miles on my F3, I haven't bumped anything or skid on anything.
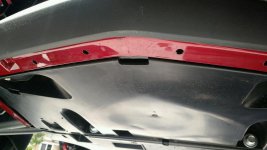
Did this with 425 miles on the Spyder.
 Not really that much damage, but I know it is there.
 Also these are the holes that are drilled into the plastic before installing the Bumpskid.
Attachments
Similar threads
- Replies
- 0
- Views
- 571
- Replies
- 0
- Views
- 193
- Replies
- 7
- Views
- 2K
- Replies
- 2
- Views
- 409