• There were many reasons for the change of the site software, the biggest was security. The age of the old software also meant no server updates for certain programs. There are many benefits to the new software, one of the biggest is the mobile functionality. Ill fix up some stuff in the coming days, we'll also try to get some of the old addons back or the data imported back into the site like the garage. To create a thread or to reply with a post is basically the same as it was in the prior software. The default style of the site is light colored, but i temporarily added a darker colored style, to change you can find a link at the bottom of the site.

BRP Trailer Module Kit

KJWEB

New member
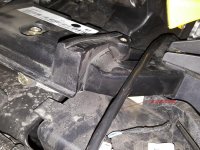
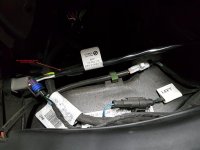
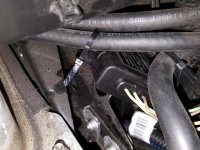
I installed my hitch yesterday and plugged in the wire module kit. I want to make sure I have the bike side trailer pigtail routed correctly before I put the tupperware back on.
Here are some pictures. Is the routing of the pigtail correct?

Under the passenger left hand rail
attachment.php
attachment.php
attachment.php
 

Attachments

  • module3.jpg
    module3.jpg
    94.2 KB · Views: 533
  • module2.jpg
    module2.jpg
    54.7 KB · Views: 534
  • module1.jpg
    module1.jpg
    87.6 KB · Views: 538
Here is the trailer I bought this past Saturday.

Mission MMT 3'x4'

attachment.php
attachment.php
attachment.php
 

Attachments

  • 20160227_161646 - Copy.jpg
    20160227_161646 - Copy.jpg
    48.8 KB · Views: 528
  • 20160227_161446 - Copy.jpg
    20160227_161446 - Copy.jpg
    67 KB · Views: 530
  • 20160227_161425.jpg
    20160227_161425.jpg
    69.4 KB · Views: 524
Nice looking trailer you bought. Regarding your power module, please let me pass along something that I learned from people on this site who are far more knowledgeable than me. I too pull a "non-BRP" trailer. Two BRP modules fried. Following the advice provided on this forum, when I had the third module installed I had the Spyder tech do two things: ground the module to the frame and ground the trailer wiring to the trailer. Problem solved. You may not have to do this, but I thought I'd pass it along.
 
Why do you have to ground them separately I'm getting ready to install a hitch on my wife's ST and she will be pulling at times a on BRP trailer like I do with my Victory. Thanks
 
Would the ground be the white wire coming out of the module to the pigtail? Or ground the module for the other side to the frame?
 
You need to look at the wiring schematic for your bike in the shop repair manual. I don't want to steer you wrong but the grounds on my RS are Black. That said we are back to the statement that I believe that the same wiring harness is used on all the same models, ie all RT's, ST's, F-3's and RS's. :gaah::gaah:

Joe Meyer; Ann's husband would be the expert source that I would consult
 
Ok, the latest update on the newer BRP trailer Module Kit. There is no more extra grounding needed on the bike side. The new module fits in between the 9 pin bike harness under the plastic cover under the seat. Access is by removing the left side panel and left passenger hand rail. Just disconnect the bike 9 pin harness plug, then plug the module in between the bike's harness. Then the bike side trailer pig tail plugs in to the into module. That's it.
I will be adding an extra ground for the trailer to be safe.

Hope this information helps others.
 
Can someone post a picture of your trailer plugged into the bike pigtail? After mounting the bike pigtail under the left saddlebags as directions indicated, I would like to see what it looks like all plugged in with the trailer end pigtail.

Thanks in advance.
 
Why do you have to ground them separately I'm getting ready to install a hitch on my wife's ST and she will be pulling at times a on BRP trailer like I do with my Victory. Thanks

Good question but I have also noticed more hitch comments with independent grounds not frying the modules. Fyi I am also going to have one installed when I get mine. Easy enough to add for the comfort of not frying a module. Compared to truck hitches the ball must not conduct as well. (Just a guess)


Sent from my iPad using Tapatalk
 
You need to look at the wiring schematic for your bike in the shop repair manual. I don't want to steer you wrong but the grounds on my RS are Black. That said we are back to the statement that I believe that the same wiring harness is used on all the same models, ie all RT's, ST's, F-3's and RS's. :gaah::gaah:

Joe Meyer; Ann's husband would be the expert source that I would consult

The grounds on the wiring module are white. The wiring module will fit RT and ST but not the RS. Not sure about the F3 but suspect the module for it is different.
 
Ok, the latest update on the newer BRP trailer Module Kit. There is no more extra grounding needed on the bike side. The new module fits in between the 9 pin bike harness under the plastic cover under the seat. Access is by removing the left side panel and left passenger hand rail. Just disconnect the bike 9 pin harness plug, then plug the module in between the bike's harness. Then the bike side trailer pig tail plugs in to the into module. That's it.
I will be adding an extra ground for the trailer to be safe.

Hope this information helps others.

Just a minor correction. That is a 10 pin connector on the harness.
 
Why do you have to ground them separately I'm getting ready to install a hitch on my wife's ST and she will be pulling at times a on BRP trailer like I do with my Victory. Thanks

The normal cause for the module to burnout is faulty wiring in the trailer. Not from a short circuit. If there is a short. The fuse will blow and no harm to the module. What will kill it is an intermittent connection. (flickering lights) Can be on any circuit but more common on the ground side. Some aftermarket manufacturers get lazy and only have one grounding point on the tongue. Then paint, glue or corrosion will interfere with a steady ground circuit. Good practise is to run a ground wire to each major light fixture.
 
LOL

Fry a few trailer modules, you become an expert! Expensive lessons!
Glad it worked out! Joe
 
First, I stand corrected, it is a 10 pin connector under the seat. Thanks for that clarification.

I brought the trailer home behind the pickup yesterday. I bought the female 4 pin flat connector and put that on the end of the 4 pin square male connector. Here is what it looks now under the left saddlebag.

attachment.php
attachment.php
 

Attachments

  • 20160302_194858[1].jpg
    20160302_194858[1].jpg
    97.8 KB · Views: 364
  • 20160302_194941[1].jpg
    20160302_194941[1].jpg
    36.4 KB · Views: 371
A few more pics of the Mission 3'x4' (25 cu. ft. of storage) trailer. I have to come up with a cooler rack. The tongue is 3" square aluminum.

attachment.php
attachment.php
attachment.php
attachment.php
 

Attachments

  • 20160302_194404[1].jpg
    20160302_194404[1].jpg
    60.4 KB · Views: 334
  • 20160302_194418[1].jpg
    20160302_194418[1].jpg
    54.2 KB · Views: 325
  • 20160302_194434[1].jpg
    20160302_194434[1].jpg
    79.3 KB · Views: 325
  • 20160302_194500_001[1].jpg
    20160302_194500_001[1].jpg
    41.2 KB · Views: 325
Last edited:
That is a really nice looking trailer. Clean installation on your trailer plug in!!

Will need to get a rack fabricated from aluminum and attach it with u bolt type clamps or two flat stock or small box channel stock front and back with stainless bolt and washers to cinch it all in place. Or whatever you can think up.

Hope that short tongue tows well!!
Now your ready to travel down the highway!!!
:yes::yes::ohyea::ohyea::thumbup:

Al
 
Update

I came up with my own cooler rack. Now all that is left to do is some trailer graphics

20160305_192759.jpg 20160305_192750.jpg
 
A few more pics of the Mission 3'x4' (25 cu. ft. of storage) trailer. I have to come up with a cooler rack. The tongue is 3" square aluminum.
Keep an eye for possible cracking on the bottom side on the tongue. I used a 2" square .062 steel tube for the tongue when I made my trailer. There is so much bouncing and vibration from the hitch being mounted on the swing arm that the weight of the trailer and cooler causes a lot of deflection and stress on the tongue. Mine cracked all the way around to where there was only about 3/4" of steel on the top side pulling the trailer! Had it broken clear through the safety chains would have been pulling a 4' piece of tubing with a tool box attached. Who knows where the trailer would have gone!:yikes:

Aluminum is less resistant to stress than is steel. How thick is the tongue tube? Do you know if other Spyder owners have pulled this same trailer? You might check with the trailer manufacturer and ask them about this possibility. A trailer tongue is subjected to much more up/down bouncing behind a Spyder than motorcycles like Goldwing and Harley where the hitch is suspended from the bike frame. If the manufacturer is aware of this and has taken it into account with the design then you should have no problem.
 
Thanks for the "heads up". I always inspect the trailer before, during, and end of the ride. Even with the cooler filled with ice and water, the weight of the tongue is under 30lbs. The aluminum tubing is 3" squared x 5/16" thick.
 
Back
Top