• There were many reasons for the change of the site software, the biggest was security. The age of the old software also meant no server updates for certain programs. There are many benefits to the new software, one of the biggest is the mobile functionality. Ill fix up some stuff in the coming days, we'll also try to get some of the old addons back or the data imported back into the site like the garage. To create a thread or to reply with a post is basically the same as it was in the prior software. The default style of the site is light colored, but i temporarily added a darker colored style, to change you can find a link at the bottom of the site.

BajaRon Sway Bar on 2012 RT Ltd

Upstater

New member
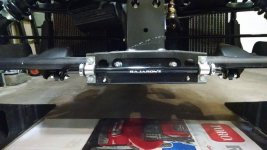
Installed a new BajaRon sway bar (purchased from Lamonster) this weekend. It can be done without removing the frunk, but I was doing some other additions, so off with the frunk. It was an extremely easy project without the frunk. I'm looking forward to the re-assembly and new ride.

attachment.php


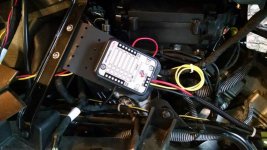
Now, where to mount the new FZ1 Fuzeblock?? AND the new SmoothSpyder tensioner came today! Woohoo... lots to do this week.
 

Attachments

  • IMG_20160424_143938706.jpg
    IMG_20160424_143938706.jpg
    48.7 KB · Views: 269
Let me know where you install the FZ1!

Sent from my VS990 using Tapatalk

There is space just behind the frunk (under the driver's side light), but I have a Wolo Bad Boy air horn in that space. So with all the Tupperware removed, I'm thinking about the driver's side just forward of the knee, above the oil tank and below the speaker. Lots of room in that space. I have the air vent modify, so lots of air flow should keep the Fuzeblock cool enough. I made a mount from a mending plate that will attach to the brace bar. This also puts the Fuzeblock closer to the battery for wiring (I purchased the wiring kit). When I need to access it, it's just a quick panel removal. I'll post pics when I install it.
 
There is space just behind the frunk (under the driver's side light), but I have a Wolo Bad Boy air horn in that space. So with all the Tupperware removed, I'm thinking about the driver's side just forward of the knee, above the oil tank and below the speaker. Lots of room in that space. I have the air vent modify, so lots of air flow should keep the Fuzeblock cool enough. I made a mount from a mending plate that will attach to the brace bar. This also puts the Fuzeblock closer to the battery for wiring (I purchased the wiring kit). When I need to access it, it's just a quick panel removal. I'll post pics when I install it.
Well, finally got to the FZ-1 install. I made the brace from a mending plate. It is solid and doesn't move at all. The FZ-1 comes with a plastic backing for the unit. I mounted that on top of the plate and then the FZ-1 on top of that. It eliminates any metal contact with the electronics board.
This area is closer to the battery for wiring the unit. It's also easy to remove the top panel for maintenance or additional add-ons. It is also cooled by the vents added from the v-twin heat resolution kit.
85a8780cdcefbda96ba11eaa07913d5f.jpg
036d087f94611b895b335f17d2bf9e0f.jpg


Sent using Tapatalk
 

Attachments

  • uploadfromtaptalk1462112484227.jpg
    uploadfromtaptalk1462112484227.jpg
    59.5 KB · Views: 22
Well, finally got to the FZ-1 install. I made the brace from a mending plate. It is solid and doesn't move at all. The FZ-1 comes with a plastic backing for the unit. I mounted that on top of the plate and then the FZ-1 on top of that. It eliminates any metal contact with the electronics board.
This area is closer to the battery for wiring the unit. It's also easy to remove the top panel for maintenance or additional add-ons. It is also cooled by the vents added from the v-twin heat resolution kit.
85a8780cdcefbda96ba11eaa07913d5f.jpg
036d087f94611b895b335f17d2bf9e0f.jpg


Sent using Tapatalk
Forgot the pre-paint pic of the mount. Primed and painted the mending plate and brace with high temp spray paint.
bc1d19490edfb3a15899997ea59b19e3.jpg


Sent using Tapatalk
 
where do you find "mending" plates? That looks like a useful item for lots of things

Yes, they are very useful. Can be used for lots of projects. They can be found at Home Depot or Lowe's. Usually in the building supply aisles near roofing or deck building stuff.
 
AMAZING upgrades

Just took the Bronze Bomber for a quick test ride after the mod installs. The vibration at higher rpms is completely gone. Much thanks to Jim at SmoothSpyder for providing this product. I've been waiting all winter to do this. Small price to pay for a solid solution.

The Spyder is an absolute beast in the twisties now with the BajaRon sway bar and new links (both purchased from Lamonster Garage). I've read all the great reviews but nothing compares to the actual experience. If you haven't installed this yet, don't wait any longer. It is a MUST have. Forget about all the lights and other stuff. This is the best bang for buck you can get.

Thanks to everyone that provides information (good and bad) on this forum. The community is simply incredible and I respect all the experience you provide to new riders like me.

My Spyder is even more fun to ride now. I can't wait for my Northeast tour (Rochester to P.E.I.) next month.
 
Would you mind educating me on why you purchased and installed a "sway bar". What is their purpose? I see a lot of people add that, so I am curious what it's for.

Thanks
Joe
 
Anti-sway bar

Hi Joe,

An Anti-sway bar keeps the :spyder2: From leaning outwards while turning (sway ). Most all cars have them and many now also have one on the back axel also. The anti-sway bar on the :spyder2: Is a bit undersized for "sprited" riding and many of us have added a larger diameter bar. I recently let a new :spyder2:Owner try my BajaRon equiped RT-S and as she pulled back in she said she HAD to have one!!

It's a very common addition to many :spyder2:.'S. :thumbup:

Kaos
 
Would you mind educating me on why you purchased and installed a "sway bar". What is their purpose? I see a lot of people add that, so I am curious what it's for.

Thanks
Joe

Hi Joe,

I wasn't real sure at first either. As I read more I began to understand the necessity, especially after taking a few corners a bit too fast. The Spyder automatically went into "safety" mode and all but shut down (as it is supposed to do). The BajaRon sway bar increases stability dramatically when cornering. I can take corners as fast I can in my Dodge R/T (well... almost). A side by side comparison will show that the OEM bar is not as beefy as the new replacement. This explains the great difference in cornering stability. You will enjoy the Spyder so much more on curvy roads. Along with the belt tensioner from SmoothSpyder, both items are a must have for a more enjoyable ride. Not sure why BRP has not upgraded the newer models with these features, but they should.

Make the investment, you will not be disappointed. Watch the video from "Finless Bob" on You Tube for the installation. It's relatively easy, especially if you are a wrench head.

-Rick
 
Where did you tap into a ignition source wire?

Sent from my VS990 using Tapatalk

I disconnected both of my analog dash gauges (gas and temp) to utilize the digital readout. Attached to each gauge is a three-wire connector and a "free" spade wire that powers the gauge light. This single free wire is a switched wire and can be tapped. It is easy to fish/route a wire to this location, especially with the upper tupperware and dash removed.

I have the BRP dash insert blank covers to replace the removed analog gauges. On the left blank cover I drilled a 1 1/8" hole and inserted a USB charger. This is connected to my FZ-1 Fuzeblock.
Thanks a lot!

Sent from my VS990 using Tapatalk
 
Back
Top