Scoops installed, a few lessons learned to pass along
Today was the day I installed the scoops. Doc's instructions were very helpful but I found after some trial and error that there were some tricks that made the second side go better than the first. So to help anyone that tries this themselves, here are some highlights.
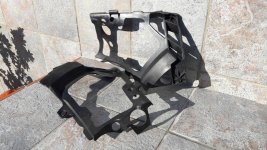
Assemble the two base parts together as Doc's instructions suggest, use tape to hold them together along with the clips. Put the clips in first before you slide the front grate in.
Take the mirrors off along with the quick access panels, but leave the large panels attached. Take off the clear deflectors and use one of the longer screws that comes in the parts bag to attach the scoop assembly to the bike. This lets you position the scoop where it needs to be so you can drill pilot holes. Push upward on the scoop so its snugged as close to the crease in the panel as possible and then drill the easy holes (you will figure out which these are. Doc's instructions have you trying to use some type of tape to transfer the location of two of the holes that you cant make with an average length drill bit. I ended up using a dental pick to mark the positions of both the hard to drill holes and it worked well enough.
Right side:
Left Side:
After you mark some pilot holes, you can take the scoops off as well as the left and right panels. If you arent familiar with how to do this, there are some good videos online. Remove the grates by pulling off the metal clips and you can either cut the bit of plastic that holds the last side in or just pry it up.
The first side I did I used painters tape to keep the paint from getting scratched and to have a lighter surface to mark on. It worked well enough. The second side I used the dental pick to scratch the surface of the paint which worked better then I outlined those marks with tape. I drilled some holes at the corners as well as along the lines and use a jigsaw with a fine blade to cut out the excess plastic. Some sections I cut from the front, some from the back.
First side:
Second side: Note the bolt with the wingnut that is holding the scoop tight to the panel.
I did most of the work of fitting the scoop to the panel in the kitchen using an old blanket to keep from scratching the counter as well as the panels paint. Once the scoop is secured with the self tapping screws, you can then mount the outer plastic cover that slides in and secures with two more self tapping screws. Then the shiny front plastic goes on, again snapping in and held in with two more screws. I was having a tough time with those screws till I pulled out a small ratchet set I had bought years ago and never used till today. It came with an assortment of torx bits, one of which fit.
Scoops installed:
The kit includes some foil faced sound deadening material. Hardest part is getting the paper off to expose the sticky side:
I got three of the metal braces in this kit, guess they had a few extras. B side goes down. Old inner panels go in the trash.
Scoops installed:
Happy with the results. I can see the job taking about 2 hours if you know what you are doing and have all the right tools. Took me longer for sure, but I also combined it with some other work since the panels were off.