BlueLine
New member
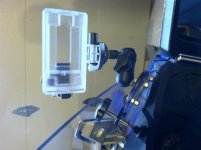
During the Lamonster Bar-B-Que ride I saw every video camera set up known to man or woman. Here's the direction I went. After seeing several posted videos, I knew I had to have the capability, and at the same time convert or use what I had, an iPhone 4. Optrix makes a Sport case with an enhanced 179 degree angle lens that houses the Apple 3&4 phones, I found one on eBay. Next item of business was where should I mount the thing. The package comes with a helmet mount curved base brackets and flat mount brackets. I like the option of a helmet mount, but didn't like the idea of having to remove my helmet to turn the camera on and off or change settings. I have mounted one bracket on one of my helmets, but I needed an accessible location that would allow me to utilize all the camera functions from a riding position.
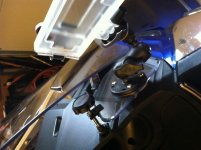
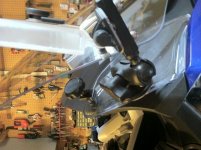
I opted for the clear wind deflector on the lower side of the windshield. I used a Ram Ball mount attached to the wing. Prior to making a permanent mount I taped the mount in place and checked for uninhibited windshield travel. after insuring clearance I marked and bore holes thru the plastic with a pencil soldering iron, a hot nail could be used in lieu of the iron. The holes were trimmed cleaned up, then the Ball base was mounted with a rubber gasket and nylon back plate and stainless machine screws.
A trial run with the camera revealed a slight shudder over rough roads. To counter this I added an adjustable leg with flex foot to the wing. I attached the leg via a metal clip to the wing, but another hole bored thru the wing would have also worked. The stabilizing adjuster worked, no more shudder.
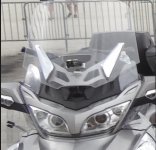
After installation my goals were met: a Stable, affordable, accessible, and removable installation. All for under $100 (Phone not
I opted for the clear wind deflector on the lower side of the windshield. I used a Ram Ball mount attached to the wing. Prior to making a permanent mount I taped the mount in place and checked for uninhibited windshield travel. after insuring clearance I marked and bore holes thru the plastic with a pencil soldering iron, a hot nail could be used in lieu of the iron. The holes were trimmed cleaned up, then the Ball base was mounted with a rubber gasket and nylon back plate and stainless machine screws.
A trial run with the camera revealed a slight shudder over rough roads. To counter this I added an adjustable leg with flex foot to the wing. I attached the leg via a metal clip to the wing, but another hole bored thru the wing would have also worked. The stabilizing adjuster worked, no more shudder.
After installation my goals were met: a Stable, affordable, accessible, and removable installation. All for under $100 (Phone not