-
There were many reasons for the change of the site software, the biggest was security. The age of the old software also meant no server updates for certain programs. There are many benefits to the new software, one of the biggest is the mobile functionality. Ill fix up some stuff in the coming days, we'll also try to get some of the old addons back or the data imported back into the site like the garage. To create a thread or to reply with a post is basically the same as it was in the prior software. The default style of the site is light colored, but i temporarily added a darker colored style, to change you can find a link at the bottom of the site.
You are using an out of date browser. It may not display this or other websites correctly.
You should upgrade or use an alternative browser.
You should upgrade or use an alternative browser.
Any pics of Cutting a windshield? How is it done?
- Thread starter Mike0123
- Start date
cruisinTX
Member
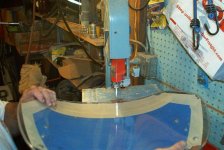
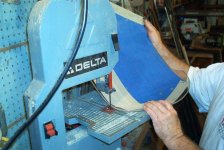
I have cut down a couple of motorcycle windscreens over the past few years. Most (if not all) are poly-carbonate and cut easily with a jig saw or small band saw. The thing that most folks try is cutting from the wrong side. On a band saw you want to cut with the face of the windscreen down against the table. With a jig saw you want to cut with the saw against the face with the windscreen held firmly in place on a solid surface.
The next important point is to completely mask off both sides to prevent scratching and to have a place to mark a highly visible line where you want to cut.
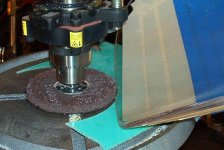
Once the cutting is done, shaping the square edge back to something similar to the factory rounded edge is desirable but not totally necessary. I start that process using the trusty Dremel tool to get roughly the shape I want with a 1/4" burring bit. Making that rounded edge smooth can be done with hand-held sand paper of various grits progressing from about 100 to 150, 220, 320 to 400. However, if you have a drill press, that can be done in two steps using a compressed paper disc impregnated with polish followed by a 3/4" stiff sponge wheel that will allow you to press the edge of the screen into it. As you press inward the sponge gives in such a way as to create a cup and makes a nice rounded edge. That, too, must be done with the face of the windscreen down against the drill press table and with a thin piece of plastic or wood holding it up off the table about 3/16 to 1/4" so the thickness of the edge is centered in the sponge.
Lastly (or maybe firstly) leave all of your masking in place until done in the event you slip with any of the tools or paper it will help avoid scratches.
I may have pictures of one I did a while back; if I find those will post them for you here.
Found them. Please note how I keep the face of the windscreen as flat as possible against the table on both the band saw and the drill press. This will prevent getting the saw blade in a bind and keep the edge centered on the sponge wheel on the drill press. The green you see in the image of the drill press is 1/8 plastic so the edge of the windscreen is centered in the edge of the sponge.
Attachments
Last edited:
RICZ
New member
I have cut down many windshields and photos would look like it's a stock w/s.
+ You will need a saber / scroll saw and a palm sander with medium-fine sandpaper on it. Also various grades of sandpaper down to about 400.
+ The first thing you want to do is establish the exact height you want. I do that by clipping or taping a piece of cardboard to the w/s and raise or lower it until I can see over it and still have wind protection.
+ Having established the height, cover the convex / outside surface with blue painters tape where you intend to cut - and then some.
+ Draw a curve on the blue tape, following the original profile, but only from one side to the centerline. Trace the line on a sheet of plain, white paper. Flip the paper and draw the line from the center to the other side to get symmetry. With a Sharpie, smooth out the line, as that is what you will be cutting along.
+ Using the saber saw (I stongly recommend applying tape to the bottom the the saw's plate) slowly cut along the line. I hang the w/s over the edge of the work table so as not to hit anything with the saw.
+ With the palm sander (or manually if you don't have one) go back a forth over the edge, leaning the sander one side to the other to form a rounded edge.
+ When your new edge is flawless and smooth, keep sanding manually, going to finer grits as you progeress.
+ When the edge is smoother than a baby's bottom, apply plastic polish.
+ If you see imperfections, carefully go over the edge gently with a propane torch or heat gun.
And there you have it. First times are always the hardest, but the next time will be easy.
Isopedella
Well-known member
I have cut one down.
After laying down plenty of masking tape. 2 layers where the power tool was to slide.
I used what I had.
A jig saw with a fine metal blade from memory. Sort of melted its way through.
Finished off with several grades of sandpaper and a cork sanding block.
Worked well.
After laying down plenty of masking tape. 2 layers where the power tool was to slide.
I used what I had.
A jig saw with a fine metal blade from memory. Sort of melted its way through.
Finished off with several grades of sandpaper and a cork sanding block.
Worked well.
Isopedella
Well-known member
Isopedella
Well-known member
Hell No.
Thats 2 for 2.
Thats 2 for 2.
Mike0123
Member
The thing that most folks try is cutting from the wrong side. On a band saw you want to cut with the face of the windscreen down against the table. With a jig saw you want to cut with the saw against the face with the windscreen held firmly in place on a solid surface.
Can you explain why the different positions on this? Do we want the teeth of the blade cutting down (or up) through the finished face of the windshield, leaving any tendency for tear out on the back side? So a bandsaw has teeth that would grab and pull the windshield tight against the table, and a jigsaw is the opposite?
I just want to understand so if I do this I can pay attention better!
TIA
Jig saw typically cuts on the up stroke. You MUST keep the tool firm against the material ! Keep a jig saw on the forward face of windshield so you can follow the curve and keep the saw firmly in place. I have done several. As said use blue tape and keep it on till done. I use anything from a coffee can to a washer to draw a radius on sides after main cut to get even curves. Finnish with fine sandpaper or if you have it,I really like the sponge wheel tool as referred to above. Take your time,keep the tool tight to material,remember you can cut more but really tuff to put back on! You'll be fine.
Can you explain why the different positions on this? Do we want the teeth of the blade cutting down (or up) through the finished face of the windshield, leaving any tendency for tear out on the back side? So a bandsaw has teeth that would grab and pull the windshield tight against the table, and a jigsaw is the opposite?
I just want to understand so if I do this I can pay attention better!
TIA
See why I went to the plastic shop and had them do it.
RICZ
New member
That is all irrelevant, as you will smooth out any imperfections. The key to cutting a w/s down is to take is slow and easy. The steps mentioned are all low tech.Can you explain why the different positions on this? Do we want the teeth of the blade cutting down (or up) through the finished face of the windshield, leaving any tendency for tear out on the back side? So a bandsaw has teeth that would grab and pull the windshield tight against the table, and a jigsaw is the opposite? I just want to understand so if I do this I can pay attention better!,
TIA
mikthebik
Member
Cutting screen on the Spyder.
Agree with Ricz. Almost identical to the method I just used to cut my F4 Customs tall screen on my F3S. Tape both sides, create the cut line as described, cut with jig saw and sand to perfect the curve. Cutting with the screen on the bike, with a jig saw, the cut line will almost certainly need to be adjusted by sanding. I used my small belt sander, then a palm sander once the curve was to my liking. Hand sanding with finer grits, then polish with auto polishing compounds can finish the edge to meet your aesthetic requirement. The finish I easily achieved was actually better than the rest of the factory edge. Good luck! :2thumbs:
Agree with Ricz. Almost identical to the method I just used to cut my F4 Customs tall screen on my F3S. Tape both sides, create the cut line as described, cut with jig saw and sand to perfect the curve. Cutting with the screen on the bike, with a jig saw, the cut line will almost certainly need to be adjusted by sanding. I used my small belt sander, then a palm sander once the curve was to my liking. Hand sanding with finer grits, then polish with auto polishing compounds can finish the edge to meet your aesthetic requirement. The finish I easily achieved was actually better than the rest of the factory edge. Good luck! :2thumbs:
Similar threads
- Replies
- 2
- Views
- 495
- Replies
- 13
- Views
- 2K
- Replies
- 6
- Views
- 1K
- Replies
- 7
- Views
- 408


