• There were many reasons for the change of the site software, the biggest was security. The age of the old software also meant no server updates for certain programs. There are many benefits to the new software, one of the biggest is the mobile functionality. Ill fix up some stuff in the coming days, we'll also try to get some of the old addons back or the data imported back into the site like the garage. To create a thread or to reply with a post is basically the same as it was in the prior software. The default style of the site is light colored, but i temporarily added a darker colored style, to change you can find a link at the bottom of the site.

Amazing Modern LED Headlamps for Spyders!

One year after JC's install

Finally got the LED headlights installed. I ended up removing the circuit board, had to trim off tabs on the sides of the circuit board holder which then let it move enough sideways to disengage the bottom of the holder and remove it from the housing. This allowed me to insert the LED Box in one side and run the lead to the light under and then up the other side of the shutter solenoid. I could then fit the circuit board holder back in the general area it came from with the bottom section removed, reinstalled the circuit board and fiddled with its plugs until I had them where they didn't interfere with anything. The plug from the LED box I set by the light socket and tucked the black lead down between the side of the housing and the socket. All the while I was checking the shutter for unobstructed motion and keeping wiring as far away from the solenoid as possible. I then bent the heat sinks down and around the bulb housing, trapping the power plug under them. Shout out to JC for the photos to give me the determination to wrestle with this project. I almost gave up and installed them in my Motorhome. Lol
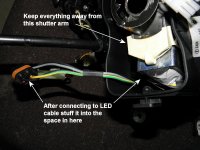
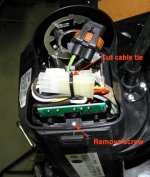
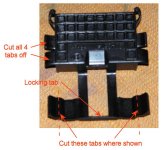
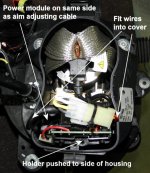
I'm just now working on doing this same install. I've run into the same problem Tweakers did. There is no question the inline box is now a bit larger than when JC did his install a year ago. There is no way to fit the box in like JC did and not jam the shutter. I believe I will do the same mod Tweakers did, remove tabs on one side of the PC board holder. I may add a pic or two to add some additional info to what Tweakers has above.
 
Here are pics of my installation of the Xenon Depot LED headlights. I found it easier to fit the holder in by cutting off all the tabs as shown. Removing the holder is a bit of a pain. It is held in place with the cross piece of the long tab hooking over the end of a rib under the screw. The lamp cable and module cable can be stuffed into the housing alongside the lamp after plugging them together. I rerouted the wires to the PC board as shown in the pics.

attachment.php


attachment.php


attachment.php


attachment.php
 

Attachments

  • Cable stuffing.jpg
    Cable stuffing.jpg
    68.8 KB · Views: 160
  • Remove holder.jpg
    Remove holder.jpg
    55.6 KB · Views: 160
  • Start point.jpg
    Start point.jpg
    48.5 KB · Views: 162
  • Tab cuts on PC board holder.jpg
    Tab cuts on PC board holder.jpg
    47.4 KB · Views: 160
Here are a couple of pics of the completed installation.

attachment.php


attachment.php
 

Attachments

  • Completed install 2.jpg
    Completed install 2.jpg
    63.2 KB · Views: 161
  • Completed install.jpg
    Completed install.jpg
    60.1 KB · Views: 161
PICS & INFO

Nice job.....Thank you very much.....it's help like this that benefits all :clap: :clap: :clap: :yes: :yes: :yes:...............Mike :bbq:
 
Looks good.

I assume you verified the shutter clearance by moving it by hand prior to closing it up.
Both by hand and then jerry rigging an electrical connection and testing it with power.

Also consider, the original post was done to an F3 which is supposed to be much different than an RT.
Look again! :rolleyes: The LED install was done on his wife's RT, which I think is the one he had problems with and sold after buying a replacement. He has since traded his RT in on the F3 that's in his sig.
 
Looks good.

I assume you verified the shutter clearance by moving it by hand prior to closing it up.

Also consider, the original post was done to an F3 which is supposed to be much different than an RT.

When I did the LED install in our RTs, knowing the black box was waterproof, I simply did an entire plug and play with no mods to the headlights or internals, by mounting the box on the exterior of the headlight housing.

My install differed also since I used LEDs that are fan cooled and have no braids.

Again, nice job.

The photos were taken the other night. Our RTs with 3200 lumens per bulb, a different brand than yours, and two stock RTs, one on each side. Gives an idea of how the lights compare. The difference is more dramatic looking forward onto a dark road but we did not have time for that.

I did my install like you, but I notched the cover so as not to pinch the wires and put the LED control box on the out side of the headlight housing. Works fine and there is room for the box and headlight housing in the Spyder. I went with the Xenon Depot units.
 
When I did the LED install in our RTs, knowing the black box was waterproof, I simply did an entire plug and play with no mods to the headlights or internals, by mounting the box on the exterior of the headlight housing.

I did my install like you, but I notched the cover so as not to pinch the wires and put the LED control box on the out side of the headlight housing.
Based on your comments, PMK, earlier in this thread I considered notching the housing or cover and putting the power module outside of the housing. Like you say, the entire housing is sealed but it does have vent tubes at the back that have foam filters in them. I was concerned about getting a good seal where the wires go in and out of the box. Water isn't the real issue, dust is. If the headlight envelope is breached without a filter in the breach then dust can eventually get in. The reflector and lens are not sealed inside the housing so any dust that gets in there could coat the backside of the headlight lens and the front of the projector lens.

The real solution, I think, for the Spyder headlights would be for Xenon Depot to make the power module with Delphi connectors so it could be inserted right into the power leads coming to the headlight assembly. They could make an adapter to connect the LED lamp to the headlight plug which would fit comfortably inside the housing.
 
Both by hand and then jerry rigging an electrical connection and testing it with power.


Look again! :rolleyes: The LED install was done on his wife's RT, which I think is the one he had problems with and sold after buying a replacement. He has since traded his RT in on the F3 that's in his sig.


Correct. The install in the first post is on a 2013 RT. Those lamps are now in Louise 2015 RT and still working great. I have also installed LEDs in my F3.
 
Back
Top