• There were many reasons for the change of the site software, the biggest was security. The age of the old software also meant no server updates for certain programs. There are many benefits to the new software, one of the biggest is the mobile functionality. Ill fix up some stuff in the coming days, we'll also try to get some of the old addons back or the data imported back into the site like the garage. To create a thread or to reply with a post is basically the same as it was in the prior software. The default style of the site is light colored, but i temporarily added a darker colored style, to change you can find a link at the bottom of the site.

Amazing Modern LED Headlamps for Spyders!

I wish he would come out with sets for my '11RS,I would love to change the headlights and add foglights to it.


XenonDepot has the LED replacements for most of the standard type lamps. I cannot help you with the lamp type on that bike though. Perhaps someone else can post the lamp numbers for the 11RS.
 
I think the headlamps are H7, but not sure and I don't know what is used for fog lights as I don't have them.
 
LED

Great! Thanks for posting. My experiment went gloriously wrong, a dismal failure, and at twice the price, an expensive lesson! I am ordering these! Joe
 
What would best match BRP HID headlights ?

I plan to upgrade my BRP fog lights as soon as weather permits. I have the optional BRP HID head lights and would like to match up the fog lights to the same color and intensity. I was planning on Xenon Depot's HID Extreme H8 with the Phillips bulb upgrade to get the maximum lumens possible. I realize the extreme amount of work and disassembly required to install the HID bulbs and the ballasts and feel that I can do it. Since you have experience with both, what do you think would match my HID head lights best ?
 
I plan to upgrade my BRP fog lights as soon as weather permits. I have the optional BRP HID head lights and would like to match up the fog lights to the same color and intensity. I was planning on Xenon Depot's HID Extreme H8 with the Phillips bulb upgrade to get the maximum lumens possible. I realize the extreme amount of work and disassembly required to install the HID bulbs and the ballasts and feel that I can do it. Since you have experience with both, what do you think would match my HID head lights best ?


I think the HID of the same color temperature as your HID headlamps would match better and be a bit brighter. The LEDs are MUCH easier to install. Also some have had nanny diffeculties with the HID kits. Mine work fine. I think it has to do with where the ballasts are located and good circuit grounding to keep electrical noise out of the bikes electrical circuits. The LEDs will not cause these noise issues.
 
Thanks

Thank you for your quick and courteous response. I plan to use Doc Riverside's plan and mount the ballasts on the tunnels. He sent me an excellent pictorial on mounting the ballasts and drilling the fog lights. From what he said, there is no need to use the relays on my 2010 RT. I realize that I have to remove and extensively disassemble the "frunk" & I'm comfortable with this as I have done it before. Do you have any thoughts on this or things to be careful of not breaking ?
 
Where did you get the LED's that's mounted on the control steering arms?

Reg

Next a quick BEFORE pic of the RT with the old halogen lamps still installed. Note the yellow color of the head and fog lamps compared to the fender tips and the LED daytime running lamps on the A arms.
attachment.php


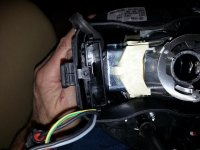
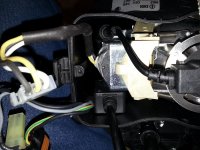
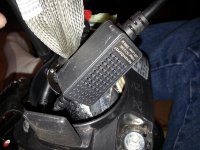
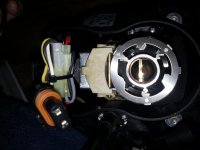
Next here is the XenonDepot 9005 replacement lamp installed in the headlamp housing.
attachment.php


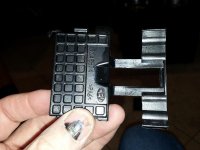
And the headlamp with the cover re-installed. Note that this cover is important as it keeps the dirt and moisture out of the lens housing while the bike is in use.
attachment.php


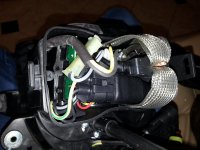
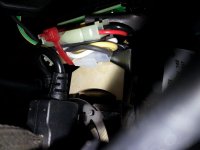
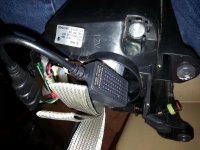
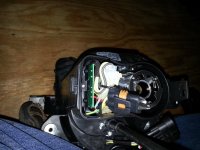
Here is the Xenon Depot H11 replacement lamp installed in the Fog housing. Again, this pic is taken with the frunk removed so I could take the pic, you can easily reach these above the a arms from behind the wheel.
attachment.php
 
led install, 14 SE5

I have been trying my best to install the led conversion inside the housing on the headlight assembly but can't seem to cram it all in. Don't want to jam the high beam solenoid. Looking for suggestions:sour:
 
WELLLLLLLLLLLLLLLLLLLLLLLLLLLLLLLLLLLLLLLLL

I have been trying my best to install the led conversion inside the housing on the headlight assembly but can't seem to cram it all in. Don't want to jam the high beam solenoid. Looking for suggestions:sour:
:hun: :lecturef_smilie:....How about looking at the PICS in post # 30 !!!!!.....Mike :thumbup:
 
THIS MAY BE .....BUT

Mike, I may be wrong, but it sure looks like the connector and wires exiting the connector are against the shutter that moves to provide high beam. The shutter is the white colored bar under the connector. Tough call but appears that way to me from the photo. I believe this is what the person is asking about.

PK
JC Thorne , did the PICS of His install....( as shown in post # 30 ) and He was the tester for Xenon Depot ......and He says they are working fine .....I haven't attempted mine yet and I may be sticking the BRAID out the back due to the same concerns plus keeping the BRAID cool ........I'll keep you all posted .......Mike :thumbup:
 
All I can really tell you is the pics show the way they were installed back then. They and the shutter mechanisms are still working fine today. The braid get little more than warm to the touch, not hot.
 
I don't see how to fit this much "STUFF" into this housing. There must be some differences in a) housing design (the locking ring for the bulb is to big go let the rectangular box to fit past it or b) these lights come with differing box dimensions or c) done of each of the above. There is some room next to the circuit board but it interferes with the shutter linkage. :gaah:
 

Attachments

  • 20151213_204958.jpg
    20151213_204958.jpg
    77 KB · Views: 86
  • 20151213_205012.jpg
    20151213_205012.jpg
    37.3 KB · Views: 68
  • 20151213_204945.jpg
    20151213_204945.jpg
    63.6 KB · Views: 62
  • 20151213_195019.jpg
    20151213_195019.jpg
    50.5 KB · Views: 77
  • 20151213_194906.jpg
    20151213_194906.jpg
    60.2 KB · Views: 71
Has anyone removed the "holder" for the circuit board that's mounted in the headlight housing. If I can get this out. I should be able to fish the LED box down below the solenoid....where there appears to be an Apartments worth of room. Thanks in advance for any wisdom offered! ;)
 

Attachments

  • 20151213_222621.jpg
    20151213_222621.jpg
    59.2 KB · Views: 60
Last edited:
Has anyone removed the "holder" for the circuit board that's mounted in the headlight housing. If I can get this out. I should be able to fish the LED box down below the solenoid....where there appears to be an Apartments worth of room. Thanks in advance for any wisdom offered! ;)


If you look closely at the photo I posted, you can see where the black box for the LED is on the lower left. Sharing space with the circuit board.
 
I won!

Finally got the LED headlights installed. I ended up removing the circuit board, had to trim off tabs on the sides of the circuit board holder which then let it move enough sideways to disengage the bottom of the holder and remove it from the housing. This allowed me to insert the LED Box in one side and run the lead to the light under and then up the other side of the shutter solenoid. I could then fit the circuit board holder back in the general area it came from with the bottom section removed, reinstalled the circuit board and fiddled with its plugs until I had them where they didn't interfere with anything. The plug from the LED box I set by the light socket and tucked the black lead down between the side of the housing and the socket. All the while I was checking the shutter for unobstructed motion and keeping wiring as far away from the solenoid as possible. I then bent the heat sinks down and around the bulb housing, trapping the power plug under them. Shout out to JC for the photos to give me the determination to wrestle with this project. I almost gave up and installed them in my Motorhome. Lol
 

Attachments

  • 20151214_171745.jpg
    20151214_171745.jpg
    59.1 KB · Views: 76
  • 20151214_172024.jpg
    20151214_172024.jpg
    53.4 KB · Views: 59
  • 20151214_173128.jpg
    20151214_173128.jpg
    66.6 KB · Views: 85
  • 20151214_182321.jpg
    20151214_182321.jpg
    39.5 KB · Views: 66
  • 20151214_171648.jpg
    20151214_171648.jpg
    73 KB · Views: 77
Finally got the LED headlights installed. I ended up removing the circuit board, had to trim off tabs on the sides of the circuit board holder which then let it move enough sideways to disengage the bottom of the holder and remove it from the housing. This allowed me to insert the LED Box in one side and run the lead to the light under and then up the other side of the shutter solenoid. I could then fit the circuit board holder back in the general area it came from with the bottom section removed, reinstalled the circuit board and fiddled with its plugs until I had them where they didn't interfere with anything. The plug from the LED box I set by the light socket and tucked the black lead down between the side of the housing and the socket. All the while I was checking the shutter for unobstructed motion and keeping wiring as far away from the solenoid as possible. I then bent the heat sinks down and around the bulb housing, trapping the power plug under them. Shout out to JC for the photos to give me the determination to wrestle with this project. I almost gave up and installed them in my Motorhome. Lol


Yahoo! So glad you got them in. Congrats.
 
Back
Top