• There were many reasons for the change of the site software, the biggest was security. The age of the old software also meant no server updates for certain programs. There are many benefits to the new software, one of the biggest is the mobile functionality. Ill fix up some stuff in the coming days, we'll also try to get some of the old addons back or the data imported back into the site like the garage. To create a thread or to reply with a post is basically the same as it was in the prior software. The default style of the site is light colored, but i temporarily added a darker colored style, to change you can find a link at the bottom of the site.

Amazing Modern LED Headlamps for Spyders!

jcthorne

Well-known member
A bit of background first, I have had HID headlamps and fog lamps purchased from site sponsor XenonDepot for a little over a year and been very happy with them. They were not all that easy to install and some folks have had difficulty with them getting along with the bike. I did not have any trouble with them and they work very well. That said, with the newer LED technology making great strides in the recent years, I was hopeful that an LED retrofit product would come along that would work correctly in the Spyder's projector lamp housings before I replaced the halogen lamps in Louise's Spyder RT.

A number of LED headlamp replacement bulbs have come to market and I had been researching many of them but none worked well in a projector housing or in the Spyder due to problems with beam pattern and the cooling apparatus on the rear of the lamps. Most had heat sinks and fans sticking out the back which had no place to go on a Spyder.

Recently, XenonDepot came to market with a very different LED replacement lamp system that seemed taylor made for our application. I was still skeptical as I had seen so many LED units fail in projector housings. Steve with Xenon Depot reached out to me and asked if I would be willing to give the new lamps a try and do a review here. I agreed and while hopeful was still skeptical it would work out.

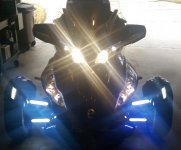
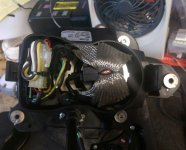
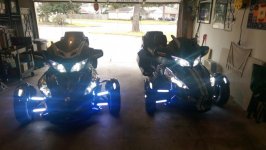
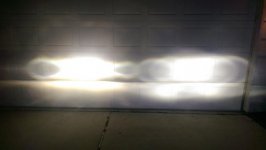
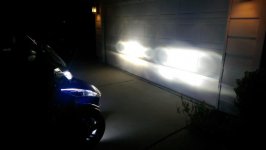
I am hear to report these LED replacements are GREAT. Could not be more pleased with the results. They were easy to install. Most folks could install head lamps and fog lamps in under an hour. I took because I wanted good photos of the process so removed the frunk module. Removal of the frunk is NOT necessary for fog lamp install. You can reach them easily through the wheel well.

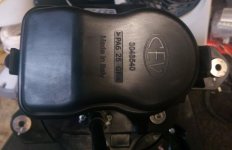
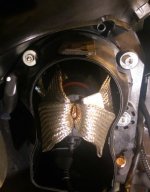
I cannot vouch yet for longevity but the units seem VERY well made. Quality components throughout. Phillips LEDs, high quality connectors and well packaged. Below are a few photos of the install process and the results. Please feel free to ask any questions and either I or Steve will be glad to answer (He is awaiting me to post this review).

First a photo of the lamps as recieved from XenonDepot. Well packaged and in perfect condition.
attachment.php
 

Attachments

  • IMAG1369.jpg
    IMAG1369.jpg
    40.9 KB · Views: 2,317
Last edited:
Next a quick BEFORE pic of the RT with the old halogen lamps still installed. Note the yellow color of the head and fog lamps compared to the fender tips and the LED daytime running lamps on the A arms.
attachment.php


Next here is the XenonDepot 9005 replacement lamp installed in the headlamp housing.
attachment.php


And the headlamp with the cover re-installed. Note that this cover is important as it keeps the dirt and moisture out of the lens housing while the bike is in use.
attachment.php


Here is the Xenon Depot H11 replacement lamp installed in the Fog housing. Again, this pic is taken with the frunk removed so I could take the pic, you can easily reach these above the a arms from behind the wheel.
attachment.php
 

Attachments

  • Before.jpg
    Before.jpg
    42.8 KB · Views: 2,392
  • Inside Headlamp.jpg
    Inside Headlamp.jpg
    53.3 KB · Views: 2,371
  • Headlamp with cover.jpg
    Headlamp with cover.jpg
    36.9 KB · Views: 2,352
  • Inside Fog Lamp.jpg
    Inside Fog Lamp.jpg
    36.9 KB · Views: 2,357
Now the pics everyone actually wants to see. The great results.

This pic shows Louise bike with the LED lamps on the left and my bike with the HID lamps on the right. The slight color difference between the two head lamp types is really there. My HIDs are now slightly warmer color temp than Louise's LEDs. Notice how her headlamps are nearly the same color as the LED daytime running lamps and fender tips. Mine are not a perfect match.
attachment.php


And here is two shots of the beam pattern at night. In these photos, the LED lamps are on the RIGHT and the HIDs are on the left. In real world observation, the LED light is just slightly more spread out than the HID and the HID seems just slightly brighter. The LED is MUCH brighter and whiter than the old halogens.
attachment.php

attachment.php


I have to say, these new lamps make a GREAT upgrade to the Spyder. They were easy to install and required NO cutting, drilling or wiring modifications to the Spyder to install. Nanny did not notice a thing. I will follow up in a few months with a longevity report but they are running cool and bright.

In summery, if you want to upgrade your Spyder RT to LED lamps, you need the XenonDepot 9005 lamps for the head lamps and the H11 kit for the fogs.

Here are links to the two kits:
http://www.xenondepot.com/9005-LED-headlight-kit-p/9005-led-hl.htm
http://www.xenondepot.com/H11-LED-headlight-kit-p/h11-led-hl.htm

Thanks Steve for the opportunity to try these!

Enjoy everyone.
 

Attachments

  • IMAG1378.jpg
    IMAG1378.jpg
    50.5 KB · Views: 2,166
  • IMAG1379.jpg
    IMAG1379.jpg
    21.1 KB · Views: 2,154
  • IMAG1380.jpg
    IMAG1380.jpg
    21.5 KB · Views: 2,152
Last edited:
JT,

Good review - thanks. Is a seperate ballast required, or is this simply a remove and replace of the OEM bulbs? I'll be interested to see the life expectancy! I went to the super bright halogen bulbs on my daughter's car and they burned out in months, so I've been reluctant to do so with my Spyder, since replacement is such a chore . . .
 
JT,

Good review - thanks. Is a separate ballast required, or is this simply a remove and replace of the OEM bulbs? I'll be interested to see the life expectancy! I went to the super bright halogen bulbs on my daughter's car and they burned out in months, so I've been reluctant to do so with my Spyder, since replacement is such a chore . . .


There is a small black box in line in the new connector. You can see it in the pic of the lamps in the box. Its smaller than the lamp itself, nothing like the ballasts that come with the HIDs. They were small enough to fit inside the lamp housing and still put the covers back on. These really are plug n play.
 
With the braided Heat Sink encased in the headlight housing does the housing/cover get warm?
 
The LEDs use less power than the halogens they replaced so the net change is LESS heat inside the housing. The heatsink is to disperse that heat away from the LED junction itself.

After the lamps being on for about an hour, the housings and rear caps were still cool to the touch.
 
Now the pics everyone actually wants to see. The great results.

This pic shows Louise bike with the LED lamps on the left and my bike with the HID lamps on the right. The slight color difference between the two head lamp types is really there. My HIDs are now slightly warmer color temp than Louise's LEDs. Notice how her headlamps are nearly the same color as the LED daytime running lamps and fender tips. Mine are not a perfect match.
attachment.php


And here is two shots of the beam pattern at night. In these photos, the LED lamps are on the RIGHT and the HIDs are on the left. In real world observation, the LED light is just slightly more spread out than the HID and the HID seems just slightly brighter. The LED is MUCH brighter and whiter than the old halogens.
attachment.php

attachment.php


I have to say, these new lamps make a GREAT upgrade to the Spyder. They were easy to install and required NO cutting, drilling or wiring modifications to the Spyder to install. Nanny did not notice a thing. I will follow up in a few months with a longevity report but they are running cool and bright.

In summery, if you want to upgrade your Spyder RT to LED lamps, you need the Xenon Depot 9005 lamps for the head lamps and the H11 kit for the fogs.

Thanks Steve for the opportunity to try these!

Enjoy everyone.

Where did you get your LED bar lights from?
Thanks
Reg
 
LED upgrade

GOOD Review...

Can these be installed in both headlights and fog lights on a 2014 RTS without removing the frunk??

Is the wiring "plug & play" or is there splicing and cutting required??

Approximate costs for the purchase of the light sets??

Headlights are something I've been wanting to upgrade and I've been watching and hoping for something in the LED market...In fact, I just talked to another VERY KNOWLEDGEABLE member about doing a headlight upgrade...

THANK YOU again for the GREAT post and the pictures...larryd
 
Thanks for the post jcthorne.

I just checked the site and see not only are they covered by a two year warranty but there's currently a 15% off coupon code posted on the site, which ends today.
 
GOOD Review...

Can these be installed in both headlights and fog lights on a 2014 RTS without removing the frunk??

Is the wiring "plug & play" or is there splicing and cutting required??

Approximate costs for the purchase of the light sets??

Headlights are something I've been wanting to upgrade and I've been watching and hoping for something in the LED market...In fact, I just talked to another VERY KNOWLEDGEABLE member about doing a headlight upgrade...

THANK YOU again for the GREAT post and the pictures...larryd


Yes, you can install both head lights and fog lights WITHOUT removal of the frunk. The fogs are easy, reachable from above the A-arms. The headlights requires removal of the trim around the headlights and the headlamps themselves to access the rear of the lamp assembly.

The wiring is actually plug n play. No cutting, splicing or revising connectors. No changes to the bike itself at all other than cutting one tywrap inside the lamp housing holding the factory wiring.

XenonDepot currently lists these lamps at $134.99 each set and they publish coupons and offers on this forum from time to time.
 
You have to remove the trunk on a 14 to replace the fog lights.


Why? I looked and can plainly see the rear cover of the fog light bulb. Will the rear cover for the bulb not come off with the trunk in place on the 14? Sure looks like it will. You do not need to remove the fog light housing itself, just the small black plastic rear cover.
 
I tried, the left side has something over the cover. I asked here on the site and the responses were I had to remove the frunk. It has something to do with the front radiator.
 
Last edited:
I believe if you pull the pins an inspection panel off (I think there is a bolt there IIRC) you can pull the top of the Fog light panel out enough to easily get to the bulbs on a 2014. I know you can on a 2013.


Do you have pictures of the low beam pattern? Highbeam is easy. Low beam is much harder to get right.


I will try and take a photo with the low beams tonight. Thought I had that photo. I did observe the pattern but must have missed taking the shot.

The high and low will look the same with a hard cut off line from the shutter mechanism removing the top part of the beam pattern Nothing else changes. On the Spyder the low beams are a shutter in front of the lamp to cut off the upper portion of the beam pattern, the lamp does not move nor change source.
 
I wish he would come out with sets for my '11RS,I would love to change the headlights and add foglights to it.
 
Back
Top