• There were many reasons for the change of the site software, the biggest was security. The age of the old software also meant no server updates for certain programs. There are many benefits to the new software, one of the biggest is the mobile functionality. Ill fix up some stuff in the coming days, we'll also try to get some of the old addons back or the data imported back into the site like the garage. To create a thread or to reply with a post is basically the same as it was in the prior software. The default style of the site is light colored, but i temporarily added a darker colored style, to change you can find a link at the bottom of the site.

Aftermarket fender lights/turn signals

MONK

New member
I just installed a set of TricLED fender lights/turn signals. (I removed the fenders to install. Not sure I'd go that route again.) I've got the lights on (what a difference) but I'm having some issues running the wire to the turn signals. If I route the little yellow wire along the A arm (so it's hidden as it should be), it doesn't reach the turn signal wires (to the mirror). It just doesn't. No way. It's about 6" short of being long enough although it would be better if the wire was another foot longer. I've watched every YouTube video I can find (there aren't many) and don't see how the wire is supposed to be run.

I put the bike back together as I don't have a garage/carport and it was getting dark but I'd like to pick this up later this week and complete the job (although I'm not enthused about having to remove all that tupperware again). Some suggestions would be appreciated. BTW, while tugging on one of the LITTLE yellow wires, I broke it. Pulled it apart close to the wheel so I'll have to add wire to that anyway.

TIA

HAGO!
 
Monk...
I installed the TricLEDs on my ST-S back in March. I took off several side panels and mirrors, and fished a fairly sturdy wire thru the mirror openings down to an opening somewhere behind and below the frunk. I taped the yellow wire to the 'fishing line' and pulled it thru and then connected to the fender lights. Once I was certain everything was working, I zip-tied the yellow wire in a few spots including the A-arms, making sure to leave some slack for turning. I had about a foot or more left over on each side.
It's pretty thin gauge, so yeah, it does break easily!
Good luck,
Rap

P.s. PM me if you want to ask questions, but maybe easier to contact Reggie at TricLED...he was super-helpful to me!!!
 
When I did mine I replaced both the side & rear facing reflectors with light/turn signals.
I cut both of the wires from the lights and joined them to a single set of wires and ran them to the mirror keeping the paired connection under top reflector cap.
Soldered it & put some heat shrink over the connection.
 
I had enough wire when I put them on. They are bright and eye catching with the sequential motion. I also fished a heavy wire down and pulled up the small signal wire. Removing the wheel is the easiest way IMHO.

Lew L
 
I had enough wire when I put them on. They are bright and eye catching with the sequential motion. I also fished a heavy wire down and pulled up the small signal wire. Removing the wheel is the easiest way IMHO.

Lew L

Mine are the 1st gen so they're not sequential. They'll just flash (once I get them wired up). Depending on the weather, I might get a small folding gazebo and work on them this weekend. (The gazebo would cover whatever part of the bike I'm working on when it rains. Kinda sux not having a carport or garage.)
 
I too installed sequential front fender lights, mine had plenty of wire. I find it ironic that the manufacturer makes the main tie in down by the suspension waterproof with an AMP 1.5 Superseal, but everything else either isn't waterproof or either actually substandard (the T-Tap). I cut the turn signal wires, soldered in some single pin AMP Superseal connectors, and sealed/heat shrunk them in place. I will not use a T-Tap on anything. I've seen too many of them fail over time. I wish they had made all the connections water proof, seems like it wouldn't have cost that much more to do it.
 
I cut the turn signal wires, soldered in some single pin AMP Superseal connectors, and sealed/heat shrunk them in place

Please explain, sir. Preferably w/pics. I can't solder but I thought about making a new harness/bridge to add between the existing turn signal wires and the mirror. Not sure what parts to get, though. Looked like something I could do w/o soldering. Please tell me how wrong I am.
 
Please explain, sir. Preferably w/pics. I can't solder but I thought about making a new harness/bridge to add between the existing turn signal wires and the mirror. Not sure what parts to get, though. Looked like something I could do w/o soldering. Please tell me how wrong I am.

You could make a harness with the OEM style waterproof connectors (which I have seen referenced as AMP Superseal 1.5). That's the ones you disconnect to remove the mirrors. But then you'd have to make the harness long enough to reach outside to the mirror, and I didn't fancy having all the extra harness behind the headlight bucket. My case may be a little different than yours, I had the Frunk off along with all the headlight buckets and such as I was doing a complete lighting upgrade, so running my wiring may have been much easier than otherwise. In this case, the hot side of the turn signal was wide open in the headlight bucket, so I could get to it and really make a good job of it. But anything is better than the little T connector that is supplied.
 
Please explain, sir. Preferably w/pics. I can't solder but I thought about making a new harness/bridge to add between the existing turn signal wires and the mirror. Not sure what parts to get, though. Looked like something I could do w/o soldering. Please tell me how wrong I am.

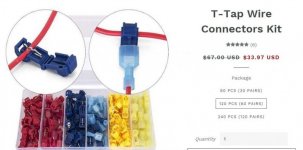
don't have to cut...……… I found "T-taps" really good for tapping onto wiresCapture.jpg
 
Capture1.jpg

here is example of connector that has solder right in itself. different sizes, push wires in each side, heat with torch or heat gun, melts solder, and seals up to with special sealant
 
View attachment 181251

here is example of connector that has solder right in itself. different sizes, push wires in each side, heat with torch or heat gun, melts solder, and seals up to with special sealant
:thumbup: used before on different bike , np connected well & couple years or so later was changing to something else. Removal was fairly easy too, simply use a straight edge razor remove insulation at joint & heat the solder while pulling wires apart. Wire comes out tinned at exposed end. Handy when making second connection. Have also tried the T taps mentioned earlier & quite useful when not splicing but adding. Advise finding some that have double “teeth” for better connections without making wire too weak. The spade end helps greatly if you accidentally ran tap wire through non optimal route. *note* the limited space to work with in the mirror housing did bind & break wire on one mirror from my gen 1 lights installed by Tricled (broke where the mirror meets the body)
 
Last edited:
Back
Top