I decided to add a power port to the left panel of the F3. Upon looking through the forum posts, I found a couple of reference to the addition, but no photos. Sooooo, for you that like to get in there and play with things here are some pics. It's really easy once you know what to look for.
Left Panel:

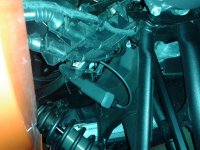
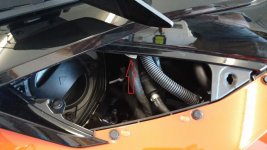
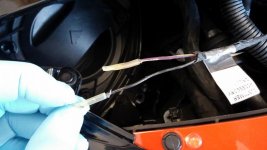
Opening the left panel, you will find several bundles of wires. As it turns out the bundle that I thought I was going to use, was not the correct bundle. In one of the forum posts I read a statement that there were three after market wire bundles for customer accessories and they were labeled for the Customer. When I opened the left panel and started looking around in earnest, I found the wire bundle I thought I was going to use, did not have any labels. The forum post I'd read stated Can Am did a pretty good job of hiding the bundle in the left panel so I got out my flashlight and had a look see. At the top of the panel, tucked, in under a wire bundle, I found the wires labeled for customer accessories. I've added a red arrow so they're easier to see.

This customer accessory wire bundle is wrapped in black clothe tape and tucked up nice and tight, zip tied in place to a larger wire bundle. I was able to pull one end of the wire bundle loose but had to cut a zip tie for full access. After getting the wires loose, I removed the black clothe tape with a utility knife, careful cost me a bandaged finger tip, exposing the wires.

I had ordered a Car, Boat, Motorcycle 12v USB outlet port off or Amazon. This is the one I ordered, but there are tons of them out there in differing configurations.
http://www.amazon.com/gp/product/B00W3W6AMU?psc=1&redirect=true&ref_=oh_aui_detailpage_o06_s00
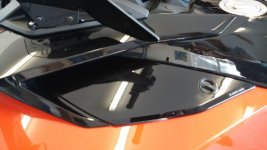
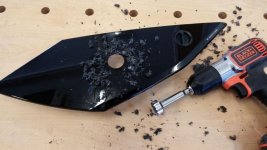
After finding the wires, mounting the outlet was simple. I marked the mounting location with a sharpie then drilled a 1-1/8" hole in the panel with a Forstner bit. BTW, I tested the fit of the hole on a piece of cardboard before I actually drilled the panel. Measure twice or something like that.

After cutting the hole, it was a simple matter to fit everything together and crimp the wire connecters on the wires. One bit of advice, look at the power port for the + and - . I looked at the posts, one brass and one silver. Having done some house wiring in the past, I naturally thought the hot wire went to the brass post and the neutral went to the silver post. I ended up wiring it backwards. I guess they don't adhere to the US wiring standards in China because when I actually looked at the power port, I found the silver post was labeled + . Of course the power port didn't come with instructions, but what do you want for $10.00.
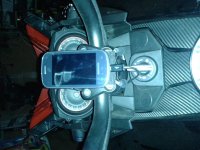
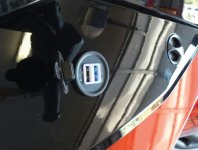
End result, it works just great. I started the engine, plugged my phone in and it started charging immediately.

Happy Camper :doorag: :spyder2:
Left Panel:
Opening the left panel, you will find several bundles of wires. As it turns out the bundle that I thought I was going to use, was not the correct bundle. In one of the forum posts I read a statement that there were three after market wire bundles for customer accessories and they were labeled for the Customer. When I opened the left panel and started looking around in earnest, I found the wire bundle I thought I was going to use, did not have any labels. The forum post I'd read stated Can Am did a pretty good job of hiding the bundle in the left panel so I got out my flashlight and had a look see. At the top of the panel, tucked, in under a wire bundle, I found the wires labeled for customer accessories. I've added a red arrow so they're easier to see.
This customer accessory wire bundle is wrapped in black clothe tape and tucked up nice and tight, zip tied in place to a larger wire bundle. I was able to pull one end of the wire bundle loose but had to cut a zip tie for full access. After getting the wires loose, I removed the black clothe tape with a utility knife, careful cost me a bandaged finger tip, exposing the wires.
I had ordered a Car, Boat, Motorcycle 12v USB outlet port off or Amazon. This is the one I ordered, but there are tons of them out there in differing configurations.
http://www.amazon.com/gp/product/B00W3W6AMU?psc=1&redirect=true&ref_=oh_aui_detailpage_o06_s00
After finding the wires, mounting the outlet was simple. I marked the mounting location with a sharpie then drilled a 1-1/8" hole in the panel with a Forstner bit. BTW, I tested the fit of the hole on a piece of cardboard before I actually drilled the panel. Measure twice or something like that.
After cutting the hole, it was a simple matter to fit everything together and crimp the wire connecters on the wires. One bit of advice, look at the power port for the + and - . I looked at the posts, one brass and one silver. Having done some house wiring in the past, I naturally thought the hot wire went to the brass post and the neutral went to the silver post. I ended up wiring it backwards. I guess they don't adhere to the US wiring standards in China because when I actually looked at the power port, I found the silver post was labeled + . Of course the power port didn't come with instructions, but what do you want for $10.00.
End result, it works just great. I started the engine, plugged my phone in and it started charging immediately.
Happy Camper :doorag: :spyder2:
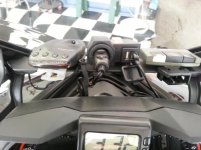


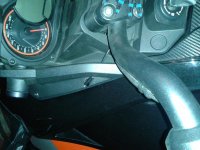
") Also what does the end product look like when it's fed up through the steering?
Also what does the end product look like when it's fed up through the steering?