• There were many reasons for the change of the site software, the biggest was security. The age of the old software also meant no server updates for certain programs. There are many benefits to the new software, one of the biggest is the mobile functionality. Ill fix up some stuff in the coming days, we'll also try to get some of the old addons back or the data imported back into the site like the garage. To create a thread or to reply with a post is basically the same as it was in the prior software. The default style of the site is light colored, but i temporarily added a darker colored style, to change you can find a link at the bottom of the site.

A Bit Of Housekeeping Today...

Bob Denman

New member
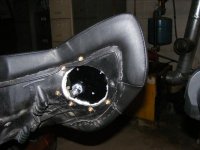
I had a fuel door mounted in my OEM seat by Mike (BLUEKNIGHT911) at SpyderFest. I knew that I wanted to change the mounting bolts, and we had some "issues", when orienting the door on the seat...
(My fault completely! :opps:)
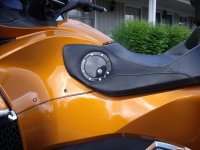
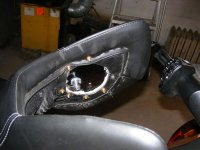
Anyway; we started out with this:

attachment.php


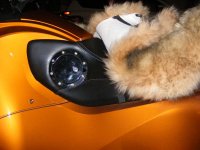
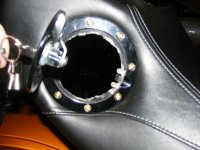
After about an hour of "Tinkering"; here's what I've got now:


attachment.php


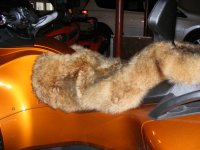
And with Rudolph in place:

attachment.php


And the BESTEST part: The Missus has given it her Seal of Approval! :yes::yes::yes:
 

Attachments

  • Gas Filler Door.jpg
    Gas Filler Door.jpg
    59.1 KB · Views: 486
  • DSCF2460.jpg
    DSCF2460.jpg
    56.3 KB · Views: 491
  • DSCF2459.jpg
    DSCF2459.jpg
    58.6 KB · Views: 477
:shocked: Oh! In the second picture of the door (The "After" shot...); it looks pretty wonky... :yikes:
That's just some really weird reflections: everything is clean and mean! :thumbup:
 
Bob would it be possible for you to post a picture from inside the seat? I have the same Fuel Door and planning to install it soon.
Thanks
Jim
 
:thumbup: Glad you took care of the missing bolt from first pic:clap::roflblack::roflblack::popcorn:
 
:D I knew that I needed some hardware for this little effort, so I hit the local Home Depot. To my amazement: they actually had Gold-Colored 2" 10-24 bolts! :yes: Naturally; I snapped them up! :thumbup:
Since I was rotating the door by one screw hole, I knew that I'd need to drill one hole for this job. :shocked:
Two of the bolts hold the hinge in place. By moving things around; I'd need a hole in a spot where the hinge had been... Mike had toid me to use a Red-Hot nail, and poke it through the seat! After I was done throwing up; I figured that he was right.
So with visions oi this:

attachment.php


This:

attachment.php


And even this:

attachment.php


I heated-up a proper sized screw to the right color, and dove in... :yikes: The smell of melting vinyl and foam was rather disturbing, but the bike, house, and Planet remained as they should be.
Mike used a Dremel tool when he removed the foam and vinyl from the inside of the seat. It was kind of like watching a New Year's Eve Party unfold: confetti was flying everywhere! :D
 

Attachments

  • SpyderFyre1.jpg
    SpyderFyre1.jpg
    58 KB · Views: 371
  • housefire.jpg
    housefire.jpg
    9.5 KB · Views: 366
  • BOOM.jpg
    BOOM.jpg
    34.1 KB · Views: 365
Here's a couple of more pictures from "the other side"... as well as what you see when the door is open. :D

attachment.php

attachment.php

attachment.php
 

Attachments

  • Fuel Door Inside 01.jpg
    Fuel Door Inside 01.jpg
    54.9 KB · Views: 362
  • Fuel Door Inside 02.jpg
    Fuel Door Inside 02.jpg
    58.3 KB · Views: 361
  • Fuel Door Open.jpg
    Fuel Door Open.jpg
    52.3 KB · Views: 359
Nicely done...

Congrats to you both..:2thumbs: looks great with the matching black and gold but gets lost under the animal hide....:roflblack:
 
:D When I bought it; I thought that I might ride home without pants... :ohyea:

The rest of the East Coast Posse, shot that plan down quickly! :banghead:
 
:clap: GREAT job!! :firstplace: :2thumbs:

Mike has reminded me that I still haven't put any glue over the exposed foam yet... :opps:
Once I complete that task; I promise to give it a coat of Black Paint, and make it look even better! :thumbup:
 
Back
Top