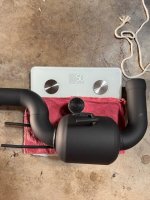
As promised by Ricky (RLS Exhaust), my RLS cat delete arrived today. When UPS updated its delivery ETA from 1:00-3:00 to 3:00-7:00, when work stopped at 4:30, I figured I'd at least get the bike jacked up while taking my time about it, since I never had before.
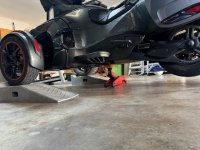
Front tires: super simple, just ride up onto the ramps. The right one slid just about an inch, but I was firmly on the flats of both, so I figured I was good. (My garage concrete is finished, so there was a little bit of tire squeal, but nothing too scary.) I DID remember to turn my Pedalbox OFF before trying any of this.
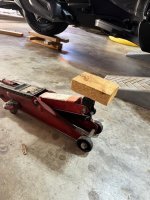
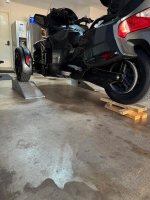
After surveying the clearance with just the front wheels on the low-profile ramps, I figured it would help to get the back up a bit. I don't have a fancy lift, just my trusty small floor jack. So I got a block of wood and put it as far back under the center frame as possible (as shown) and jacked it up. To the newbies like me, this is a little unnerving, as the jack seems way too far forward. But since all the engine is in front of it, it works, as you are still behind the balance point of the bike. There was a very, very slight shift in the front wheels as some of the weight was lifted from them, but the rear wheel came up as expected.
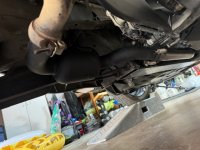
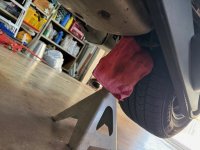
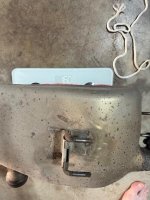
So then I put a jack stand under the rear shock mount, protected by a rag. (pic) However, after examining things, I realized the jack stand would probably block me from pulling the cat front tines out of their rubber grommets in the frame. So I replaced the jack stand with the wood stack as shown.
After getting the jack out from under the bike, I gave the whole thing a pretty good shake back and forth and forward and back; and I was comfortable I was safe under the bike now.
Then I sprayed some liquid wrench on the muffler clamp bolt and let that set for a bit. When it still wouldn't break loose with my short 13mm, I used the rubber mallet to help persuade it to break loose a bit, then the rest was easy. Once the clamp was loose enough to move to the muffler side of the pipe, a whack with my hand broke the joint loose. Then I used a rubber block in between the tail of the muffler and the bike to keep the joint between the cat and muffler open a bit.
Then the tricky part. I knew RLS was sending a spring puller tool, but I wanted to get this thing off. So I used some thin nylon rope and a large dowel I had to loop through the end of the springs, and then used a boat-cleat style wrap on the dowel to lock the rope around it. Then I tried just simply pulling the spring off the hook. I think a stronger, younger man could have done it, but I could not one handed. However, I quickly figured out that I could wrap up enough rope slack and find something on the bike to wedge one end of the dowel against, and then I could use the dowel as a pry bar to pull the spring. Viola! All three springs removed quite easily.
Then a little 'heel of the palm' to the cat, forcing it straight towards the back wheel, while pulling down a bit, and the top prong pulled loose. Similar for the bottom prongs, and tada! The cat was out!
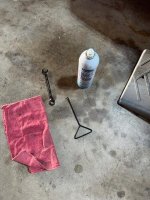
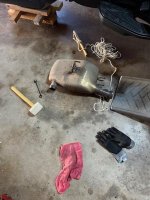
The next pic is of all the tools I used for the removal.
I wanted to see how much weight savings I would have, so I weighed it. 16.0 lbs flat.
As I was headed upstairs to post this while waiting for UPS, the doorbell rang, and my new toy arrived! Right on time! One hour has elapsed so far, and I was going very deliberately and slowly.
Next post is the install...
Front tires: super simple, just ride up onto the ramps. The right one slid just about an inch, but I was firmly on the flats of both, so I figured I was good. (My garage concrete is finished, so there was a little bit of tire squeal, but nothing too scary.) I DID remember to turn my Pedalbox OFF before trying any of this.
After surveying the clearance with just the front wheels on the low-profile ramps, I figured it would help to get the back up a bit. I don't have a fancy lift, just my trusty small floor jack. So I got a block of wood and put it as far back under the center frame as possible (as shown) and jacked it up. To the newbies like me, this is a little unnerving, as the jack seems way too far forward. But since all the engine is in front of it, it works, as you are still behind the balance point of the bike. There was a very, very slight shift in the front wheels as some of the weight was lifted from them, but the rear wheel came up as expected.
So then I put a jack stand under the rear shock mount, protected by a rag. (pic) However, after examining things, I realized the jack stand would probably block me from pulling the cat front tines out of their rubber grommets in the frame. So I replaced the jack stand with the wood stack as shown.
After getting the jack out from under the bike, I gave the whole thing a pretty good shake back and forth and forward and back; and I was comfortable I was safe under the bike now.
Then I sprayed some liquid wrench on the muffler clamp bolt and let that set for a bit. When it still wouldn't break loose with my short 13mm, I used the rubber mallet to help persuade it to break loose a bit, then the rest was easy. Once the clamp was loose enough to move to the muffler side of the pipe, a whack with my hand broke the joint loose. Then I used a rubber block in between the tail of the muffler and the bike to keep the joint between the cat and muffler open a bit.
Then the tricky part. I knew RLS was sending a spring puller tool, but I wanted to get this thing off. So I used some thin nylon rope and a large dowel I had to loop through the end of the springs, and then used a boat-cleat style wrap on the dowel to lock the rope around it. Then I tried just simply pulling the spring off the hook. I think a stronger, younger man could have done it, but I could not one handed. However, I quickly figured out that I could wrap up enough rope slack and find something on the bike to wedge one end of the dowel against, and then I could use the dowel as a pry bar to pull the spring. Viola! All three springs removed quite easily.
Then a little 'heel of the palm' to the cat, forcing it straight towards the back wheel, while pulling down a bit, and the top prong pulled loose. Similar for the bottom prongs, and tada! The cat was out!
The next pic is of all the tools I used for the removal.
I wanted to see how much weight savings I would have, so I weighed it. 16.0 lbs flat.
As I was headed upstairs to post this while waiting for UPS, the doorbell rang, and my new toy arrived! Right on time! One hour has elapsed so far, and I was going very deliberately and slowly.
Next post is the install...
Attachments
Last edited by a moderator: