• There were many reasons for the change of the site software, the biggest was security. The age of the old software also meant no server updates for certain programs. There are many benefits to the new software, one of the biggest is the mobile functionality. Ill fix up some stuff in the coming days, we'll also try to get some of the old addons back or the data imported back into the site like the garage. To create a thread or to reply with a post is basically the same as it was in the prior software. The default style of the site is light colored, but i temporarily added a darker colored style, to change you can find a link at the bottom of the site.

headlights adjustment

900Dave

New member
I rode at night yesterday eveening and it seems people are not very happy with me. I feel my low beams are more like a high beam and my high beam, well I was lighting up the tops of the tree's. I did have a passenger.

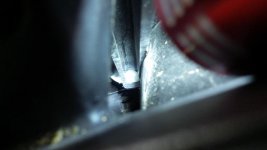
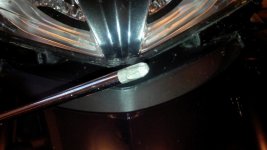
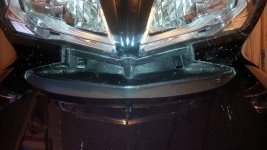
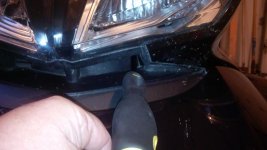
I read the manual on how to set up and aim the headlights. Question is I cannot see the headlight adjustment screws on my ST that they are talking about. Do I have to remove plastic to see them?
 
Yes you have to take the panel n the left side to adjust the lights. At lease on my 2010RTL. I have a 2014 RTL. hadn't check on the adjustment for it but I wouldnthey would have moved it.' It is the Panel that has cam am on it under the handle bars.
 
Let's see..!!

The ST may have the same set up as the RSS, RS and you will find a small hole under each light on the faring. You cannot see the screw but a long blade phillps screwdriver will fit in and you can adjust them. If you ryde double up most the time make sure you have weight on the seat while adjusting. I am usually alone working on bikes so I use cement bags...:roflblack::roflblack: new meaning for dead weight...:roflblack:
 
Mine was exactly like that. It takes a #4 Phillips screwdriver minimum 8 inches long. Good luck finding one, not a common size. After a bunch of searching my local NAPA dealer got me one overnight at a reasonable cost. The reason it is important to get the right size is the screwdriver is that it fits in the hole and meshes with the adjusting gear. The adjustment gear is located in the vent under the light.

Sorry the the white plastic gear is blurred. But you can see clearly the slot that the screwdriver follows to mesh with the gear.
attachment.php
 

Attachments

  • IMG_00000082.jpg
    IMG_00000082.jpg
    23.4 KB · Views: 432
Mine was exactly like that. It takes a #4 Phillips screwdriver minimum 8 inches long. Good luck finding one, not a common size. After a bunch of searching my local NAPA dealer got me one overnight at a reasonable cost. The reason it is important to get the right size is the screwdriver is that it fits in the hole and meshes with the adjusting gear. The adjustment gear is located in the vent under the light.

Sorry the the white plastic gear is blurred. But you can see clearly the slot that the screwdriver follows to mesh with the gear.
attachment.php

I could see the gears but was looking for a screw driver slot to turn them. I have the wall marked already and we just got back from a ride and with both of us on the Spyder when we pulled in the garage the light was about 8 to 10 inches above the high point.

No wonder I got the one finger salute from the guy in front of me last night.
 
Last edited:
Also need help...

I'm currently riding 2014 STS... I'm also having trouble adjusting the headlights...
Here in Australia the low beam is located where the US fog lights are fitted... these present no problem to adjust, as mentioned above with a long phillips screwdriver...
Same as my old 2008 GS, it was simple to adjust both high & low beams....

However adjusting high beam on the STS, being the upper lights is a different story ...(they are presently looking for possums in the treetops) :yikes:
The owners manual shows the adjustment screws to be just below the headlights in an area above the frunk latch....
There is a small black panel there that I have tried to remove, it appears to be held in place with two small hex screws to gain access to the area indicated in the manual,, but there seams to be something else holding it in place...
Or do I need to remove all the side panels (including the mirrors ect) to gain access to these adjustment screws... :banghead:

Why dose BRP make a simple task, into a engineering nightmare...:dontknow:

All advice appreciated ..... Col..

I believe there is no difference between my 2013 and your 2014 in this area. No panels need to be removed or harmed in the adjustment of the headlights. :joke: To access the adjuster gears is through the vents below the headlights, above the trunk. If you look in the vent and up at the bottom of the headlight you will see the channel the guides the screwdriver into the hole that adjusts the vertical aim. See picture in previous post. You will need a #4 Phillips screwdriver with a shaft longer than 200 mm.

#4 Phillips
attachment.php


Screwdriver length
attachment.php

Vents under headlights
attachment.php

Screwdriver in adjuster
attachment.php
 

Attachments

  • Head 1.jpg
    Head 1.jpg
    36 KB · Views: 361
  • Head 2.jpg
    Head 2.jpg
    55.3 KB · Views: 356
  • Head 3.jpg
    Head 3.jpg
    53.5 KB · Views: 358
  • Head 4.jpg
    Head 4.jpg
    39.4 KB · Views: 357
Quote ;... I believe there is no difference between my 2013 and your 2014 in this area. No panels need to be removed or harmed in the adjustment of the headlights. :joke: To access the adjuster gears is through the vents below the headlights, above the trunk. If you look in the vent and up at the bottom of the headlight you will see the channel the guides the screwdriver into the hole that adjusts the vertical aim. See picture in previous post. You will need a #4 Phillips screwdriver with a shaft longer than 200 mm.

___________________________________________________________________

Thanks, billybovine, much appreciated.....:thumbup:

That clears that mystery....I was looking Phillips screw or a small bolt head of some sort ......not a gear wheel....

Ride Safe... Col..
 
I agree about the #4 phillips also. Most places only carry up to #3. So a #4 that long? I will do the same and call my local NAPA they also seem to be able to get what I need in a short amount of time.
 
I believe there is no difference between my 2013 and your 2014 in this area. No panels need to be removed or harmed in the adjustment of the headlights. :joke: To access the adjuster gears is through the vents below the headlights, above the trunk. If you look in the vent and up at the bottom of the headlight you will see the channel the guides the screwdriver into the hole that adjusts the vertical aim. See picture in previous post. You will need a #4 Phillips screwdriver with a shaft longer than 200 mm.

[/IMG]

...Thanks!!! Picked up #4 8" Phillips at Sears and it worked perfectly. ..
 
Back
Top