• There were many reasons for the change of the site software, the biggest was security. The age of the old software also meant no server updates for certain programs. There are many benefits to the new software, one of the biggest is the mobile functionality. Ill fix up some stuff in the coming days, we'll also try to get some of the old addons back or the data imported back into the site like the garage. To create a thread or to reply with a post is basically the same as it was in the prior software. The default style of the site is light colored, but i temporarily added a darker colored style, to change you can find a link at the bottom of the site.

How to Activate Cruise Control on Base RS

BonesDT

New member
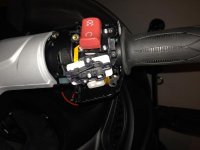
Wow! I was disassembling my right-hand controls to see how to fab a garage door opener where the cruise control is supposed to be & I found the cruise control electronics & buttons are all there. They basically replace the switch with a dummy switch and put a block off plate over it.

You can fab the "dummy switch" to turn it into a real switch:
IMG_0389.jpg

I tested it & it indeed works. The only caveat is the base-model black & white display does not give you any indicators whatsoever. I'll do a full write-up later. I'm still figuring out the best household items to make the switch 100% perfect.
 
Nice find! I wonder what the parts would cost to add the missing "switch" pieces?

Sent from my SCH-I545 using Tapatalk
 
ACTUALLY THIS IS NORMAL

Wow! I was disassembling my right-hand controls to see how to fab a garage door opener where the cruise control is supposed to be & I found the cruise control electronics & buttons are all there. They basically replace the switch with a dummy switch and put a block off plate over it.

You can fab the "dummy switch" to turn it into a real switch:
View attachment 90118

I tested it & it indeed works. The only caveat is the base-model black & white display does not give you any indicators whatsoever. I'll do a full write-up later. I'm still figuring out the best household items to make the switch 100% perfect.
This is even more prevalent in the RT......It is way less expensive for the manufactorer to say run the EXACT same wiring harness including all the connectors ....than it is put in separate & different harnesses........Take the HEATED PASS. GRIPS on the RT ....I think if I just buy the SWITCH and connect it ......the heat elements are already in the grips .......I could be wrong..... ...but maybe not :gaah:...Mikeguyver :thumbup:
 
Nice find! I wonder what the parts would cost to add the missing "switch" pieces?

Sent from my SCH-I545 using Tapatalk

Actually, from my brief review of the parts diagrams, it looks like the entire left and right control assemblies only come as full pieces and they cost $210 for RS (non-CC) and $400+ for RS-S (with CC). So be VERY careful in this mod process, you don't want to crack any of the small pieces.

It would be great to get separate parts. All you would need is the actual plastic switch cover that your finger touches. Even an OEM couldn't charge more than $10 for that. The internal part is modded easily with an exacto. You also need 2 tiny springs (my pen spring was a tad too big) and 2 ball bearings. I'll post pics later.


Sent from my iPhone using Tapatalk
 
That's It..!!

must be more involved. I know all the harnesses have connections for acc we don't have, but there are two ends to the deal. You have the switch side but what about the the sending side of the cruise...:dontknow::dontknow:
 
OK, here's the details. First, you have to disassemble the right handlebar controls:
1) Remove the tiny piece of rubber covering the "blank" where the cruise control switch is supposed to be. Not sure how to do it since mine fell off on it's own. I suppose you just pull on it.
2) Remove the silver Torx 10 bolt that was behind the rubber boot. You can now pry the plastic switch blank off of the white 2-sided tape. You will notice the clear plastic LED indicators are hidden under the double-sided tape, so all the LEDs for the Cruise Control system are intact too!

DISCLAIMER: I have a 2014 RS. I can not vouch for the earlier years. If you do not see the dummy switch inside that looks like the below picture after you remove the Blank, then you might not want to proceed further.

3) Remove the four black bolts in the rear of the assembly with a Hex/Allen #3 wrench. The middle interior bolt goes into metal and is important in that it prevents the entire assembly from rotating with the throttle, so the factory used some loctite, so when all is done, it's probably a good idea to reapply loctite.
4) After removing the rear black plastic cover, you will see two gold bolts w/ washers. Removed those with a Hex #3. This separates the front assembly from the handlebar.
5) Looking into the interior of the front assembly, remove the five BLACK Torx 10 bolts. Do not remove the SILVER Torx 10 bolts, it is not necessary. There is also another Torx 8 bolt on the outside of the plastic shell which needs to be removed. After removing all of these, the front plastic cover will separate from the interior electric module.
6) Undo the three silver Torx 10 bolts that mount the black plastic dummy switch to the white rubber circuit board.

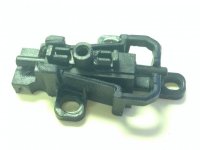
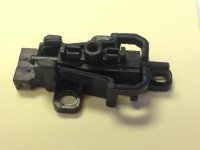
This is how the dummy switch assembly should look after removal:
Off.jpg

Now carefully pry each shaft end out of the base to separate the 2 pieces. Remember, be careful. From what I currently understand, you can not buy ANY of these components separately, they only sell you the entire handlebar assembly, which is over $200 for non-cruise & over $400 for cruise.

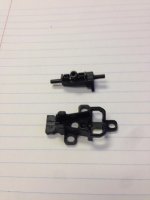
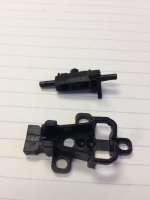
Here's what they look like separately. From what I can tell, only the top piece is slightly modified from the real cruise control switches in the RS-S+ models.
1.jpg2.jpg

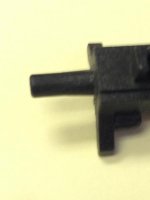
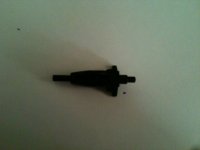
Now the major change by the factory is that they thickened the base part of the right shaft preventing the switch from being able to slide to the right to activate the cruise control. I was too excited when I started this project, so I don't have any before pictures of the dummy switch. All pictures I am showing you are after I shaved the shaft down. I used a box cutter and slowly shaved down the shaft. It's actually fairly easy to do. I don't normally have a ton of patience for these things, but I did take a few minutes to shave a little bit at a time. Too much and it's game over. Get it as smooth as possible so the switch glides and rotates easily in the base. Here's a close-up of my handy work:
Shaved.jpg

Now, when you put the dummy switch back in it's mount, it should freely slide left to right and when it's in the right-most position (cruise control activate), it should be able to rotate up and down for the Accel/Resume & Decel/Set buttons.

Cruise Control Off:
Off.jpg

Cruise Control On:
On.jpg
 
Last edited:
Now we're not done yet. We're missing some parts. First of all, let's understand how the electronics work. If you look at the white rubber pad back on the control assembly, the cruise control operates with three buttons in a triangle formation. The right two buttons are easy, and the switch assembly is now fully ready to click the Accel/Resume and Decel/Set buttons. The left button is the Cruise Control On button, but, contrary to common sense, it's not a touch-and-release-and-now-cruise-control-is-activated deal, I believe the button has to be held down for the entire duration that Cruise Control is on.

So if you look at the underneath of the dummy switch, you will see 2 holes. Now I have no idea what the OEM parts look like that are supposed to go in these holes, but I can guess there is some combination of springs and/or ball bearings. The left hole is for something to push down & hold down that On button - you will see a corresponding hole in the base as well as a little ramp to aid in the sliding back & forth. The right hole is for a spring'ed something to give the switch a nice click feel when you shift it left to right - you will see corresponding dimples in the base. The former is mandatory to get it operational, the latter is not mandatory, but you could risk a pot hole jostling your cruise control switch off since it lacks this clicking resistance.

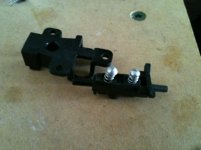
A pen spring was too thick, so I disassembled a standard door knob lock cylinder to steal it's springs & tumblers. They work nicely in theory, but the tumblers are a little too thin and jostle around the holes too much causing the switch to jam a little bit, but here's the idea:
Springs.jpg

Now it's not clear if you need a spring for the left hole "device". It does need a tad of give for it to run up on the ramp of the base, but I don't think relying on a spring is strong enough to hold the On button down, so I think a perfectly sized solid shaft with a nice round end is all you need. The longer tumbler I have here is a micro-meter too long. I'll try to file it down.

Once this is figured out, and I hope you guys can give me some ideas, everything can be put back together and you now have Cruise Control ... for free!!! Remember, there are no indicators on the base-model black & white instrument panel, so you'll have to remember/feel when your cruise control is set. Also, I have to figure out how to fab up a nice external switch, maybe by modifying the blank.

And, yes, I did test this on the road and it DOES work. I was able to accelerate by only clicking the cruise switch upwards and without touching the throttle. As soon as I tapped the brake, the engine braking was significant to indicate Cruise Control was no longer helping. Keep in mind, as in normal operation, you have to be going at least 25mph and possibly in a reasonable gear & rpm range.
 
Last edited:
I think you found the answer I have been looking for.
Is this a 2013, Fly by Wire throttle? From the pics it looks like it is.

Biggest question. It works in theory but have you been able to use the cruise on the road?
 
(It would HAVE to be; there was no electronic cruise control available on the prior model years...)
:congrats: on some very astute observations and findings! :clap: :firstplace:
 
I think you found the answer I have been looking for.
Is this a 2013, Fly by Wire throttle? From the pics it looks like it is.

Biggest question. It works in theory but have you been able to use the cruise on the road?

2014. I'm still learning about my byke, but I assume it's fly-by-wire. I editted to add, after Step 2, if you don't see the dummy switch, then things are different.

I made some edits and I did add that, yes, it works!

And, yes, I did test this on the road and it DOES work. I was able to accelerate by only clicking the cruise switch upwards and without touching the throttle. As soon as I tapped the brake, the engine braking was significant to indicate Cruise Control was no longer helping. Keep in mind, as in normal operation, you have to be going at least 25mph and possibly in a reasonable gear & rpm range.
 
Thank you! I have a base '13 ST. The dealers tell me that Cruise cannot be added unless I add over a thousand dollars in sensors etc. But they would be happy to trade me for one new bike that does have cruise.

My LCD display tells me that Cruise if "off". It looked easy enough to me, like everything was there except the switch. But I gave up and tried to add a throttle lock. Could not get one to fit. So I bought a Cramp Buster.

In trying to get the throttle lock to fit I removed the the right hand throttle switch. The lock tite was so strong that I destroyed the allen bolt that goes into the handle bar. Had to drill it out and use vise gripes once the switch was out of the way. It is a metric allen bolt that you can buy almost anywhere. Nothing special to it.

I tried to take the switch apart but could not get to the front side. I was afraid to remove the little black rubber piece on the dummy switch.

Now I will try to remove the rubber piece and see if my bike has the same switch gear as yours.

Thanks again!
 
DIY'ER

OK, here's the details. First, you have to disassemble the right handlebar controls:
1) Remove the tiny piece of rubber covering the "blank" where the cruise control switch is supposed to be. Not sure how to do it since mine fell off on it's own. I suppose you just pull on it.
2) Remove the silver Torx 10 bolt that was behind the rubber boot. You can now pry the plastic switch blank off of the white 2-sided tape. You will notice the clear plastic LED indicators are hidden under the double-sided tape, so all the LEDs for the Cruise Control system are intact too!

DISCLAIMER: I have a 2014 RS. I can not vouch for the earlier years. If you do not see the dummy switch inside that looks like the below picture after you remove the Blank, then you might not want to proceed further.

3) Remove the four black bolts in the rear of the assembly with a Hex/Allen #3 wrench. The middle interior bolt goes into metal and is important in that it prevents the entire assembly from rotating with the throttle, so the factory used some loctite, so when all is done, it's probably a good idea to reapply loctite.
4) After removing the rear black plastic cover, you will see two gold bolts w/ washers. Removed those with a Hex #3. This separates the front assembly from the handlebar.
5) Looking into the interior of the front assembly, remove the five BLACK Torx 10 bolts. Do not remove the SILVER Torx 10 bolts, it is not necessary. There is also another Torx 8 bolt on the outside of the plastic shell which needs to be removed. After removing all of these, the front plastic cover will separate from the interior electric module.
6) Undo the three silver Torx 10 bolts that mount the black plastic dummy switch to the white rubber circuit board.

This is how the dummy switch assembly should look after removal:
View attachment 90222

Now carefully pry each shaft end out of the base to separate the 2 pieces. Remember, be careful. From what I currently understand, you can not buy ANY of these components separately, they only sell you the entire handlebar assembly, which is over $200 for non-cruise & over $400 for cruise.

Here's what they look like separately. From what I can tell, only the top piece is slightly modified from the real cruise control switches in the RS-S+ models.
View attachment 90223View attachment 90224

Now the major change by the factory is that they thickened the base part of the right shaft preventing the switch from being able to slide to the right to activate the cruise control. I was too excited when I started this project, so I don't have any before pictures of the dummy switch. All pictures I am showing you are after I shaved the shaft down. I used a box cutter and slowly shaved down the shaft. It's actually fairly easy to do. I don't normally have a ton of patience for these things, but I did take a few minutes to shave a little bit at a time. Too much and it's game over. Get it as smooth as possible so the switch glides and rotates easily in the base. Here's a close-up of my handy work:
View attachment 90227

Now, when you put the dummy switch back in it's mount, it should freely slide left to right and when it's in the right-most position (cruise control activate), it should be able to rotate up and down for the Accel/Resume & Decel/Set buttons.

Cruise Control Off:
View attachment 90222

Cruise Control On:
View attachment 90228
You are my kind of Spyder Person :yes::yes::yes::yes::yes::yes::yes:.....someone who thinks out of the box and goes against common logic........Mikeguyver :thumbup:
 
Last edited:
Looks great just hope that the module they talk about is not something directly for the cruise.

Hope for the best good luck with it keep us posted

13 and 14 should be the same
 
Looks great just hope that the module they talk about is not something directly for the cruise.

Hope for the best good luck with it keep us posted

13 and 14 should be the same
I think he's saying the cruise works in his first post.
 
Just took mine apart. The tiny little black piece on the dummy button is just a piece of tape. It comes off very easy. I was afraid to take it off when trying add the throttle lock because I didn't want to mess up something that may make the switch waterproof.
Trust me, that little piece of tape would not matter.

The dummy switch is there. It works the water proof switch behind it. The three contacts are on the waterproof part are easy to see. Took some pics with my cell phone so will post later. The dummy switch has no electrical contacts in it. It just pushes the silicon on the waterproof part.
 
Last edited:
ImageUploadedByTapatalk1403220944.856951.jpgyou can see the shoulder on the right that needs to be removed. I started with a Dremel but finished with a small hand file.


Sent from my iPhone using Tapatalk
 
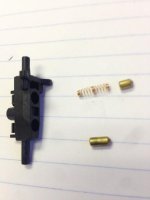
ImageUploadedByTapatalk1403221032.707045.jpgThis was my first attempt at the switch. If you look inside the holes you will see a little nipple in the center of the hole. It looks like it is there to center a spring.

The two little black ears to the right of springs in the pic are used to push the contacts for accel or decel. The switch pivots on the axle portion (the part you cut down) to accomplish this.
I found a little spring in an old mechanical pencil that was just about the right size. Found a second pencil and now I had two springs.

First attempt was with the center of a pop rivet, cut down to length. This is what shows in the pic. I thought it was a little too firm. I was afraid of breaking the switch.

I then tried a .177 bb. It was just a hair too big. Got it stuck in the hole. Used a hot straight pin to drill in from the back and pushed the bb out. Then I found a drill bit that was about .175 diameter and widened the holes.

To put it all back together. One spring and bb goes in the switch. It is the one to the right of the bike or the wider portion of the moving part. Push the back of the switch down until both axles click in. Now move the switch to the right position, wide side of switch. Second spring and bb can now go in from the back through the hole. Now push the switch to the left. It will trap the second bb. Reinstall on bike.

I cannot test drive the bike right now due to the pain killers from my knee surgery. Do NOT want to mix a narcotic and a bike.
Couple of days and the pain killer will be out of my system.


Sent from my iPhone using Tapatalk
 
Last edited:
Back
Top