• There were many reasons for the change of the site software, the biggest was security. The age of the old software also meant no server updates for certain programs. There are many benefits to the new software, one of the biggest is the mobile functionality. Ill fix up some stuff in the coming days, we'll also try to get some of the old addons back or the data imported back into the site like the garage. To create a thread or to reply with a post is basically the same as it was in the prior software. The default style of the site is light colored, but i temporarily added a darker colored style, to change you can find a link at the bottom of the site.

2012 RT-S SE5: Front Suspension

Yes, Habor Freight is where I got my coil spring compressor. I also has a motorcycle spring compresser. I used the car one as it it more beefier. Don't forget the zip ties. They keep the coil compressors ~180 degrees apart and from rotating around.

I'll have to wait to see what it costs to get aluminum spacers cut. PVC is workable; which way were you leaning? Also, what is your weight?

Jerry

I think I would go for aluminum. 220#

Regards,

Dan
 
I think I would go for aluminum. 220#

Regards,

Dan

Got it, I'll do a little math to see what 220# works out to be. Since I am a bit under 25%, you will be closer, so I still think the same size space would work.

Question - how do you like the Seal boards? Are they at the same foot height?

Jerry
 
Riding update 2.

I did a little more riding when the ground was dry and was able to push the riding envelope a little bit. Based on the previous riding, I thought I would be seeing about 900 lbs on the front, but it looks like it is more like 1100 lbs. This means the original PVC preload spacer was not going to be thick enough.

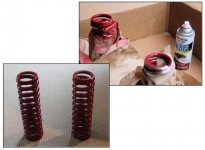
I set out to make a thicker spacer, but decided not to make it all out of PVC; not because it will not work, but because my fellow RT riders may not try this as they desire a metal spacer. So, I made the spacer out of 1 1/5" galvanized pipe with a pvc outer sleeve (the pvc pipe is for cosmetic purposes as the metal is more than strong enough to support the loads it will see).
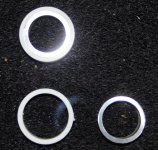
Pic 1 is what I brought home from Home depot. I went to the plumbing section and got the man there to cut two 1" spacers with their machine. I later checked them and found that they are slightly more than 1" (1.05").
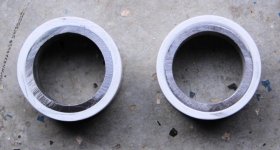
Pic 2 is after I sanded the metal ends and cut one PVC outer sleeve, then pushed the metal spacer into the pvc spacer (nice snug fit), then sanded the pvc ends flush with the metal.
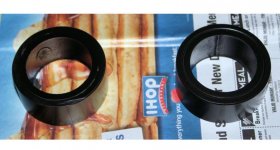
Pic 3 show both spacers complete
Pic 4 I cleaned the pvc outer to remove the bar code ink, then painted them black
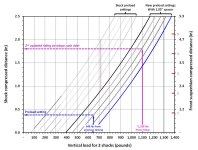
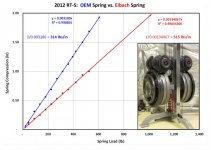
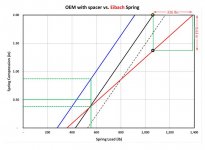
Pic 5 is the projected performance envelope. The initial sag is not where I'd like it to be, but I have to hedge on this side to preserve margin on the other end. It looks like for solo riding I'll use 15% (~0.38") of the 2.5" working range of the shock for the initial sag setting. 65% (1.62") of the shock will be used as I ride, and 20% (0.5") is my reserve. When I carry a passenger, I'll have to dial in my last 2 oem preload indents.

I'll use the ratchet technique to compress the spring this time as it really worked nicely on the rear spring. I'll post back how this all work and include a 3rd riding update.

Elka shocks are superior to be sure, but adding spacers gets the oem shock into a serviceable range and saves $$$'s for a corbin seat and possibly some floorboards. Plus, I will not be scraping the bottom of my frunk anymore. If you look at pic 5 on the right side, you will see I added the front suspension compression range. It is not exacly linear to the shock compression distance, but is very close to being a linear relationship, so I added it so you can see how low the front of the bike dips as the shock is compressed. For those of you that weigh over 200 and still ride on oem shocks (even with full preload), the bottom of your frunk is scrapping the asphalt some times.

Dan - if you are still interested, I can work up a patch of mixed metal and pvc spacers like mine (I'll pm you on what it would cost to include shipping). Of you can go down to HD to get the parts and do this yourself for about $15. After I get mine in, I'll be able to tell you what thickness you need to make them.

Jerry
 

Attachments

  • 50  gal pipe.jpg
    50 gal pipe.jpg
    61.9 KB · Views: 100
  • 51.  1st spacer made.jpg
    51. 1st spacer made.jpg
    68.6 KB · Views: 90
  • 52.  both spacers done.jpg
    52. both spacers done.jpg
    43.7 KB · Views: 102
  • 53.  painted spacers.jpg
    53. painted spacers.jpg
    43.2 KB · Views: 108
  • 55. corected new projected performance.jpg
    55. corected new projected performance.jpg
    67.6 KB · Views: 97
Last edited:
I was just reading this thread.
First I want to thank you for making me realize I'm not as smart as I thought I was.
What dia. galv. pipe and PVC?
how did it handle after you finished tweaking?
heavier rider or 2 up, shorter spacer??
Thanks for all your hard work.
BTW you can borrow a coil depressor and other tools from discount auto parts
Stefan
 
I'll post more info later this afternoon
 

Attachments

  • 1.  Can Am front shock.jpg
    1. Can Am front shock.jpg
    59.6 KB · Views: 99
  • 2.  Spring testing.jpg
    2. Spring testing.jpg
    51.6 KB · Views: 70
  • 3. springs preped.jpg
    3. springs preped.jpg
    51.7 KB · Views: 66
  • 4.  spring testing.jpg
    4. spring testing.jpg
    59.2 KB · Views: 52
  • 5.  spring margin.jpg
    5. spring margin.jpg
    43.5 KB · Views: 43
Thanks Drew. I wonder who might try this?

I have been riding for sever hundred miles on the spacers added to the oem shocks. The spacers set the sag correctly, but could still be made to bottom out without really trying. The springs needed to stiffer. While working on the GL650 swapping out the rear shock (it was not good) and had swapped it out for a FJ1200 rear shock. It turns out the rear FJ1200 shock spring was not stiff enough for the GL650. After interacting with the FJ1200 forum, they pointed me in the direction of the Eibach springs. It turns out they make a wide range of springs which got me to thinking; could they make a spring that could fit the Can Am Spyder.

So, I pulled and measured the oem spring. Mounted in the shock I had earlier assessed it had a 308 lbs/in spring. In testing the spring by itself, I could see the spring has a 314 lb/in rate. So I ordered the most stout spring they sell - a 550 lb/in spring - after verifying via the nylon disc that I was bottoming out. That meant I was seeing loads up to about 1,100 lbs along the shock axis. I got a pair of Eibach springs (1000.188.0550) on eBay for $116 including shipping.

1st pic: The disassembly and a comparison of the springs. You can see the Eibach (red spring) is much more stout than the oem spring.

2nd pic: A comparison between the springs after testing both. The Eibach is supposed to be a 550 lb/in spring, but my testing suggests it a tad over 515 lb/in.

3rd pic: Eibach springs are uniform width top to bottom, but the retainer cap on the oem shock required me to sand down the top edge a slight amount on the belt sander. It took about 20 minutes each spring. Then, I painted the spring where I had to remove the powder coating. It turns out I had an almost exact match in a rustoleum paint. If you look close, you can see in the upper pic, one of the springs has not been painted. IN the lower spring, both are painted. You cannot see the difference in the color of the paint and the powder coating.

4th pic: I have to fix this graph as I thought the shock had a 2" working rang, it has a 2.5" range. But, as it is, it shows the difference in the oem spring with all preload dialed in - you can see it is insufficient to set the preload correctly + the max load is well short of the loads I was seeing. SO I TELL YOU ALL RIDING ON OEM SPRINGS, YOU ARE BOTTOMING OUT A LOT. Just feel under your nose to feel the scratches. Adding the spacer helped things as far as setting the sag on the front end. But I still doesn't help you enough. The 550 lb/in Eibach spring appears to be just right. It sets the sag correctly and has a lot more max capacity.

5th pic: This shows how much margin the Eibach has over the oem spring.

6th pic: The Eibach spring on the oem shock, then mounted on the bike.

I rode the bike about 28 miles this evening, and it feels awesome. I'd didn't feel it bottom once; it also kept the bike from leaning as much in the turns + you could see it sits up a little higher.

I have to slip on a nylon disc and track how much of the suspension I end up using with the new spring. I'll report back after I accumulate a few hundred miles. I will try to get to the rear shock this coming weekend. I will look into other options. At a minimum, I will put on a set of Eibach springs on the rear too. They may springs that range up up to 1,400 lbs/in.

Jerry
 
How are things going with this Jerry? I cant believe more people havent done this!

With the eibach springs I'm wondering where you are running the preloaded adjuster at on your RT.

I'm running stock 12'RT shocks on my RS with the preloaded at the 4th notch. It works fine i guess. However, i would like it to be a bit stiffer for cornering, especially 2 up (I've already done a sway bar). When i go to the 5th notch the cornering improves to where I like it, but it just becomes harsh for normal bumps. Wondering if running the eibachs at lower preload would result in an initial softer/smoother ride but still progressively stiffen at a better rate for cornering??
Thanks!

Drew,

The springs have worked out well. I am actually running with all preload spacing dialed in because the Eibach spring (the longest you can get are 10" length) is a bit shorter than oem length spring.

I suggest you get a 1/2" ID nylon washer and slip it on the shock shaft; cut the washer, add some tape around the washer like I posted then use a needle nose pliers to hold the washer to slip it past the spring and a finger to split the washer so it slips past the shock chrome shaft.

This washer should be in between the shock body and rubber bumper. The washer will hug the shaft and tell you what the sag and max load you are seeing on the shock as the washer will remain in the last position it was pushed to by the shock body as the shock compresses.

You need to do this because you are not going to believe what I'm going to tell you. The harshness you experience is the shock bottoming out. You will experience this even though you are using all of the preload (5th). If you look at the length between indents, you can see it isn't much, small fraction of an inch. The spring is about 315 lb/in, so a 0.07 indent step is less than 22 lbs.

Once you get the nylon washer on, you can see after a ride, the rubber bumper is pushed all the way up and the washer is right behind it! I added a spacer of about .7" + used the 4th indent and was still bottoming out. I later used the 5th indent - same results. I was very surprised as I only weigh 205. I am convinced that is why everyone's nose is scraping on the bottom.

So, even though the Eibach are much stiffer than oem, they are like riding on air because I don't bottom out. I'm just riding on coil springs,

Jerry.
 
So I ordered the bajaron sway bar, will be installing that as soon as I get it. I am very interested in this as well as it most likely will improve my ride? I weigh about 150lbs, sometimes 160 lbs (yikes, don't like that but what can I say).....when I hit a pot hole, or speed bump (we have these by the loads here, so I do miss them occasionally because they are not painted (the speed bumps) but pot holes are sometimes hard to avoid. My RT does this "click clack" sound in the rear, it was just checked out at the agency and they say nothing is wrong, but I suspect I am bottoming out the rear shock. I want to fix this. I also want to improve my ride however I can, and economically if possible. I am very interested in your aluminum guys, and also springs if need be. I do not ride up double hardly ever......I do not have the air compressor, I ride with my shock at around 50 pounds......Thanks, you are way smarter than I am....I get the gist of this, but not all of it. :shocked:
 
Jerry,could you tell what the part number is for the springs you ordered?

never mind I found it.
 
Last edited:
The first thing you need to do is get the nylon washers on the shocks so you see how much of the suspension you are using. The washers will cost you about $1 from Lowe's or possibly Home Depot. I'll take some pics this weekend if you do not know what I'm talking about.

Jerry
 
Back
Top