• There were many reasons for the change of the site software, the biggest was security. The age of the old software also meant no server updates for certain programs. There are many benefits to the new software, one of the biggest is the mobile functionality. Ill fix up some stuff in the coming days, we'll also try to get some of the old addons back or the data imported back into the site like the garage. To create a thread or to reply with a post is basically the same as it was in the prior software. The default style of the site is light colored, but i temporarily added a darker colored style, to change you can find a link at the bottom of the site.

2012 RT-S SE5: Front Suspension

spacetiger

New member
Jim has a separate thread going on with his suspension (http://www.spyderlovers.com/forums/showthread.php?60434-RT-Weight-distribution). Rather than gum up that thread, I'll post my activities (similar subject) here and link my efforts back to his.

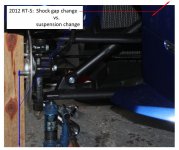
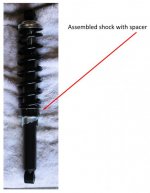
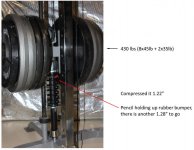
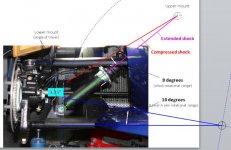
For me, I am gathering information to see how I want to modify my suspension (if any). I have already replaced the swaybar to a thicker (stiffer) one. It has done wonders to handle turns and keeping you flat. That leaves the shocks to be looked at. In this first posting, I am putting up the results of bench testing the front right shock to determine the K value of the front spring. Having removed the shock, I placed it in some gym equipment to allow me to add 45 and 35 lb plates, 1 at a time, while measuring how much the shock compresses. I was able to put 430 lbs on but found it was not sufficient to compress the shock. (Pic 1)

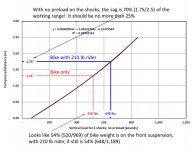
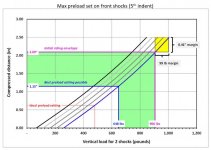
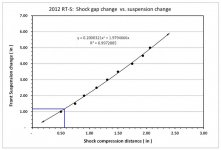
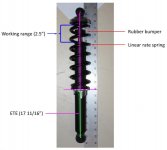
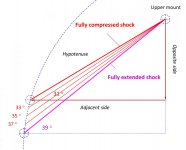
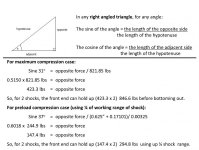
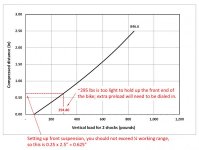
Based on the data, I can plot the data and use a linear curve fit to determine the spring rate (pic 3). It turned out to be just under 308 lbs/in. With a working range of 2.5 inches and a preload amount of 50 lbs, the max load per shock before bottoming out is ~821 lbs. So, with 2 shocks, it is 1642 lbs. But, the shock is mounted at an angle, so that has to be accounted for. I'll work that out later tonight.

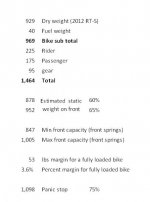
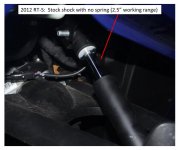
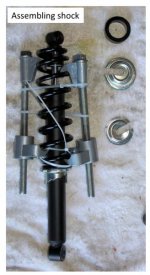
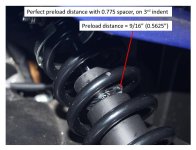
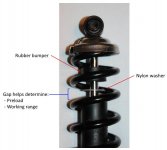
Basic shock info (pic 2):
ETE length (measured, inches): 17 11/16 or 17.688"
Working range (measured, inches): 2.50"


Jerry
 

Attachments

  • spring compressed.jpg
    spring compressed.jpg
    51.5 KB · Views: 308
  • Front Spring.jpg
    Front Spring.jpg
    50.1 KB · Views: 212
  • front shock corrected.jpg
    front shock corrected.jpg
    30.1 KB · Views: 284
Last edited:
shock geometry

Based on the shock data, I was able to take a pic of the front end of the bike and layout the working range of the shock (pic 4).

When the shock compresses to the rubber bumper, the Eye To Eye (ETE) distance is depicted by the red line. If there was no rubber bumper, the shock could compress more (~0.5") and would look like the dashed brown line. You can see the difference in vertical movement of the wheel. With the rubber bumper in place, the working range of the front wheel is 4.55". If the rubber bumper was not there, you would get 5.9" (the factory advertised range).

When the shock compresses and rotates about the upper mounting point, it rotates 13 degrees.

When Home Depot opens tomorrow, I will get the plastic washers and mount them in the shock to track how much of the shock working range I use. I'll post that up tomorrow. Happy Thanksgiving to all.

Jerry

Edit:I was relooking at the bike and realized the lower shock bolts does not bolt to the axle assembly (so it moves up and down) but bolts to the lower A arm. This means as the lower A arm rotates up, it also swings the lower shock mount through an arch. In correcting the geometry for the shock, I find the shock swings through a smaller angular range and the front wheel vertical movement is only 3.25" (pic 5).
 

Attachments

  • corrected shock geometry.jpg
    corrected shock geometry.jpg
    52.2 KB · Views: 320
Last edited:
More math

I spent a few hours on the computer cranking out the working range of the shock spring, here is where I stand.

1. Working through the range of movement of the shock, I can determine the angle the shock under different loading conditions (pic 6).

2. Once I know the angles, I can break down the angular components of the loading into horizontal and vertical components.the load the shock spring is under and more importantly can identify the load in the vertical axis. (pic 7)

3. plotting out the range of vertical loads versus range of shock compression, I can can start to set up a system to help dial in the front spring rate needed. I have chosen the 2 variables to use are distance shock compression and vertical loading because they are measurable (shock compression distance) and intuitive (load of the bike, people, gear). Here is the basic plot of the what the front 2 shocks can carry with no extra preload adjustments (pic 8). You can see the max load capacity of both front shocks in the vertical axis is 846.6 lbs and the 1/4 preload point is 294.8 lbs. Since the bike weighs well over 1,000 and I, with gear, is another 225, I will not be able to go with no extra preload dialed in. I will need rotate the shock preload to increase the load on the spring so it can carry more weight.

4. This plot (pic 9) shows how the spring increases in load capacity through the different indents. Each indent decreases the spring about 2/16" and helps it but is it enough? It looks like I will need to dial in at lease 4, maybe 5 indents to set the preload correctly. Even so, with the max preload dialed in, it would appear the max load the springs can carry are ~1,005 lbs. If I rode 2 up, I could see the bike getting up to 1,500-1,600 pounds. I'm not sure the stock spring will be stiff enough.

5. This is a pic of the nylon washer I cut then slipped on the shock shaft (pic 10). The washer is on the shaft stiff enough (once I added some electrical tape to make the center diameter a tad smaller than the shaft diameter) on the shaft to hold the last position it was pushed up to. This happens when the shock compresses. The rubber bumper will be above the washer. I can easily reset the washer by pushing down on the rubber bumper. I will ride the bike wiht washers on on both end to see how much of the front suspension I am using. After collecting enough data, I will be able to see if the spring is stiff enough or if I will have to make some modifications (spacer or new spring).

I post a few pics tomorrow afer I get the shock back in and note what I see as I set the initial preload...

Noone has said anything, so I'm guessing everyone is following this thread?

Jerry
 

Attachments

  • 6. shock angles.jpg
    6. shock angles.jpg
    41.7 KB · Views: 123
  • 7. calulations.jpg
    7. calulations.jpg
    61.8 KB · Views: 122
  • 8. determining preload.jpg
    8. determining preload.jpg
    49.1 KB · Views: 113
  • 9. range of options.jpg
    9. range of options.jpg
    67.1 KB · Views: 120
  • 10. nylon washer.jpg
    10. nylon washer.jpg
    28.6 KB · Views: 179
I love it! I don't understand it all, with this old head-injured brain, but I do applaud your efforts. One thing I might point out as far as your assumptions are concerned...the weight that the shocks carry is not the entire 1,000 pounds of the Spyder (unloaded). There is significant unsprung weight for one thing. The front springs also do not carry the entire load...I'd estimate only 60-65% of the sprung weight. Those adjustments may bring your calculated spring capacities within bounds...as they seem to be in real life. I agree that the stock springs reuire significant preload, especially as performance is concerned, but I don't think the situation is quite as dire as your numbers would suggest. :)
 
Sorry if it didn't make this clear, I took into account the angle of the shock springs so I could determine the weight carried on front end. I think you are right about the front weight bias (60-65%) of the total weight of the Spyder.

So consider the weights (pic 11). A fully loaded bike could easily reach 1,464 lbs. If 65% of the [static] weight is on the front, that is 952 lbs on the front. With all the preload dialed in, the max capacity is 1,005 lbs. That's a 53 lb margin to handle the riding envelope. I would think the bike rides bottomed out 95% of the time under these conditions.

With the linked braking system, the bike does not nose dive much under hard braking. But, some weight transfer does occur, if it was only 75%, that would put almost 1,100 lbs on the front suspension when you are panic braking. That guarantees you overload the front suspension.

It may sound funny, but if you put stiffer springs up front, the ride would be much softer since you are riding on springs, not the hard rubber bumper. I'll be able to verify this later when I put the shock back in.

Jerry

Edit: Scotty, you are right, I have not accounted for the unsprung weight. I will try to account for this when I go back to clean up the post as I have a few other things I have to correct. That said, the work is showing the front suspension can really squat down.
 

Attachments

  • 11 weights.jpg
    11 weights.jpg
    22.9 KB · Views: 174
Last edited:
First preload check

Not too surprised at the results, the springs are weak and the front end is heavy...

Pic 1: Shock installed and fully extended (wheel off the ground); the rubber bumper is pushed against the shock body.

Pic 2: Bike set on ground, then jacked back up to fully extend the shock to see how far the rubber bumper has been pushed up by the weight of the bike alone. The bike alone pushed up the rubber bumper 1.31". I then set the bike back down and got on the bike. The rubber bumper was pushed further up for a new total of 1.75".

Pic 3: Graph of the initial test, you can see for 2 shocks (only accounting for the vertical spring force component) with no preload adjustment, the 1.31" compression indicates 520 lbs is being carried by the front end (54%). After I got on, the weight on the front end (based on the 1.75") was 648 lbs. But that too was only 54% of the weight.

Its clear I need lots of preload dialed in If I use these springs. After lunch I'll post the results of max preload dialed in.

Jerry
 

Attachments

  • 11.5  setting rubber bumper.jpg
    11.5 setting rubber bumper.jpg
    36.1 KB · Views: 139
  • 11.75 compression check.jpg
    11.75 compression check.jpg
    37.4 KB · Views: 149
  • 12. checking preload.jpg
    12. checking preload.jpg
    58 KB · Views: 125
Great job. Haven't had time to look it all over as I'm on my phone.

Just checking, but your taking into consideration that there are two shocks on the front? Dividing by 2 all considered equal?

Sent from my DROID BIONIC using Tapatalk
 
This is some GREAT stuff! :2thumbs:
If I read it about eleventeen more times; I might understand some of it; but it sure is interesting!! nojoke
 
Great job. Haven't had time to look it all over as I'm on my phone.

Just checking, but your taking into consideration that there are two shocks on the front? Dividing by 2 all considered equal?


Sent from my DROID BIONIC using Tapatalk

The analysis is based on a single shock then multiplied by 2. The final graph is set up to account for both shocks.


jerry
 
This is some GREAT stuff! :2thumbs:
If I read it about eleventeen more times; I might understand some of it; but it sure is interesting!! nojoke

i didn't explain everything so let me know if I need to clarify any thing. There are no dumb questions.

jerry
 
Thanks Jerry! :thumbup: Let me reduce the number of them to an acceptable level; then I'll hit you up for some explanations! :2thumbs:
 
Initial riding data

I have ridden about 55 miles since Sunday. Nothing pushing the envelope, just straight line riding for the most part; no hard panic stops and no faster than 65 mph. I weigh 208, with riding gear, I was 224. I also switched to max preload setting (5th indent)before riding, about 25 miles yesterday and 30 today.

I checked the spacers and see I am using 1 11/32" (1.34") above the initial sag measurement of 0.75". This means I maxed out somewhere on the ride at 2.09" (1.34 + .75). This likely came from the stops as both shocks indicated this gap distance between shock body and rubber bumper (sitting on the nylon washer). This isn't good because I was a solo rider with few things in the luggage compartments. When I plot the results on the graphs you can see the problem (pic 1). This pic shows:

1. Ideal preload setting: should only take up 25% of your suspension travel capacity. That should set it at 0.25 x 2.5" = 0.625"
2. The best preload setting I can get out of the stock shocks is using all preload adjustment as the weight on the front suspension is 648 lbs, drawing up the line and then over, I can see I am using 1.15" out of 2.5".
3. Riding the 55 miles then checking my gaps, I see I used 1 + 11/32" (1.34") on top off my initial sag measurement on 0.75"), or a total of 2.09 out of 2.5". Moving from the 2.09" Y axis, I draw a line till it hits the curved purple line, then draw a line straight down (actually I determined the equation of the purple line and mathematically determined what to graph). The line intersects the x-axis at just under 906 lbs.
4. The green area is my riding envelop
5. The yellow area depicts my margin; I have 0.41" of suspension travel left before bottoming out with equates to 99 lbs based on my spring testing data.

Based on this data, I am going to make a bold prediction... You know the highway weirdness in the handlebars that so many riders post about and our collective response is to not hold the handlebars so tight because thats the way this three wheel bike rides on the highway... I am going to say thats not right. I think the front suspension is bottoming out and many/most of us are riding on the rubber bumpers. I can see if I had another person + gear I would be fully compressing the spring easily and I am only 208 lbs.

For now, I am good if I am solo riding but will want to get some stiffer springs on the bike as there is insufficient margin in the stock design. I think if I can add at least a 0.5" spacer at the top of the spring, that would buy me 185 additional lbs of marg for a total of 284 lbs (185 +99). I'll check into this and report back.

Anyone who wants to check this out for themselves; go to Lowes or Home Depot and get a package of Nylon washers (4 for 92 cents) - see pic 2. Make sure they have a 0.5" inside diameter. Cut the washer and add some electrical tape to reduce the diameter of the inside hole. that way, the washer can hug the inside shaft of the shock. Twist the washer to spread the gap and, reaching past the spring, pop the washer on the shaft in between the shock body and rubber bumper. Then pull the rubber bumper down back against the shock body. Now, just ride like you normally do. Every once and a while, look to see how big the gap is. I use a small narrow piece of paper with a hash mark on one end. once the paper is behind the spring resting against the shock body, I mark where the bottom of the rubber bumper is, then pull out the paper and measure the gap with a ruler. I think many of you will be very surprised. For me when I pulled the shocks, one had the rubber bumper down around the shock body, the other had the rubber bumper jammed in at the top. I had to carefully dig it out... It was clearly jammed in there because the shock had bottomed out...

If anyone else checks, post back your results. I am willing to bet most of us are riding on little to no front suspension...

Jerry
 

Attachments

  • 13. initial riding results.jpg
    13. initial riding results.jpg
    57 KB · Views: 116
  • 12.5  washer.jpg
    12.5 washer.jpg
    40.7 KB · Views: 161
Last edited:
Adding a 0.75" spacer

A quick check on what I can expect if I add a 0.75" spacer to the top of the spring on each shock. Adding this spacer will shift the family of indent curves to the right as it increased the initial preload for each shock from 52 lbs to 52 lbs + 0.75 in x 308 lb/in, or 283 lbs. see pic 1.

with a new family of curves, I can select the 3rd indent and get just under the ideal preload setting using up 25% of the suspension travel (0.625"). The 3rd indent will correspond to 0.57" (23%) and leave 0.8" suspension travel for solo riding. I can add a passenger and probably not bottom out as there is lots of margin. If I added a heavy passenger, I still have 2 more levels of preload adjustability, based on the analysis, the passenger could be over 200 lbs and would still leave me good margin to keep from bottoming out.

I will work on getting a suitable spacer and building a rig to compress the shock. I will need something to help me compress the spring enough to fit the 0.75" spacer, so that would be a little over 300 lbs. I will not be able to muscle it down with my bear hands.

Jerry
 

Attachments

  • 14 with .75 spacer.jpg
    14 with .75 spacer.jpg
    78.6 KB · Views: 108
Update

I got a chance to work on the bike to get some spacers on and check the results... I'm spot on.

I disassembled the front shocks (pic 1)

Having the shock apart, I re-installed the shock in the bike minus the spring. Then, I raised the lower A-arm noting the shock gap and suspension change (pic 2-4). I was able to verify the spec suspension distance of about 6" vs 2.5" of shock travel. Based on this direct measurement, I will have to go back to my earlier drawing that indicated only about 3.25" of suspension travel. I have an error in the drawing somewhere. Pic4 shows how the suspension changes per shock compression. The blue line showed the final result of obtaining a 0.5625" preload spacing (front suspension changes ~1.2").

Making spacers. On my 2 wheeled bikes, I have used PVC piping to make preload spacers. The material is cheap and strong enough for the task. Jim is making a set of aluminum spacers that will look better than my PVC ones. I'll swap them out once they get here. I'll look into making them available if there is a demand for them. I used 1.5" PVC pipe with a fitting glued around the outside to make the it much thicker. Pic 5 depicts the 2 spacers (0.775" thick) on the bandsaw. I sanded them smooth on the ends and ended up with slightly thicker spacers.

Time to assemble the shocks with the spacer between the preload adjuster and spring centering washer (pic 6); note I painted the spacer black.

The assembled shock with spacer (pic 7), it looks like a roll of electrical tape.

All assembled with the preload dialed to the 3rd indent; I checked the spacing after I got on, then off the bike (pic 8), a perfect gap distance as it uses just under 25% of the shock working distance. The front end is not drooping anymore and I have a sufficient riding envelope with good margin for 2 up fully loaded riding without bottoming.

So, to set up the preload height on the front suspension takes a little work but I think it is well worth it. There are many options to do this, some buy $750+ shocks with stiffer springs, some buy a $190 upper shock mount relocating kit (some do both); now you know it can be done for $10 if you have the spring compression tool and go with PVC. If there is enough interest, I'll see what making spacers out of aluminum will run. I think keeping the front end up will help in a number of areas to include MPG improvement (I have to do a little more work to show this). I will look at the rear spring at a later date, perhaps mid summer next year.

As I ride, I'll post back what kind of results I'm getting.

Jerry
 

Attachments

  • 15.  disassembled shock.jpg
    15. disassembled shock.jpg
    53.3 KB · Views: 172
  • 16.  testing suspension range.jpg
    16. testing suspension range.jpg
    37.8 KB · Views: 187
  • 17. test suspension with no spring.jpg
    17. test suspension with no spring.jpg
    50.4 KB · Views: 177
  • 18. test results.jpg
    18. test results.jpg
    40.8 KB · Views: 109
  • 19.  pvc spacers.jpg
    19. pvc spacers.jpg
    51.4 KB · Views: 201
Last edited:
Remaining pics

Seems I can only post 5 pics at a time, here are the other pics
 

Attachments

  • 20 assembling shock.jpg
    20 assembling shock.jpg
    33.3 KB · Views: 191
  • 21.  assembled shock.jpg
    21. assembled shock.jpg
    27.1 KB · Views: 177
  • 22.  perfect preload spacing.jpg
    22. perfect preload spacing.jpg
    49.5 KB · Views: 191
Not sure I follow what this is about? Are you just trying to make the factory shocks work better/properly?


I don't have adjustable factory shocks so probably all different for me.....at least I don't think I do? LOL
 
So, to set up the preload height on the front suspension takes a little work but I think it is well worth it. There are many options to do this, some buy $750+ shocks with stiffer springs, some buy a $190 upper shock mount relocating kit (some do both); now you know it can be done for $10 if you have the spring compression tool and go with PVC. If there is enough interest, I'll see what making spacers out of aluminum will run. I think keeping the front end up will help in a number of areas to include MPG improvement (I have to do a little more work to show this). I will look at the rear spring at a later date, perhaps mid summer next year.

Jerry

Here's some interest. I don't have the disposable income for $750 shocks or $190 to relocate the upper shock mount. Now to find a spring compression tool. Harbor Freight?

Regards,

Dan
 
Not sure I follow what this is about? Are you just trying to make the factory shocks work better/properly?


I don't have adjustable factory shocks so probably all different for me.....at least I don't think I do? LOL

Snoopy,

I am trying to set up the front suspension like you do any 2 wheeled motorcycle. The first step is to set the preload so the suspension is holding up the motorcycle/rider but only using a set % of the working range. The rest is to hold the motorcycle in its riding envelope and leave you some margin. After you get the spring right, then comes damping (compression and rebounding).

What makes this a challenge, we have a 2 wheel set up and don't use a fork like our 2 wheel cousins. But, the theory is still the same, so , I have to characterize the Can Am suspension components. The data and technique is common to all Spyders.

For me, I am going to just get the spring right. I'm willing to live with the OEM damping since this is a touring ride. If I had a RS or ST, I might be interested in adjusting the damping. We have few options to fix weak springs. My effort shows it is possible to do this without buying expensive hardware.

Jerry
 
Last edited:
Here's some interest. I don't have the disposable income for $750 shocks or $190 to relocate the upper shock mount. Now to find a spring compression tool. Harbor Freight?

Regards,

Dan

Yes, Habor Freight is where I got my coil spring compressor. I also has a motorcycle spring compresser. I used the car one as it it more beefier. Don't forget the zip ties. They keep the coil compressors ~180 degrees apart and from rotating around.

I'll have to wait to see what it costs to get aluminum spacers cut. PVC is workable; which way were you leaning? Also, what is your weight?

Jerry
 
Back
Top