• There were many reasons for the change of the site software, the biggest was security. The age of the old software also meant no server updates for certain programs. There are many benefits to the new software, one of the biggest is the mobile functionality. Ill fix up some stuff in the coming days, we'll also try to get some of the old addons back or the data imported back into the site like the garage. To create a thread or to reply with a post is basically the same as it was in the prior software. The default style of the site is light colored, but i temporarily added a darker colored style, to change you can find a link at the bottom of the site.

Info about Doc Humphrey's Air Ryde Rock Guard

IdahoMtnSpyder

Active member
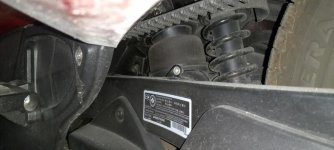
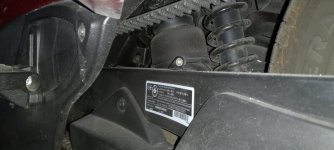
As most of you know by now Doc Humphreys has evaporated from the Spyder scene, and all his accessories have evaporated with him. One of his most beneficial accessories was his Air Ryde Rock Guard to protect the rear suspension air bag from getting rocks under it and wearing holes into the bag. Fortunately, based on my observation and installation of his guard about two years ago I am confident anyone who is somewhat technically proficient can duplicate it.

Two things you need to buy. Go to any good plumbing material retailer and purchase a rubber test cap for a 4" ABS drain, waste, and vent pipe. Toss the hose clamp from it into your "material resource pile for potential future projects"! Drill a 3/8" hole dead center in the end. Buy from a hardware store, or wherever you can, an 8 mm x 80 mm flange head bolt. You probably can use a hex bolt with a washer but I wouldn't guarantee it. You don't want a bolt too long because it goes into the bottom of the air bag and if it's too long I'm guessing you'll destroy the bag. Read Doc's cautions carefully.

Doc's installation instructions are here: https://roadsterrenovations.wordpress.com/air-ryde-rock-guard/. How long they will stay there is anyone's guess. His YouTube videos are all gone. Read his instructions closely, and then review my discussion about installing it here: https://www.spyderlovers.com/forums...allation-of-Doc-s-Air-Ryde-Rock-Armour-Part-1. Decide which route you would rather go, removing the catalytic converter as he instructs, or removing the rear tire like I did.

Following all these instructions should end up with your air bag well protected from gravel bits damaging it.

Have fun, and good luck!
 
Did mine back in '16. Went the remove cat route. Worked fine. Just take your time!!
 
Last edited by a moderator:
Some of my Iron Butt Rides (Pines to Palms, and others) actually require extensive gravel road sections so I did Doc Humphrey's Air Ryde Rock Armor on my '13 RTL, that coupled with Spyderpop's missing belt guard was all the insurance I needed for those long gravel sections, and i could ride those sections at speed as well.

Thanks IdahoMtnSpyder, I've already put the MBG on and will use your solution for the Air Ryde Rock Armor. By the way Doc Humphey's is well and innovating, though now over in the Facebook Electric Bikes forums. He even had some leftover product from his Spyder days.
 
Last edited:
First, I got the plastic belt guard, POC! Couldn't get it to fit w/o touching either the belt or the wheel. It came with double sided tape with which to attach it. Again, a POC. Finally I ordered the aluminum belt guard. Very sturdy well made and simple to install. It comes with three self-tapping metal screws and is predrilled for an easy installation. It's been on my ride for over 20k miles w/o any issues. By the way, you can have my unused flimsy plastic guard free of charge if you want.
 
First, I got the plastic belt guard, POC! Couldn't get it to fit w/o touching either the belt or the wheel. It came with double sided tape with which to attach it. Again, a POC. Finally I ordered the aluminum belt guard. Very sturdy well made and simple to install. It comes with three self-tapping metal screws and is predrilled for an easy installation. It's been on my ride for over 20k miles w/o any issues. By the way, you can have my unused flimsy plastic guard free of charge if you want.
Where did you get the aluminum belt guard from?
 
Where did you get the aluminum belt guard from?

Can't tell you Ernest it's a secret I guess. I searched and searched and had trouble locating this website. It's been a while and if I recall I got it through Inspector Gadget. But all Inspector Gadget web searches come up with the movie, not parts. But WALLA! I found it. This is as close as I could get. It's the first item on the list. https://www.spyderrt.info/u-do-it For $20, it's in the top ten of the 199 improvements that you could make for your spyder. Or should I say that BURP could have made for you? Good luck.
 
Can't tell you Ernest, it's a secret I guess. I searched and searched and had trouble locating this website. It's been a while and if I recall I got it through Inspector Gadget. But all Inspector Gadget web searches come up with the movie, not parts. But WALLA! I found it. This is as close as I could get. It's the first item on the list. https://www.spyderrt.info/u-do-it For $20, it's in the top ten of the 199 improvements that you could make for your Spyder. Or should I say that BURP could have made for you? Good luck.

At the web page https://www.spyderrt.info/u-do-it it lists the belt guard for $20 for a purchase, but it also has a link to copy a pattern to a pdf file so that you can make your own. In order to get instruction as to install it scroll down a little further for "5. Print out and follow the installation instructions found on the Products Page. ". Click on the Product Page and it will take you to https://www.spyderrt.info/can-am-rt-products. Scroll way down to the bottom and look for Installation instructions included and Here. . Click on Here and a file will be downloaded to your computer. The file is of the type "pages" so you will have to convert it into a readable file such as a pdf. I used https://cloudconvert.com/
 
Last edited by a moderator:
At the web page https://www.spyderrt.info/u-do-it it lists the belt guard for $20 for a purchase, but it also has a link to copy a pattern to a pdf file so that you can make your own. In order to get instruction as to install it scroll down a little further for "5. Print out and follow the installation instructions found on the Products Page. ". Click on the Product Page and it will take you to https://www.spyderrt.info/can-am-rt-products. Scroll way down to the bottom and look for Installation instructions included and Here. . Click on Here and a file will be downloaded to your computer. The file is of the type "pages" so you will have to convert it into a readable file such as a pdf. I used https://cloudconvert.com/

Hey, seeweed good work. I was going to mention that simply bending a piece of aluminum 90 degrees, and cutting it out would be a simple job. But, $20 these days will hardly buy a round of drinks. So, I just cut it short and bought the premade guard. By the way, once properly installed, there isn't a 1/2" distance between the guard plate on either side, tire, or belt. A little hand adjustment cured that issue. Nothing rubs after that.
 
Last edited by a moderator:
Unless I'm missing something, it say's cost of project $20.00 I read this to say that it can be made for $20.00

You can go here https://www.spyderrt.info/can-am-rt-products and scroll down to the bottom right and it is $55.00 + 10.00 shipping.

I agree <$20 to make it yourself or to purchase it is $55.00 + 10.00 shipping

Fair enough, if you value the time you spend making it at $0 (or less than $30/$40 anyway! ;) ) AND if you have the skills to do the job &/or nearby sources of the necessary materials.... :rolleyes: .... And/or if you really want something cheap & easy to practice/develop skills on for a bigger/more worthwhile job, of course! :thumbup:

I'm all for Doing it Yourself if the circumstances/costs warrant it, but I try not to be silly about it & waste my valuable time &/or resources on doing things that I really couldn't do as well in the (short?) time I'll hafta wait for them & the (usually small!) $ outlay it takes to buy & get them delivered!! :rolleyes:

ALWAYS consider your time as a valuable resource, and Work Smarter, not Harder! :lecturef_smilie:
 
Last edited:
I dont really care how long it takes for my DIY. I enjoy it, cant really put a price or that.

But... For bits and stuff I do look at whats available and the cost. Then, well can I fab that up? Horses for courses I guess.
 
I dont really care how long it takes for my DIY. I enjoy it, cant really put a price or that.

But... For bits and stuff I do look at whats available and the cost. Then, well can I fab that up? Horses for courses I guess.

I agree, now that I'm retired time is not so important but staying busy is.
 
Just finished replacing air spring on my 2013 RT SE5. Used the rubber 4" end cap( wish there was a 3 !/2" would be perfect) Did the complete job with just removing both side panels and above plastic. Removed shock bolt, jacked up frame till wheel was off the floor, removed belt, level linkage, upper and lower bolts. Was able to work the bag down to get the sleeve pushed in and released hose from fittting. When rehooking hose, just use needle nose pliers and carefully push hose back into fitting.
 
Just finished replacing air spring on my 2013 RT SE5. Used the rubber 4" end cap( wish there was a 3 !/2" would be perfect) Did the complete job with just removing both side panels and above plastic. Removed shock bolt, jacked up frame till wheel was off the floor, removed belt, level linkage, upper and lower bolts. Was able to work the bag down to get the sleeve pushed in and released hose from fittting. When rehooking hose, just use needle nose pliers and carefully push hose back into fitting.

I have done several caps under the air bag jobs...I always used the Fernco 3" caps...You just need to drill a hole in the center and get a little longer metric bolt...Fits VERY SNUG on the bag...larryd PS A 3" cap is about 3 1/2" ID...
 
I have done several caps under the air bag jobs...I always used the Fernco 3" caps...You just need to drill a hole in the center and get a little longer metric bolt...Fits VERY SNUG on the bag...larryd PS A 3" cap is about 3 1/2" ID...

Unfortunately the #" is too tight and if you look at the bag fully inflated and under weight, it will be mushrooming out over a 3" cap. It may eventially wear through the bag where it contacts the top of the cap.
 
Here's a picture of mine at rest with 65# of air in the bag and one with 220lbs of me on the seat. The fernco caps are cheap enough, if you're going to do this DIY get a 3" and a 4" and use the one you like best.
 

Attachments

  • 20220918_114757.jpg
    20220918_114757.jpg
    38.3 KB · Views: 45
  • 20220918_114722.jpg
    20220918_114722.jpg
    37.6 KB · Views: 44
Based on my experience, which I posted in the OP, I recommend the 4" test cap. The bag fit snugly into in it. In fact it fills the 4" cap. I released most of the air before squishing it into the cap, and then filled and released it a couple of times to get it to seat nicely in the cap.

If you haven't already I strongly suggest you read how I did it and described here: https://www.spyderlovers.com/forums...allation-of-Doc-s-Air-Ryde-Rock-Armour-Part-1
 
Back
Top