• There were many reasons for the change of the site software, the biggest was security. The age of the old software also meant no server updates for certain programs. There are many benefits to the new software, one of the biggest is the mobile functionality. Ill fix up some stuff in the coming days, we'll also try to get some of the old addons back or the data imported back into the site like the garage. To create a thread or to reply with a post is basically the same as it was in the prior software. The default style of the site is light colored, but i temporarily added a darker colored style, to change you can find a link at the bottom of the site.

HowTo: 2020 RT Panel removal

Jetfixer

Well-known member
So it all started when I got the GPS Harness for my 2020 RTL, and the instructions said to remove the side panels per the service manual. Well I have the service manual, and the side panel removal instructions are not there. Through trial and error, I figured it out. For any side panel removal you must start with the front service panel here: service panel.jpg
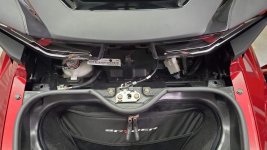
You need to squeeze the sides inward and then just give the front middle area a sharp tug, and this panel will pop out.

For either side panel, you must then pull out the side service access panel by simply tugging outward, they are only held on by clips, no screws. These are the black side panels. Open the drivers' seat and you will see where to pull.

To continue further, you must now remove the body colored panel at the lower aft sidewall. These panels are only held on by clips, no screws. Just get your fingers under part of it and pull outward.
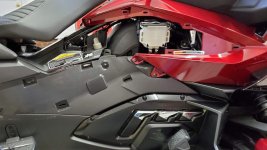
right side lower body panel.jpg rt side lower body panel aft.jpg The most important thing here, is that the panel needs to be swung outwards from the rear. There are two hooks that engage forward. Body panel hooks.jpg
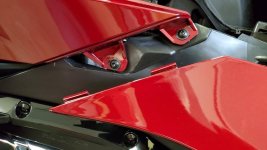
You will have to pivot the rear of this panel outward BEFORE these hooks will release, then the whole panel comes out.

Now you need to remove the forward body side panel. This involves removing 3 push pins from the frunk area, Front panel push pins.jpg
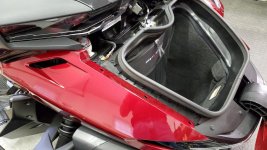
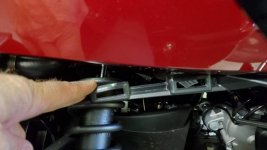
3 screws from the body panel, and then numerous clips. The strange part is that the front piece that hangs down by the radiators must be slotted out from between the black plastic parts. Before you try to remove this panel, you must first push inwards at the shock strut area to disengage two clips from the body panel. Front panel lower attach.jpg
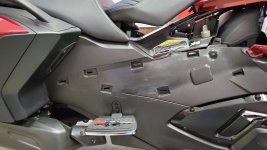
After that, you have to pull outwards from the upper areas around the center console, side panel at console.jpg and the rest of the upper area near the mirrors. These are just clips, no screws. This leaves you with the entire side opened up. right side.jpg
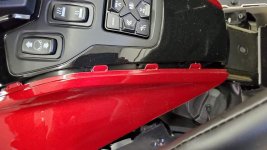
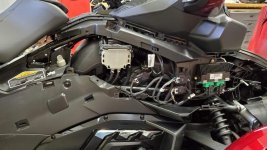
I found it is MUCH easier to access the center console area now than on the earlier model. I added a switch to the blank area of the console to control options. But thats another write-up! By the way, like many others here, the wiring for the GPS harness was incorrectly pinned on my bike. The right side "customer accessory connection" was wired backwards. After spending a couple of hours trying to unpin and redo the wiring, I gave up and cut and spliced the connector properly.
 
Last edited by a moderator:
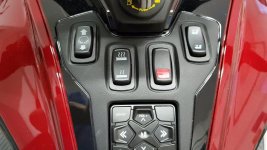
Please post a picture of the added switch and where you got it from. Also, once you take the side panels off a couple of more times, it's much easier. Wait till you take the back panels off!

Thanks.
 
Here's the switch in place. The middle position is "off" like the grip and seat heat switches. The rearward position is "on", and the forward position is "momentary". I use the "on" position to power my Sirius radio, and the "momentary" position for my homemade garage door opener. (I use a Homelink opener from a junkyard car! It's easy to make.) I've wired it so that the red led light is only on when the switch is in the on position. I picked up switched power from the front accessory power wires that were very well hidden near the battery. If you want this setup to be powered all the time, you just move the fuse from the F6 position to the F7 position in the right fuse box.

https://www.carlingtech.com/rocker-switches-l-series

switch.jpg
 
I am so waiting for a You Tube tutorial for panel removal. My first Spyder and is all foreign to me. I can easily see me breaking something that cost a fist full of $.
 
I am so waiting for a You Tube tutorial for panel removal. My first Spyder and is all foreign to me. I can easily see me breaking something that cost a fist full of $.

My 2020 is my third Spyder. I'm still queasy about removing a panel. No one I ride with has a Spyder. Hell, since I moved down here I have no one period. :roflblack: Tom :spyder:
 
Great post. Thanks!

Question:

Did you by any chance measure the cut-out opening?

I'm planning on putting a USB charging port into the blank, but haven't popped anything off yet. I'm still researching and have kind of back burnered it for other projects at the moment.
 
Great post. Thanks!

Question:

Did you by any chance measure the cut-out opening?

I'm planning on putting a USB charging port into the blank, but haven't popped anything off yet. I'm still researching and have kind of back burnered it for other projects at the moment.

L-Series rocker switch fits into industry standard mounting holes of 44.0mm x 22.0mm, which is 1.734" x .867".
 
Hey Jetfixer, the switch looks great. Do you mind posting some pics and information of the Sirius radio you installed. I have been thinking of adding one.
 
Hey Jetfixer, the switch looks great. Do you mind posting some pics and information of the Sirius radio you installed. I have been thinking of adding one.

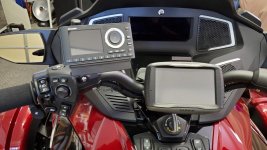
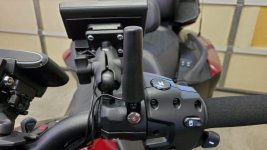
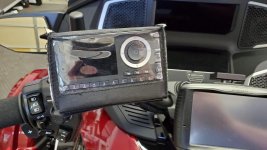
Here's some photos of my Sirius install on the 2020 RTL. This is an Onyx Plus radio with the vehicle kit. It retails now for $49. I'm using an older cone antenna that I previously used with an older Streamer GT radio. The antenna that comes with the kit needs to be mounted on too big of a piece of steel for a Spyder. (it's what's known as a "ground plane antenna". Without the steel, like a car roof, it just won't receive very well. The cone antenna is a "non-ground plane" antenna. The radio and antenna are mounted to a Lamonster Garage upper cuff. This is a great product from our site sponsor. I also added a very cheap ($5) rain cover. You can find it online. I'm using a Ram Ball connector to attach it all. I'm using the audio out connection to the aux input in the front glove box. Still waiting on a connector before I activate this radio, but other than that, it's ready to go.

onyx install.jpg

antenna.jpg

raincase.jpg
 
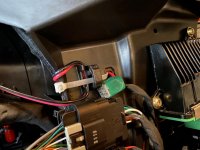
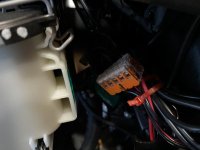
Lamont from Lamonster Garage posted the 2020 RTL right side GPS accessory plug and a terminal block he added on his FB page. See photos. I also took one of your pics and circled where the dummy plug was in case others needed the info. I am not going to tackle the panels until I am confident I know how to wire my new Zumo XT to this plug. I am a newbie and new to wiring. Can you explain or show a pic of how you wired your GPS unit?

3CA5D175-60C2-42CF-94CB-0EFDCECC5E78.jpeg 28A33494-16A3-405F-84AD-D4296A442678.jpg C2567227-42DD-4204-B8C0-6B5242F75DAE.jpeg
 
Last edited by a moderator:
Here's the switch in place. The middle position is "off" like the grip and seat heat switches. The rearward position is "on", and the forward position is "momentary". I use the "on" position to power my Sirius radio, and the "momentary" position for my homemade garage door opener. (I use a Homelink opener from a junkyard car! It's easy to make.) I've wired it so that the red led light is only on when the switch is in the on position. I picked up switched power from the front accessory power wires that were very well hidden near the battery. If you want this setup to be powered all the time, you just move the fuse from the F6 position to the F7 position in the right fuse box.

https://www.carlingtech.com/rocker-switches-l-series

View attachment 181160

Can you provide any pics or a detailed description on how to get to the "customer accessory wires"?
Thanks, Rick
 
Can you provide any pics or a detailed description on how to get to the "customer accessory wires"?
Thanks, Rick

Rick the post right above yours shows the wiring. All you have to do is open the drivers seat and pull out the right side service panel. (The black side panel.) The accessory circuit is shown in the middle photo above. It's probably wired backwards, though. For some reason they are coming from the factory with the polarity reversed as it relates to the GPS harness plug. If you just want the power for something else, you "could" cut off the plug and use the wires. The black one is ground. If you want the accessory circuit from the left side, open the front trunk, unzip the liner, then remove the battery cover. If you feel around between the left side at the top of the battery between the battery and the rubber plug that goes into the front trunk area, you should find the two wires. They are not in a plug like the right side circuit, and they have "bayonet" style ends on them already. Mine were tucked up into what felt like a conduit. When you find them, you should have about 2-3 inches of wire to deal with. Again, black is ground. If you get stuck, let me know and I'll try to get a photo of them.
 
So it all started when I got the GPS Harness for my 2020 RTL, and the instructions said to remove the side panels per the service manual. Well I have the service manual, and the side panel removal instructions are not there. Through trial and error, I figured it out. For any side panel removal you must start with the front service panel here

Thanks so much. This was EXTREMELY helpful.
 
Hey, Jetfixer, I just wanted to say thanks for doing what BRP failed to do -- explaining how to take the panels off of a 2020 RT. I was trying to install a belt pulley this afternoon and got stuck at the main side panel. After reading your post, I was able to get it off, install the belt pulley, and get the panels back on. Maybe tomorrow I'll figure out where that extra body panel pin goes. Or maybe not.
 
Lamont from Lamonster Garage posted the 2020 RTL right side GPS accessory plug and a terminal block he added on his FB page. See photos. I also took one of your pics and circled where the dummy plug was in case others needed the info. I am not going to tackle the panels until I am confident I know how to wire my new Zumo XT to this plug. I am a newbie and new to wiring. Can you explain or show a pic of how you wired your GPS unit?

View attachment 181334 View attachment 181335 View attachment 181336


I used what I learned from Jetfixer here and the Garmin Zumo GPS wiring from Lamonster to make this video.https://youtu.be/YGLGiz7Ho9g You may have to pause occasionally to study various pieces. I am NOT an expert, but I am learning from them.

 
Last edited by a moderator:
WingmanRT

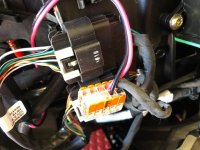
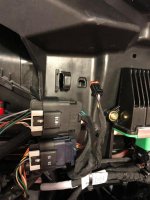
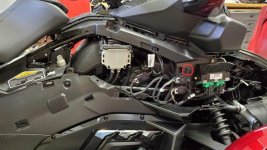
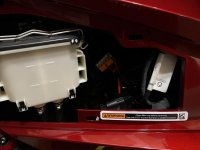
I just bought a 2021 RTL a few weeks ago. All this was extremely helpful for the install of my Garmin 398 and my 5v power plug connected to my QuadLock phone holder. I used those wago connectors from the gps connector on the right side, and just extended the power line using a 2 plug wago so I wouldn’t have to remove the huge panels anymore. I put a 5 plug wago connector in the area where you only need to remove that small black can-am panel to access the power. Similar to the left side customer access plug. Thank you everyone for the help
0D533AFE-04B6-4C1E-A49C-C28455844DB3.jpg 09C2E4E7-716A-459A-970D-ACC44C13D2C8.jpg A24D6E62-F1B5-4FB7-878B-43180814E48A.jpg
 
Last edited by a moderator:
Back
Top