• There were many reasons for the change of the site software, the biggest was security. The age of the old software also meant no server updates for certain programs. There are many benefits to the new software, one of the biggest is the mobile functionality. Ill fix up some stuff in the coming days, we'll also try to get some of the old addons back or the data imported back into the site like the garage. To create a thread or to reply with a post is basically the same as it was in the prior software. The default style of the site is light colored, but i temporarily added a darker colored style, to change you can find a link at the bottom of the site.

Pictures/Video on installation of a Baja Ron Sway bar & links

spydertrike

New member
Hi

Would anyone be able to tell me if there are any pictures or video of the installation of a sway bar and links on 2015 RT Ltd ?

Thank you
 
Bajaron Sway Bar

I just installed the sway bar and links on my 2015 RT-S last week. I didn't do a video but the instructions that came with it are pretty straight forward. The install wasn't too bad at all and took me about 3 hours. It would have been a lot less if I new what I was doing. It was my first time for taking any Tupperware off. The trickiest part is to get the Spyder high enough to get the old bar out and the new bar in. Need to have 20" to 22" of clearance to do this. Wayne
 
Agree...

Search you tube....swaybar can am spyder... and there are a list of videos to view...:thumbup:
 
I just installed the sway bar and links on my 2015 RT-S last week. I didn't do a video but the instructions that came with it are pretty straight forward. The install wasn't too bad at all and took me about 3 hours. It would have been a lot less if I new what I was doing. It was my first time for taking any Tupperware off. The trickiest part is to get the Spyder high enough to get the old bar out and the new bar in. Need to have 20" to 22" of clearance to do this. Wayne

Any special way to get it up that high? I was thinking about getting it on ramps first then jack it up a little at a time with jack stands to keep it stable. Thanks for any help.
 
Did one today

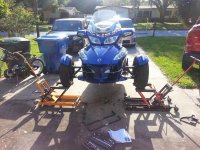
We use a Craftsman yellow ATV lift. Put the Spyder on jackstands, add jack risers, raise. We use 3 ton jackstands, raise bottom of Spyder 22". Swaybar comes right out. Ron's directions are pretty straightforward. A couple of tips:
all fasteners go in a bin, one on each side. Look at every nut and bolt, as some are different sizes, so where they come from means where they go back. There are no extra parts, so, if the bin is empty, all is good. Parts in the bin means you forgot it. Take it apart, try again.
Have all the tools on the ground with you. Getting up and down often is tiring, and tired people make mistakes. You need:
2 13mm box wrenches, preferably articulating ratcheting box wrenches
1 10mm articulating ratcheting box wrench
1 #2 flat tip screwdriver
1 1/4 drive socket set deepwell 10mm
1 #30 torx (ours is on a Dewalt power screwdriver drill)
1 icepick
1 set channellock pliers,
1 rubber mallet
1 bent nose needle nose pliers
something to lay on - carpet or foam pads.
A big helpful dog is nice, too!
Easy job. Well worth it. Call if you get stuck! Joe
 
We use a Craftsman yellow ATV lift. Put the Spyder on jackstands, add jack risers, raise. We use 3 ton jackstands, raise bottom of Spyder 22".
Just wanted to make sure I follow this... since it seems all ATV type jacks whether Harbor Freight, Craftsman, etc only go to around 16/17"...

So you lift it enough to put on 3 jackstands, then add risers - assuming you mean like 4x4 wood pieces or something? to the jack, then crank it up to 22" and re-support it with the stands?

It would be nice if you could get 20-22" out of these ATV lifts, besides the very expensive Big Blue one.
 
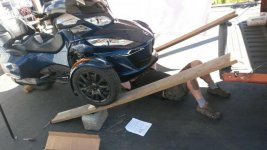
What I did

I'm not sure it was smart but it worked...

20160618_191245.jpg

I called it "Spyder Jenga".

EDIT: this was done with a standard motorcycle lift, some 4x4's to add height it to it and the blocks, of course. Crank it up some, put blocks under, lower it back. Add 4x4's to the lift, crank it up more, more blocks, drop it down. Rinse & Repeat.
 
Last edited:
Just wanted to make sure I follow this... since it seems all ATV type jacks whether Harbor Freight, Craftsman, etc only go to around 16/17"...

So you lift it enough to put on 3 jackstands, then add risers - assuming you mean like 4x4 wood pieces or something? to the jack, then crank it up to 22" and re-support it with the stands?

It would be nice if you could get 20-22" out of these ATV lifts, besides the very expensive Big Blue one.

I'm going to quote my own reply to ask a stoopid question...

When the specs on a jack/lift say lifting range, like 17", does that mean the top of the lifting pad surface (bottom of what you are lifting) can be lifted 17" off the ground? Or does it mean it will go up 17" from where it is, already a few inches off the ground, so bottom of item be lifted will be 17+ inches off ground?

On a '15 RTL are the proper jack stand support points in the front under A-Arm (under shock bolt) and in the rear under the rear shock?

Joe: Can you please clarify your technique?
 
Back
Top