• There were many reasons for the change of the site software, the biggest was security. The age of the old software also meant no server updates for certain programs. There are many benefits to the new software, one of the biggest is the mobile functionality. Ill fix up some stuff in the coming days, we'll also try to get some of the old addons back or the data imported back into the site like the garage. To create a thread or to reply with a post is basically the same as it was in the prior software. The default style of the site is light colored, but i temporarily added a darker colored style, to change you can find a link at the bottom of the site.

Didn't last a week!

Jetfixer

Well-known member
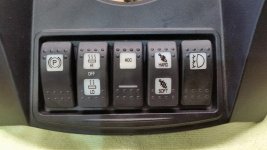
Haven't even had it for a week and already started the mods! First and most important mod was to add an aux power switch and my home-made garage door opener. This switch matches nicely and provides OFF - ON - Momentary functionality. The ON position powers a supplemental fuse panel, and the Momentary operates the garage door opener. The integrated light is slightly brighter than the other switches, but a dab of paint on the bulb will fix that. I've added the power cord for my heated clothing, (which doubles as a connector for trickle charging the battery), my front and rear digital video recorder, and the Can Am Bluetooth Dongle. The only thing left for now is to add the hookups for my portable Sirius satellite radio. After that, who knows.

attachment.php
 

Attachments

  • Aux switch.jpg
    Aux switch.jpg
    50.8 KB · Views: 1,269
Nice job. Where did you source the switch?

The switch is a Carling Contura model VMDA-2 and the actuator (cap) is model number VV C2-D. These folks have a $25 minimum order so to get there I also bought the VV C2-C actuator which doesn't have the ACC logo. If you intend on working with these switches at all, you should buy the actuator removal tool also. It is a model #VRT-CAR-REMOVALTOOL. I already had the tool from doing work on my boat. If you ever try to remove the actuator caps without using this tool, you will probably break the retaining clips and not be able to reuse the cap. You can find these parts at lots of places, but I've dealt with this vendor before and never had a problem.


http://www.searay-parts.com/Carling-rocker-switch-p/vmda-2.htm

http://www.searay-parts.com/Carling-rocker-switch-p/vv c2-d accessory.htm

http://www.searay-parts.com/Carling-rocker-switch-p/vrt-car-removaltool.htm
 
I was just going to do a search for a switch like this

If you want a switch that has different functions than I used, there are many options. There's a great tutorial here:

http://www.thehulltruth.com/new-wire-marine/513864-carling-contura-rocker-switches-explained.html#b

that explains how to "read" Carling's part numbers. You actually decide what you want the switch to do and then work backwards to get a part number. Then pick the actuator cap that you want. The list of available switch circuit diagrams can be found here:

http://www.carlingtech.com/rocker-switches-v-series-iv-v

Scroll down to the "Resources" area and you'll find .pdf files of all the circuit diagrams and actuator caps.
The switch I used is the "M" circuit. The "M" is then the second digit in the part number. This is the OFF-ON-(ON) circuit. When the ON is in parenthesis, that means it is momentary like a horn button.
 
Last edited:
The switch is a Carling Contura model VMDA-2 and the actuator (cap) is model number VV C2-D. These folks have a $25 minimum order so to get there I also bought the VV C2-C actuator which doesn't have the ACC logo. If you intend on working with these switches at all, you should buy the actuator removal tool also. It is a model #VRT-CAR-REMOVALTOOL. I already had the tool from doing work on my boat. If you ever try to remove the actuator caps without using this tool, you will probably break the retaining clips and not be able to reuse the cap. You can find these parts at lots of places, but I've dealt with this vendor before and never had a problem.


http://www.searay-parts.com/Carling-rocker-switch-p/vmda-2.htm

http://www.searay-parts.com/Carling-rocker-switch-p/vv c2-d accessory.htm

http://www.searay-parts.com/Carling-rocker-switch-p/vrt-car-removaltool.htm

Thanks for this information! :thumbup:
Welcome to the "Wild World of Farkeling your Spyder"! :D :clap:
Just for the record: this disease is incurable! :shocked:
 
Great info now may I ask what kind of camera system you are using

I'm using the Innov K1 system. This system records from two 1080p hi-def cameras simultaneously, includes a GPS module, and what I feel is the best part, for a reasonable extra charge you can get 2 more cameras to mount in your car. That way you just take the recorder with you whatever you drive. I mounted the front camera just below the windshield and the rear camera using one of the license plate bolts. The gps module is installed under the seat, and the recorder module lives in the left side bag compartment.

attachment.php
attachment.php
attachment.php
 

Attachments

  • rear.jpg
    rear.jpg
    19.7 KB · Views: 931
  • recorder.jpg
    recorder.jpg
    19.3 KB · Views: 930
  • Spyder Front.jpg
    Spyder Front.jpg
    32 KB · Views: 934
Garage door opener

Nice looking install. What did you use for the door opener? Just a regular one or did you do the flash to pass type? Also, would you be able to show us your wiring diagram you made?
 
Nice looking install. What did you use for the door opener? Just a regular one or did you do the flash to pass type? Also, would you be able to show us your wiring diagram you made?

I have a flash to pass type that I've used on my motorcycles for years. I thought about using the Spyders' PTT switch since I cannot have the CB option due to the Bluetooth dongle option. But I believe that the PTT switch is part of the CANBUS system and not just a switch. That's why I used the OFF-ON-(ON) switch. I can turn on or off the power to my aux fuse panel (mounted under the seat) and use the momentary instead of a flash to pass switch for the garage door opener. Works great! As for the wiring diagram, are you talking about the ACC switch wiring or my whole diagram for all my add-ons?


For those unfamiliar, you can add a garage door opener to your Spyder (or motorcycle) very easily and for less than $5. Just go to your local used auto parts yard and obtain the Homelink module from the sunvisor of any car. Just remember what year, make and model car you get it from. Then you can go to the Homelink web site and using the vehicles information, and your brand of garage door opener, get the instructions for how to program it to your opener. You can use a regular 9 volt battery to program it. The green wire is the positive and the black is the negative. I usually program the middle button on the module. Then using a nylon tie-wrap, keep the middle button pressed down permanently. Now all you need is a ground on your Spyder and a momentary switch to send the 12v positive to the module. Since the programmed button is already pushed, (mashed if you live in the south!), your door will open and close with each push of the momentary switch. You can seal the Homelink module on a plastic bag or wrap it in waterproof tape and mount it out of sight somewhere. I put mine near the battery access panel in the frunk.
 
Switch

I have a flash to pass somewhere that I can use. If you can share just that diagram on the acc switch, that would be great.
 
Back
Top