Bluehole
New member
Just finished up my brake job on my 2014 RTL----first a big word of THANKS to Ron @ BajaRon's & Joe @ Squared Away. These gentlemen supplied me with the courage and wisdom to take on this job. Ron, as well, supplied all the parts needed for the job.
A couple of pics:

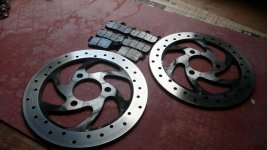
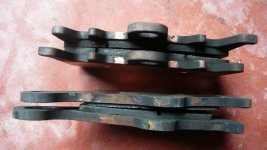
 first pic shows all parts replaced--both front rotors & all brake pads. Second pic shows how mush material the pads had left with 19500 miles on them. Bottom set of pads came off the rear. The thin pad was on the inside of the caliper. Top set of pads is from the front and is typical of the wear on both sides. Plenty left as can be seen. Replaced the rotors to stop a pulsating in the pedal at low speed. Am happy to say that was accomplished.
I started this process yesterday (Sat) with the 2 front wheels. It was way too easy. Jack up one side/remove wheel/remove caliper/replace rotor/remove some brake fluid/push pistons in/install pads (remember to install shim from old pads)/install caliper (torque 50 #)/install wheel (torque 75 #)/fill rear reservoir to proper level/put cap on/pump brakes to take up play. Rinse and recycle---do other side/refill reservoir.
Today (Sun) I tackled the rear brake. I took everything apart---removed the muffler/removed the parking brake cable & arm/removed the cable bracket & spring/remove some brake fluid from front reservoir---all of this just to get started. I was looking for a spacer as I removed the 2 16mm bolts that hold the caliper on. I found one in the rear hole. Once caliper is out---remove small "C" clip and unscrew & remove roll pin that hold the pads in alignment/push pads to center and remove/install new pads with shim from old pads/install roll pin and tighten/install caliper with shim--this was a very tight fit as the EBC pads are a bit thicker/ (torque 77 #)/replace all the extra parts I removed. I adjusted the parking brake out as far as I could in an effort to lessen any possible drag on the system. This was based on the inside pad being worn as shown in the above picture.
First run--followed Ron's recommendation of feathering the pedal frequently for about 35 hits of the pedal. Noticed that the brakes felt stronger after about the 10-12th hit. Kept using the brakes progressively a bit harder. I am here to tell you---full on power stop will send you over the handle bars if you are not ready for it!! These things are amazing & just a bit scary until you get used to them.
I have no more pulsating and I got some crazy good brakes to boot!!! All is right with the world. Thanks for all the posts on this job & again, thanks to Ron & Joe.
A couple of pics:
I started this process yesterday (Sat) with the 2 front wheels. It was way too easy. Jack up one side/remove wheel/remove caliper/replace rotor/remove some brake fluid/push pistons in/install pads (remember to install shim from old pads)/install caliper (torque 50 #)/install wheel (torque 75 #)/fill rear reservoir to proper level/put cap on/pump brakes to take up play. Rinse and recycle---do other side/refill reservoir.
Today (Sun) I tackled the rear brake. I took everything apart---removed the muffler/removed the parking brake cable & arm/removed the cable bracket & spring/remove some brake fluid from front reservoir---all of this just to get started. I was looking for a spacer as I removed the 2 16mm bolts that hold the caliper on. I found one in the rear hole. Once caliper is out---remove small "C" clip and unscrew & remove roll pin that hold the pads in alignment/push pads to center and remove/install new pads with shim from old pads/install roll pin and tighten/install caliper with shim--this was a very tight fit as the EBC pads are a bit thicker/ (torque 77 #)/replace all the extra parts I removed. I adjusted the parking brake out as far as I could in an effort to lessen any possible drag on the system. This was based on the inside pad being worn as shown in the above picture.
First run--followed Ron's recommendation of feathering the pedal frequently for about 35 hits of the pedal. Noticed that the brakes felt stronger after about the 10-12th hit. Kept using the brakes progressively a bit harder. I am here to tell you---full on power stop will send you over the handle bars if you are not ready for it!! These things are amazing & just a bit scary until you get used to them.
I have no more pulsating and I got some crazy good brakes to boot!!! All is right with the world. Thanks for all the posts on this job & again, thanks to Ron & Joe.
")
