-
Very Active Member
 Originally Posted by Jetfixer
Why not get a new one under warranty?
There's nothing wrong with the original strut. When you start adding things like the butt buffer, gel inserts and such is when the problem starts. Just replacing it with the stock strut would accomplish nothing.
-
 Originally Posted by Jetfixer
Why not get a new one under warranty?
Adding to what K80shooter noted, the stock strut is only about 15-20 pounds force which barely holds up the OEM seat so adding a gel seat insert (what I did) adds weight which renders the stock strut incapable of holding the seat up when filling gas tank and checking oil.
-
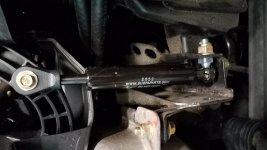
I ordered McMaster Carr PN 9416K11 (30# force) which is a little bit longer than the stock one but not quite as beefy in body and rod diameter.
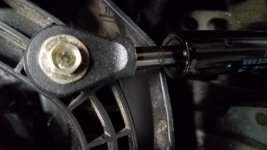
Installed it today using the OEM "ends" and it seems to work fine - holds up the seat with no problem but it is not so forceful that the seat pops up on it's own so I think I have about the right force (30#).
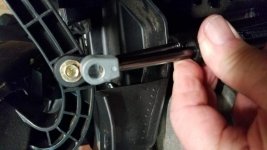
BTW, to unscrew the factory OEM "ends", it helps to place the strut in a vise using plastic vise pads like these so you don't damage the strut (in case you need it later). The eyelet end on mine took some force to unscrew but the ball socket end came right off.
You also don't need to remove anything but the passenger seat to gain access. A long narrow screwdriver wedged "just so" will release the clip at the ball socket end and it comes right out.
Thanks to K80shooter for finding the source for this strut rod. Might even be able to use one even longer but you are limited to how long it can be based on the travel of the strut and the fixed location of the ball end.
DSC_0001.jpg
DSC_0002.jpg
New strut is the smaller one in the pics above. I figured the weak link in the OEM setup is the plastic nib on the seat hinge so going with a slightly smaller shock rod was not going to make any difference - if anything breaks/fails, it will be that plastic nib not a smaller steel shock rod. And, it isn't exactly a critical component.
strut.jpg
-
I just received my strut from McMaster-Carr. I ordered 9416K14, which is exactly the same dimensions and stroke as the original. I also ordered the 6465K26 eyelet which does indeed open the seat farther.
My unscientific digital bathroom scale test indicated 43.7 lbs. to close it. I'm sure that will become some what less with use.
It appears that either WJH's part or mine will work.
I know I'm happy!
The new strut shows a Suspa part # C16-14870.
-
Very Active Member
 Originally Posted by WilcoJunoHotel
I ordered McMaster Carr PN 9416K11 (30# force) which is a little bit longer than the stock one but not quite as beefy in body and rod diameter.
Installed it today using the OEM "ends" and it seems to work fine  - holds up the seat with no problem but it is not so forceful that the seat pops up on it's own so I think I have about the right force (30#).
BTW, to unscrew the factory OEM "ends", it helps to place the strut in a vise using plastic vise pads like these so you don't damage the strut (in case you need it later). The eyelet end on mine took some force to unscrew but the ball socket end came right off.
You also don't need to remove anything but the passenger seat to gain access. A long narrow screwdriver wedged "just so" will release the clip at the ball socket end and it comes right out.
Thanks to K80shooter for finding the source for this strut rod. Might even be able to use one even longer but you are limited to how long it can be based on the travel of the strut and the fixed location of the ball end.
DSC_0001.jpg
DSC_0002.jpg
New strut is the smaller one in the pics above. I figured the weak link in the OEM setup is the plastic nib on the seat hinge so going with a slightly smaller shock rod was not going to make any difference - if anything breaks/fails, it will be that plastic nib not a smaller steel shock rod. And, it isn't exactly a critical component.
strut.jpg
You should have gotten the 9416K14 in 30lb, it's exactly like the oem one. I also got the 9416K11 just in case the other one didn't work but I think either one will work much better than the 18# factory one.
Glad it worked out for you.
-
Very Active Member
@WilcoJunoHotel Did the extra length in that strut increase the seat lift a noticeable amount? I know I like mine a lot better with the extra height.
-
Here is a pic - I placed the bottom edge of the ruler along the blue body panel piece just forward of where it meets the black body panel piece.
IMG_20210716_0629137.jpg
-
Very Active Member
 Originally Posted by WilcoJunoHotel
Here is a pic - I placed the bottom edge of the ruler along the blue body panel piece just forward of where it meets the black body panel piece.
IMG_20210716_0629137.jpg
I'd call that 11-1/2" close enough for me. I'll check mine like that to compare but it looks like you have plenty of room now.
-
 Originally Posted by K80Shooter
I'd call that 11-1/2" close enough for me. I'll check mine like that to compare but it looks like you have plenty of room now.
Thanks guys! I want some extra lift in my seat and didn't want to move my AirHawk every time I filled up. Just order myself a new strut and eyelet.
2021 Spyder RT-L Deep Marsalsa Metalic

-
Very Active Member
Harrington, Australia
2021 RT Limited
Setup for Tall & Big.... 200cm/6'7", 140kg/300lbs, 37"inleg.
HeliBars Handlebars (elongated handlebar bar slot to get more height)
Highway pegs bolted under floorboards.
Brake rubber removed to lower pedal for easier long leg/Size 15 EEEEW boot access.
Ikon (Aussie) shocks all round (setting 2 of 4 for pothole smoothing with improved handling)
Russell Daylong seat 2” taller than stock (in Sunbrella for Aussie heat & water resistance)
Goodyear Duragrip 165/60 fronts (18psi) - provides extra 1/2” ground clearance.
2021 RT Limited , Brake pedal rubber removed for ease of accessing pedal with size 15 boots. Red
-
I'm with jetfixer, I got a new one under warranty, a PIA with dealer dealings, but probably worth the aggravation.
Bill Wms
Sebring Florida
2020 RTL
-
Very Active Member
 Originally Posted by Peteoz
Yeah, I think that will be my solution……. Thanks Mike
Pete
Pete, look in my Album " gas strut " re-placement " if you click on the pic it will enlarge and tell what I did ..... Mike
-
Very Active Member
Last edited by BLUEKNIGHT911; 05-10-2022 at 12:07 PM.
-
Very Active Member
 Originally Posted by BLUEKNIGHT911
Look at my Album - gas strut re-placement - this is how I REMOVED the OEM strut so I could OPEN the seat about 14 inches higher ..... it makes " Brake fluid " checking MUCH easier .... Mikle
Pete's seat is very different from the one-piece seat in the older RT's but the added height that he will gain will help in fueling the tank.
-
Very Active Member
Harrington, Australia
2021 RT Limited
Setup for Tall & Big.... 200cm/6'7", 140kg/300lbs, 37"inleg.
HeliBars Handlebars (elongated handlebar bar slot to get more height)
Highway pegs bolted under floorboards.
Brake rubber removed to lower pedal for easier long leg/Size 15 EEEEW boot access.
Ikon (Aussie) shocks all round (setting 2 of 4 for pothole smoothing with improved handling)
Russell Daylong seat 2” taller than stock (in Sunbrella for Aussie heat & water resistance)
Goodyear Duragrip 165/60 fronts (18psi) - provides extra 1/2” ground clearance.
2021 RT Limited , Brake pedal rubber removed for ease of accessing pedal with size 15 boots. Red
-
Very Active Member
I've grown tired of fighting with the seat on my 2020 RTL too, so I'll try the K80 method.
Thanks, Shooter for the part numbers. I've ordered them and will post up my results and observations.
2020 RTL SE6
Previously 2008 GS SM5 and 2014 RT SE6

-
Very Active Member
Okay, I got and installed the parts. They work well, nothing super dramatic, it just works. The seat will now lift on its own and stay up when fueling, which it never did. Adding the plastic tip vs the OEM pot metal bracket tip is a nice extra touch. It does lift the seat slightly higher and thus makes fueling easier. Thanks again, Shooter, for taking the lead in this fix.
2020 RTL SE6
Previously 2008 GS SM5 and 2014 RT SE6

-
Thank you
Very valuable information @K80Shooter! 
My parts are on order to make this fix.
Happy Thanksgiving!
Huey
-
Removing Seat Strut
 Originally Posted by Iceman47
Thanks to all who replied and suggestions for sources I hadn't thought of. My belt tensioner from Lamonster should arrive in the next couple of days, which will necessitate removing the same panels needed to access the strut and take measurements. If I find a replacement I'll be sure to post the info.
I found it unnecessary to pull off any panels to get the strut off. I ordered the replacement strut . referenced elsewhere in the thread from McMaster Carr. after it came I removed the worthless one this way. First I removed the back seat back pad. Then removed the rear seat. At this point the top of the strut is visible. I removed the 8mm screw holding the top of the strut and removed it from the plastic pin on the front seat. I now was able to flip the front seat all the way over into the rear seat space. now looking down, one can see the bottom of the strut mounted on the ball pin below. using a long skinny screwdriver, i slipped the blade into the slot on the back of the ball clamp and pulled the spring clip away from the back of the strut and easily pried the mount off the ball and pulled it out from the top. putting the new one in was this procedure done in reverse.
sure beats having to remove any Tupperware. Just have to mess with the seats. Just need an 8mm wrench, a long screwdriver with a skinny blade, and a flashlight. I hope this helps any of you fine folks out there. If it helps even one, i'm a happy old man!
Mark
-
Ozzie Ozzie Ozzie
 Originally Posted by AZviejo
I found it unnecessary to pull off any panels to get the strut off. I ordered the replacement strut . referenced elsewhere in the thread from McMaster Carr. after it came I removed the worthless one this way. First I removed the back seat back pad. Then removed the rear seat. At this point the top of the strut is visible. I removed the 8mm screw holding the top of the strut and removed it from the plastic pin on the front seat. I now was able to flip the front seat all the way over into the rear seat space. now looking down, one can see the bottom of the strut mounted on the ball pin below. using a long skinny screwdriver, i slipped the blade into the slot on the back of the ball clamp and pulled the spring clip away from the back of the strut and easily pried the mount off the ball and pulled it out from the top. putting the new one in was this procedure done in reverse.
sure beats having to remove any Tupperware. Just have to mess with the seats. Just need an 8mm wrench, a long screwdriver with a skinny blade, and a flashlight. I hope this helps any of you fine folks out there. If it helps even one, i'm a happy old man!
Mark
ALWAYS check the date of the thread & posts before replying Mark, ESPECIALLY that of the first post in the thread AND the date of the last few posts in the thread - your info certainly might be helpful to others searching in the future, so thanks for that Buuut, I doubt it'll actually benefit Iceman now, seeing that he posted what you quoted almost a year ago, so he's probably waaayy past pulling those panels
2013 RT Ltd Pearl White
Ryde More, Worry Less!
-
 Originally Posted by Peter Aawen
ALWAYS check the date of the thread & posts before replying Mark, ESPECIALLY that of the first post in the thread AND the date of the last few posts in the thread - your info certainly might be helpful to others searching in the future, so thanks for that  Buuut, I doubt it'll actually benefit Iceman now, seeing that he posted what you quoted almost a year ago, so he's probably waaayy past pulling those panels 
Sorry, im a n00b here.
-
Active Member
Yup, this works too...
 Originally Posted by Jetfixer
Why not get a new one under warranty?
I just did this recently. They fixed the seat one and the trunk one. Both work great now, and didn't cost me a dime. Now I have to get her back in there for this new recall, and have them install the Belt Tensioner I just bought from Lamonster.
2020 Can Am Spyder RT Limited "The Comet #2"
Baja Ron Sway Bar
Passenger Armrests From Can Am
Wolo Big Bad Max Airhorn
Lamonster Top Cuff W/Ram Ball
Lamonster Power Plate
Tackform Phone Mount
Key Cover from Ebay
Lamonster Mirror Locks
Ultragard Cover from Lamonster
Top Grills from Spyderpops
Garage Door Opener from Spyderpops
3.5mm Extension from Amazon
Lamonster USB Cable Holder & Cable
Foam Grips from Spyderpops
Tricled Strobe Brake Light module
Tricled Bag Lights (replace reflectors)
Tricled Turn/Brake/Run Signals Rear
Tricled Floorboard Lights
Tricled Sequential Run/Turn Fender Lights
Tricled A-Frame Run/Turn Lights
Tricled LED American Flag Mount & Flag
Showchrome American Flag
-
 Originally Posted by Iceman47
Has anyone replaced the gas strut on their '20 or '21 RTL? Mine barely holds the seat open with nothing on it. I have a Butt Buffer and have to take it off everytime I fuel.
The original strut was shot when I got home with the Spyder brand new. How the dealership missed this is beyond me, as the tank was full. I didn't write down the info on the replacement strut or take measurements, but if no one has info on a stronger strut I'll start removing Tupperware.
As usual, I have a different approach to the problem. I just disconnected the top of the strut and left everything else in place. Put the screw back in the plastic hinge so it doesn't wind up in a tire. The seat now folds back until it hits the trunk, but that's no problem. Eventually something else will motivate me to take the plastic off the left side and I will completely remove the strut.
Chip
2020 RTL
"Stella by Starlight"
EDIT: When I did this, I had the passenger seat off for other repairs. With the pax seat back on, the driver's seat only opens about 12 inches. I cut a segment of old broom handle to hold it open during refueling. I stored the handle in the organizer at the back of the frunk between uses.
Last edited by chipveres; 05-12-2023 at 12:04 PM.
Reason: My Error
-
 Originally Posted by chipveres
As usual, I have a different approach to the problem. I just disconnected the top of the strut and left everything else in place. Put the screw back in the plastic hinge so it doesn't wind up in a tire. The seat now folds back until it hits the trunk, but that's no problem. Eventually something else will motivate me to take the plastic off the left side and I will completely remove the strut.
Chip
2020 RTL
"Stella by Starlight"
I put the external spring on mine and it works fine but I think I may try what Chip did, why not get it completely out of the way.
2021 Spyder RT Limited (Sea-To-Sky)
2022 Ryker Rally
-
Active Member
 Originally Posted by AZviejo
I ordered the replacement strut . referenced elsewhere in the thread from McMaster Carr.
What is the part number for the one You ordered ?
2022 Can Am Spyder RT Limited
Posting Permissions
- You may not post new threads
- You may not post replies
- You may not post attachments
- You may not edit your posts
-
Forum Rules
|