• There were many reasons for the change of the site software, the biggest was security. The age of the old software also meant no server updates for certain programs. There are many benefits to the new software, one of the biggest is the mobile functionality. Ill fix up some stuff in the coming days, we'll also try to get some of the old addons back or the data imported back into the site like the garage. To create a thread or to reply with a post is basically the same as it was in the prior software. The default style of the site is light colored, but i temporarily added a darker colored style, to change you can find a link at the bottom of the site.

Understanding brake linkage position

mkuszek

New member
New owner here with a 2015 F3 S.
I am looking to stretch out just a little more with my legs and want to make sure I get the correct linkage.
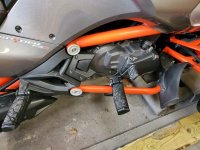
From the rear I can feel 1 hole and then there is the pedal. is that position 2? My brake rod measures 18"1/2 long.
So I am thinking to get a 2" longer leg room I will need a #3 position linkage rod right?
 

Attachments

  • 20210228_102955.jpg
    20210228_102955.jpg
    76.6 KB · Views: 24
All F3 Spyders come from the factory with the foot peg at position #3. So you have the option of going to position 4 0r 5 if you have long legs or you can go to position 1 or 2 if you have short legs. You can feel the holes in the bar that mounts the peg and count of holes back from the peg or count the holes forward of the peg. The bar should have a total of 5 holes. Hope this helps.
 
Thanks , So I can feel 1 hole to the rear of the pegs and 3 holes in front of the pegs. So if I wanted to just make it 2" longer for my legs I would need a #3.
 
Before leaving the dealer with my new 2020 F3 Limited, I had the driver floorboards moved from #3 (middle) to #1 (closest to me) position because I wanted to be able to stand up and stretch my hind legs. My inseam is 29", so this isn't a bad spot for me.

The drawback is that I now have a hard time lifting my foot all the way off the floorboard to get it on top of the brake pedal. I have a titanium right ankle replacement, which results in less range of motion. Not so bad on a straight stretch coming to a normal stop; a little awkward feeling when having to add a little brake mid-curve (I know, I know; you should always get your braking done BEFORE entering the curve, but life ain't always perfect).

Accordingly, I began loosening and adjusting the position of the driver floorboard and found that, even though the bolts had been removed/replaced only a week prior at the dealer's, they were damn hard to unscrew because of the threadlocker residue. Fearing that I might strip out the allenhead, I got out the heat gun and put the offending bolt through two heat/cool cycles, rapping on it with a hammer occasionally. This loosened it right up. The two 8mm bolts (requiring a 5mm allen wrench) screw into a threaded backing plate, so I took this plate off and ran an 8mm tap through the clugged up holes, and ordered some proper T40 Torx bolts to replace them.

Sticky bolt problem solved, I'm now working on making my own custom-length brake rod for the #2 position (from the left-over #3 position rod) which will rotate the brake pedal forward a few degrees, lowering it toward the floorboard, making it almost a heel-toe move to slip over to apply the brake while still keeping my heel in contact with the floorboard.
 
Back
Top