-
There were many reasons for the change of the site software, the biggest was security. The age of the old software also meant no server updates for certain programs. There are many benefits to the new software, one of the biggest is the mobile functionality. Ill fix up some stuff in the coming days, we'll also try to get some of the old addons back or the data imported back into the site like the garage. To create a thread or to reply with a post is basically the same as it was in the prior software. The default style of the site is light colored, but i temporarily added a darker colored style, to change you can find a link at the bottom of the site.
You are using an out of date browser. It may not display this or other websites correctly.
You should upgrade or use an alternative browser.
You should upgrade or use an alternative browser.
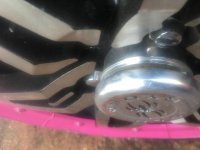
Trying to fix LED. Don’t know what I’m doing
- Thread starter Stridersr7
- Start date

Bob Denman
New member
:shocked: Wow!
LEDs aren't like "normal" bulbs. They need to have their leads properly connected to hotm, and ground...
If by "shorted": you mean that they're not lighting.. try reversing your leads!
Good luck! :thumbup:
LEDs aren't like "normal" bulbs. They need to have their leads properly connected to hotm, and ground...
If by "shorted": you mean that they're not lighting.. try reversing your leads!
Good luck! :thumbup:
Flamewinger
New member
If both wires are black one should have a white stripe and that one is the positive. Spyders have black wires as ground so black to black and blk/wht to whatever the hot wire is for that fender light.
Stridersr7
New member
It went into limp mode home mode
Ok. Disconnected the running lights and it ran fine for a mile then went back into limp mode which I figured.
Probably because the running lights were disconnected.
Now out of curiosity I reconnected the one side that was good before I shorted out the other side. It still doesn’t come back on.
Ok. Disconnected the running lights and it ran fine for a mile then went back into limp mode which I figured.
Probably because the running lights were disconnected.
Now out of curiosity I reconnected the one side that was good before I shorted out the other side. It still doesn’t come back on.
trikermutha
Active member
Please take it to someone who knows what they are doing. That picture is a mess of wire and electric tape and should never be installed that way.
You could cause more damage then good. :thumbup:
You could cause more damage then good. :thumbup:
Flamewinger
New member
When I am installing something that I got cheaper, got from someone that decided not to use it or made myself, I look for similar things that might have instructions. Not sure if you bought these or are adding your own.
http://spyderpops.com/fender-groove...rs-now-comes-with-free-set-of-tip-led-lights/
http://spyderpops.com/fender-groove...rs-now-comes-with-free-set-of-tip-led-lights/
Stridersr7
New member
When I am installing something that I got cheaper, got from someone that decided not to use it or made myself, I look for similar things that might have instructions. Not sure if you bought these or are adding your own.
http://spyderpops.com/fender-groove...rs-now-comes-with-free-set-of-tip-led-lights/
I believe that’s what’s on it. Looks like the wires weee spliced into the running lights. Now does the the running lights have a fuse somewhere?
Stridersr7
New member
Also if I kept the led would be nice to keep my current color of purple
ThreeWheels
Active member
The location you show on your Spyder is for an OEM incandescent light. The factory design already has a 12v source to a fixture in that location.
Take heart. This should be a relatively easy job.
Did you do that splice job ?
All that tape and splicing is a very poor job. Probably wires twisted together and then wrapped in too much tape.
The twisted wires are subject to moisture and can cause too much resistance, stopping the flow of electricity.
The first thing I recommend is get access to an electrical tester.
AND a soldering iron.
Next, I'd take my LED and connect them to a 12 v source directly to make sure they still work.
You should be able to use your new electrical tester to confirm the + and - terminals of your 12v source. This way you can make sure you'r not using a dead battery.
As others have said, the LED is dependent on getting the + and - on the correct terminals. If the lights don't work, try reversing the polarity.
God knows, reversing the polarity always worked on Star Trek.
If they still don't work, and you've confirmed the 12v source is active, then the LEDs are broken and you have to get new ones.
If they do wok, I'd make sure that I clearly marked which wire I connected to the + terminal during the successful trial. I usually use a small piece of tape with enough left over to make a tab, and mark it with a + or -.
Next, I'd start working om the messed up connections at the fenders.
Remove all the spliced pieces of wire, right down to the Factory harness.
If you don't have enough space to hook the new light fixture up, you'll need to make a correct splice.
Using your electrical tester, find the + and - wires and mark them. You'll have to turn your Spyder on in order to get the voltage on the harness connections.
Turn the bike off, and then connect the lights up, making sure you have the + to the + and the - to the -.
Turn the bike back on, and the lights should come on.
Shut the bike off, and then solder the splice to make sure you maintain a good connection. You can then put the tape back on to cover the splice.
Do the same on the other side.
One point: When I replaced my LED headlights, I found that BRP had mysteriously reversed the + and the -, so you'll need to confirm the polarity first when working on the opposite side.
I know it's been long winded, but I hope this helps.
Stridersr7
New member
The location you show on your Spyder is for an OEM incandescent light. The factory design already has a 12v source to a fixture in that location.
Take heart. This should be a relatively easy job.
Did you do that splice job ?
All that tape and splicing is a very poor job. Probably wires twisted together and then wrapped in too much tape.
The twisted wires are subject to moisture and can cause too much resistance, stopping the flow of electricity.
The first thing I recommend is get access to an electrical tester.
AND a soldering iron.
Next, I'd take my LED and connect them to a 12 v source directly to make sure they still work.
You should be able to use your new electrical tester to confirm the + and - terminals of your 12v source. This way you can make sure you'r not using a dead battery.
As others have said, the LED is dependent on getting the + and - on the correct terminals. If the lights don't work, try reversing the polarity.
God knows, reversing the polarity always worked on Star Trek.
If they still don't work, and you've confirmed the 12v source is active, then the LEDs are broken and you have to get new ones.
If they do wok, I'd make sure that I clearly marked which wire I connected to the + terminal during the successful trial. I usually use a small piece of tape with enough left over to make a tab, and mark it with a + or -.
Next, I'd start working om the messed up connections at the fenders.
Remove all the spliced pieces of wire, right down to the Factory harness.
If you don't have enough space to hook the new light fixture up, you'll need to make a correct splice.
Using your electrical tester, find the + and - wires and mark them. You'll have to turn your Spyder on in order to get the voltage on the harness connections.
Turn the bike off, and then connect the lights up, making sure you have the + to the + and the - to the -.
Turn the bike back on, and the lights should come on.
Shut the bike off, and then solder the splice to make sure you maintain a good connection. You can then put the tape back on to cover the splice.
Do the same on the other side.
One point: When I replaced my LED headlights, I found that BRP had mysteriously reversed the + and the -, so you'll need to confirm the polarity first when working on the opposite side.
I know it's been long winded, but I hope this helps.
Bike came with with it already done. See it all worked well. Then the light one started flickering on and off. So figured a loose wire. The right still worked great. When you hit a bump the left would come on and go right back off. So yesterday took what you saw out and moved some wires around and the LED came on and stayed on! So was trying to clean up the tape mess and 2 wires touched and made a burning smell and the other side of the bike LED went off and hasn’t came back on yet. Looked under bike and disconnected the running lights but it still puts it in “limp mode home”.
Stridersr7
New member
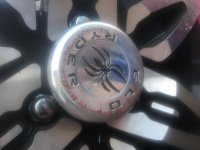
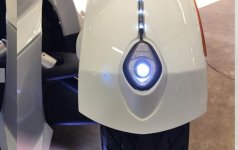
Also has anyone took off their glo Ryder cap before? I can’t find the screw or whatever holds it on so I can replace the battery and for the first time see what color it is.
Attachments
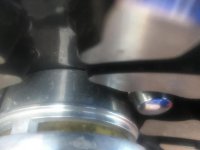
Yes that is really a nasty job of wiring. Who ever done it that way needs to be kicked in the gonads till they scream like a cheerleader at a high school football game. Just saying. Good luck.Please take it to someone who knows what they are doing. That picture is a mess of wire and electric tape and should never be installed that way.
You could cause more damage then good. :thumbup:
SpyderAnn01
Active member
Also has anyone took off their glo Ryder cap before? I can’t find the screw or whatever holds it on so I can replace the battery and for the first time see what color it is.
They use an Allen Wrench and Phillips Screwdrivers. Good luck getting it out if it’s been on there a long time you may need a slide hammer to remove them.
Stridersr7
New member
I fixed it. Basically. Someone rigged it up with all this unnecessary wires. Took that off and just plug the 2 together and bam fixed. Now I need a new fender white tip. The one side has it. The other it has the clear case. Just no led bulb in it or the connection
Stridersr7
New member
They use an Allen Wrench and Phillips Screwdrivers. Good luck getting it out if it’s been on there a long time you may need a slide hammer to remove them.
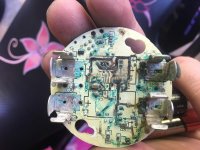
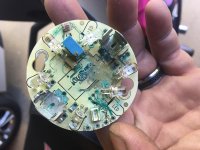
on this I just twisted it hard and it came off. It was designed just to twist off and on. But the circuit board inside was very corroded and didn’t work.
Attachments
Bob Denman
New member
I fixed it. Basically. Someone rigged it up with all this unnecessary wires. Took that off and just plug the 2 together and bam fixed. Now I need a new fender white tip. The one side has it. The other it has the clear case. Just no led bulb in it or the connection
Glad to hear that you found the fix! :congrats: :clap:
oldgoat
New member
on this I just twisted it hard and it came off. It was designed just to twist off and on. But the circuit board inside was very corroded and didn’t work.
Ugh. That's nasty.
Flamewinger
New member
on this I just twisted it hard and it came off. It was designed just to twist off and on. But the circuit board inside was very corroded and didn’t work.
GloRyder is coming out with new self powering lights. You can also but insert replacements that use batteries and a remote to change colors. gloryder.com
Also blue lights are illegal unless you're in a parade or are police.
Stridersr7
New member
BLUEKNIGHT911
Sadly Passed Oct 2024 - RIP
LED
If I understand what you want based on ....... you want /need an LED strip that matches and one side does NOT have a connector .............. the strips are easy to find and you can just hard wire it in or plastic snap splices to the OEM wiring ........ I think you will have to remove the fender to get to wires up at that light ....... Mike :thumbup:So I want a one of these because one side has it and other side doesn’t. But the side doesn’t doesn’t even have the connector that goes into LeD. So not sure where I can buy the connector out
Similar threads
- Replies
- 3
- Views
- 259
- Replies
- 42
- Views
- 9K
- Replies
- 24
- Views
- 1K
- Replies
- 8
- Views
- 2K