• There were many reasons for the change of the site software, the biggest was security. The age of the old software also meant no server updates for certain programs. There are many benefits to the new software, one of the biggest is the mobile functionality. Ill fix up some stuff in the coming days, we'll also try to get some of the old addons back or the data imported back into the site like the garage. To create a thread or to reply with a post is basically the same as it was in the prior software. The default style of the site is light colored, but i temporarily added a darker colored style, to change you can find a link at the bottom of the site.

TricLED 3rd/4th brake lights

motoswami

New member
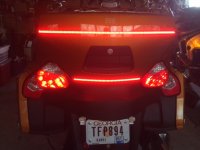
I'm in the middle of installing the 3/4th brake lights from TricLED.

Question:


Each LED strip attaches permanently to one of two different body panels.
The two LED strips are wired together and do not appear to be simple plug-and-play separable.

Specifically, the two black ground wires are crimped together into a single plug; the red wires are connected in a small gray junction block with orange press-down levers (are these wires able to be disconnected by prying up on the orange levers, or is that a one-time permanent union?)
This arrangement makes the two main rear body panels Siamesed by this wiring so if you remove the one upper (painted) panel that fits right below the trunk lid, you must also remove the lower black fender panel and keep these two bulky pieces together.

Do folk cut the red and black wires and connect/disconnect with reusable Posi-tap connectors?

What am I missing here? I feel like I'm suffering a cranio-rectal inversion.:yikes:
 
Yeah :shocked:...
They're left dangling together, by a shared umbilical cord. :banghead:
I hate to try and explain how I ended up supporting both the top panel, and the rear fender at the same time... :opps:

I ended up using rubber tie-down straps looped up through the top trunk supports, to hold the top panel...
...and I built a raised platform out of milk crates, to hold the fender...
Which left me almost NO room in which to work! :banghead:
 
posi-taps to the rescue

When I installed mine I cut wires and used positaps, make its much easier.

Strange the directions make absolutely no mention of this dilemma................

.......or does no one else find having the panels hooked together by the wiring harness an issue?
 
Installation video?

Several folks have mentioned that the Tricled website has installation videos. While I know my memory is going, guess my eyesight is too. I've looked and not found any. Help? :banghead:
 
Several folks have mentioned that the Tricled website has installation videos. While I know my memory is going, guess my eyesight is too. I've looked and not found any. Help? :banghead:

Hi, our website don't have installation video. However, we uploaded some installation video into YouTube. I hope this helps.


Sent from my iPhone using Tapatalk
 
link to TricLED 3/4 brake LED installation

Hi, our website don't have installation video.

However, we uploaded some installation video into YouTube. I hope this helps.


Cindy:

A preliminary search on YouTube didn't turn up an installation instruction video.

Could you provide a link please?

Thanks,
Pete
 
Listing would be helpful

Hi, our website don't have installation video. However, we uploaded some installation video into YouTube. I hope this helps.


Sent from my iPhone using Tapatalk

It would be VERY helpful to have a list of links to these uploaded videos. Your company has an excellent reputation for helping folks installing/maintaining your products....this list would only serve to enhance that reputation. Just sayin.
 
just cut the wires and get on with it!

When I installed mine I cut wires and used positaps, make its much easier.

Bob:

You've got the solution. Posi-taps to the rescue.

I got my installation finished up, and added a pair of red brake light flasher pods on either side of the license plate.
attachment.php
 

Attachments

  • 34 brakeLED.JPG
    34 brakeLED.JPG
    82.4 KB · Views: 164
It would be VERY helpful to have a list of links to these uploaded videos. Your company has an excellent reputation for helping folks installing/maintaining your products....this list would only serve to enhance that reputation. Just sayin.

Thank you for your suggestion Old Prof.
We are looking into this and to improve the process.


Sent from my iPhone using Tapatalk
 
I hope to be taking the parts off again this weekend now that my mini disconnects have arrived from Amazon. I have to say I was more than surprised when I discovered that the two panels cannot be separated for maintenance purposes.

While it is an easy fix, the correct connectors are worth about .25 cents each and will take no time to install when the harness is being wired up.
 
Back
Top