• There were many reasons for the change of the site software, the biggest was security. The age of the old software also meant no server updates for certain programs. There are many benefits to the new software, one of the biggest is the mobile functionality. Ill fix up some stuff in the coming days, we'll also try to get some of the old addons back or the data imported back into the site like the garage. To create a thread or to reply with a post is basically the same as it was in the prior software. The default style of the site is light colored, but i temporarily added a darker colored style, to change you can find a link at the bottom of the site.

This is how our Spyder Axle Adjusters work!

WilcoJunoHotel

New member
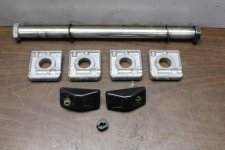
I saw these pictures on the web and I thought I would post them here as clarification for how the axle adjusters work on the Spyder RT.

I am a visual kind of person and if I can visualize what I am doing while working on something then I understand what is going on and it is not just trial and error when trying to fix something.

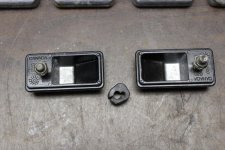
The photos show the swing arm caps (black gizmo) and shims which are used to adjust the axle. The shims are what is inside the swingarm and the caps are what you see at the back of the swingarm.

The caps have screws which have nuts that are "captured" between the 2 flat shims (2 on each side of the swingarm). If you look closely at the pics, you can see where the nuts nest into the shims.

When you adjust the screw it will move the shim; However, the swing arm cap is part of the assembly so you can see why it is critical to keep the cap snug to the back of the swingarm at all times. If you don't then you can see that the shims can move because the screw is no longer tight to the cap and the shim and axle are free to move. This is why you need to tap the axle back and forth - those shims are fixed to the axle by the thru hole in the shim. I also take a dead blow hammer and tap on the caps to ensure that they are snug. Just a small bit of movement of those caps means the axle could move which would throw your belt adjustment off.

I suspect that the swingarm is sort of "flayed out" or "sprung" at an angle and as you torque the axle down, it actually pulls the swingarms inward and it is this inward pressure that will move the axle (shims and all). You can account for this by making sure the caps stay snug as you tighten everything down.

To adjust: With the axle loose (minimal pressure on main axle nut), turning the swing arm cap screw clockwise (tightening the screw) pulls the shim and axle backwards; Turning the screw counterclockwise (loosening the screw) will move the axle and shim forward. After any adjustment, the swingarm cap must be put back SNUG to the swingarm and remain snug as you torque the main axle nut back down to full torque spec. If you don't touch either cap when doing a tire change, you shouldn't have to do any adjustment. (I put blue or green tape over the caps and screws before starting the wheel removal process.)

Hope this helps someone.

(Normally this type of adjustment is done by a threaded rod which locks the adjustment shim into place - only BRP can tell you why they did it this way - I guess it was less expensive.)
adjusters.jpg

adjusters1.jpg
 
Last edited:
If I had to guess why they use this type of adjuster it wouldnt be bc it was cheaper, it seems far more complicated to cast and build this kind of a setup. Regular bikes typically have a solid steel or aluminum swing arm, so its not possible to put the adjuster on the inside, but the Spyder uses a hollow steel box for a swing arm. I'm guessing that if they used a solid arm it would weigh 40lbs, so anyway, with a hollow arm you would crush the arm when you tightened the axle so they had the idea to put the 2 blocks in there. I think where they messed up was not securing the black adjuster caps to the back of the swing arm tube. If they just bolted that cap to the tube and used an adjusting bolt that would be fixed from moving in and out of the cap then you could possibly adjust the belt tension and position easily by jacking up the wheel and loosening the axle and just turning the tire by hand and twisting the screws in and out. Just dreaming, I love laying on my back and fiddiling with that thing. Oh yea, what is that tiny black thing below the caps?
 
Last edited by a moderator:
I think where they messed up was not securing the black adjuster caps to the back of the swing arm tube.

Yes, making the caps with ears that fit inside the swingarm secured with set screws would be a lot better. And some way to "fix" the screw to the cap, possibly a shoulder or bushing on the inside - I haven't really given it a lot of thought but there has to be a better way.
 
Last edited:
If I had to guess why they use this type of adjuster it wouldnt be bc it was cheaper, it seems far more complicated to cast and build this kind of a setup. Regular bikes typically have a solid steel or aluminum swing arm, so its not possible to put the adjuster on the inside, but the Spyder uses a hollow steel box for a swing arm. I'm guessing that if they used a solid arm it would weigh 40lbs, so anyway, with a hollow arm you would crush the arm when you tightened the axle so they had the idea to put the 2 blocks in there. I think where they messed up was not securing the black adjuster caps to the back of the swing arm tube. If they just bolted that cap to the tube and used an adjusting bolt that would be fixed from moving in and out of the cap then you could possibly adjust the belt tension and position easily by jacking up the wheel and loosening the axle and just turning the tire by hand and twisting the screws in and out. Just dreaming, I love laying on my back and fiddiling with that thing. Oh yea, what is that tiny black thing below the caps?


:agree: .... I had snowmobiles for decades ..... they also have a built-in system to adjust the TRACK ( like our belt ) ....However the rear axle is actually CAPTURED in a holder (?) .... that keeps that axle from moving either forward or backward UNLESS you twist / rotate the adjuster screw ..... This ISN'T how the Spyder adjuster is designed ...... but should have been!!! ...JMHO .... Mike :thumbup:
 
Last edited by a moderator:
The black item at the bottom looks like the rubber grommet that holds the rear brake line and the ABS sensor cable from chafing each other.
 
I've found that there is no need to move these adjusters just to remove the rear wheel. I always tape the black adjuster caps to the swingarm so they cannot fall out. If you disconnect the suspension feedback link then remove the lower shock absorber bolt the swingarm will fall to a lower position when you jack the bike allowing the belt to go slack. Then when you remove the rear axle bolt the wheel will come out and the adjusters will stay put.
 
Last edited:
My suspicion is BRP did it this way to make rear tire changes and belt alignments difficult to do for a home mechanic, in order to draw you back into the dealership network to help maximize profits.
 
My suspicion is BRP did it this way to make rear tire changes and belt alignments difficult to do for a home mechanic, in order to draw you back into the dealership network to help maximize profits.

Naw, like my old boss used to say "Some engineer got a bonus for designing it that way."
 
I'm a retired Mechanic , in 1969 I started my first Real Job in a VW dealership ... simple , simple cars to work on , and would Last forever . later on 1976 I worked in a Fiat Dealership ... not near so easy , and not near as good as the early VW . then I got into 18 wheeler's Big Stuff . and in the early 80's car's started getting harder and harder to work on or fix .. and by 2000 the shade tree Mechanic was history almost ... and NOW .. you would have to have 1/2 million dollar's worth of equipment just to make a solid Guess what the problem is ..... and you need a few years of Training on THAT make of car , to have any chance, and thats a small chance of fixing anything at all . as for an Old Guy like me , i don't need a car or truck that can drive me somewhere , or back into the parking spot because I don't know how to back into the spot . so when you have that much computer control on what you drive , you know its gonna cost a ton of cash , and another ton of cash when it breaks down . and the designers and the people who are Backing the company with the Cash like it just like that . i know this because I know some people who don't want me or you fixing anything . sad but true .
 
I've found that there is no need to move these adjusters just to remove the rear wheel. I always tape the black adjuster caps to the swingarm so they cannot fall out. If you remove the lower shock absorber bolt the swingarm will fall to a lower position when you jack the bike allowing the belt to go slack. Then when you remove the rear axle bolt the wheel will come out and the adjusters will stay put.


Installed new tire today. Removed my rear wheel and this was the technique I used as well with the TAPE. Worked great at holding the adjuster caps in place.

And another useful tip from another forum member, that worked great also, was using a ratchet strap through the rear wheel and clamped to both foot pegs to keep the tire snug, and from moving while tightening axle nut. Doing this kept the tire perfectly snug and tight, didn't have to make any additional adjustments. And.... my belt still tracked the same, before removing the tire. SUCCESS!

This is my Ist rear tire removal, took approx. 4 hours, but was still an accomplishment. Definitely a learning experience of how the rear components are nested, and working together.

Rick
 
I'm a retired Mechanic , in 1969 I started my first Real Job in a VW dealership ... simple , simple cars to work on , and would Last forever . later on 1976 I worked in a Fiat Dealership ... not near so easy , and not near as good as the early VW . then I got into 18 wheeler's Big Stuff . and in the early 80's car's started getting harder and harder to work on or fix .. and by 2000 the shade tree Mechanic was history almost ... and NOW .. you would have to have 1/2 million dollar's worth of equipment just to make a solid Guess what the problem is ..... and you need a few years of Training on THAT make of car , to have any chance, and thats a small chance of fixing anything at all . as for an Old Guy like me , i don't need a car or truck that can drive me somewhere , or back into the parking spot because I don't know how to back into the spot . so when you have that much computer control on what you drive , you know its gonna cost a ton of cash , and another ton of cash when it breaks down . and the designers and the people who are Backing the company with the Cash like it just like that . i know this because I know some people who don't want me or you fixing anything . sad but true .

:clap::clap::clap::agree:..... Mike :thumbup:
 
Installed new tire today. Removed my rear wheel and this was the technique I used as well with the TAPE. Worked great at holding the adjuster caps in place.

And another useful tip from another forum member, that worked great also, was using a ratchet strap through the rear wheel and clamped to both foot pegs to keep the tire snug, and from moving while tightening axle nut. Doing this kept the tire perfectly snug and tight, didn't have to make any additional adjustments. And.... my belt still tracked the same, before removing the tire. SUCCESS!

This is my Ist rear tire removal, took approx. 4 hours, but was still an accomplishment. Definitely a learning experience of how the rear components are nested, and working together.

Rick

Thanks Rick for the web strap to the foot pegs to prevent tire movement while tightening the rear axle. Hadn't thought of doing that, will have to try that on my upcoming tire change.

Al in Kazoo
 
Thanks Rick for the web strap to the foot pegs to prevent tire movement while tightening the rear axle. Hadn't thought of doing that, will have to try that on my upcoming tire change.

Al in Kazoo


Thanks Al, but have to give credit ( another :bowdown: forum member, who's name escapes me ? ) where credit is due.
Edited: Credit to Pegasus1300

Knowing I had a tire change coming up this season, I did my due diligence and searched for the best, and easiest, method to tackle this. As we all know there are many ways to perform this. I'm just glad I came across this method via another member here.

I think you will be impressed how well it works. Didn't make the task seem as daunting, as it sometimes appears.

Best of luck with your tire change.

Rick
 
Last edited:
I know this is sorta old.....but my question is why adjusting the rear axle position is NOT helping the front sprocket alignment! The belt is running very close to the outside flange on the front sprocket (I changed rear tire and was careful not to move the adjuster at that time) and I've moved the belt almost to the inside flange of the rear sprocket with seemingly no change up front. The OM shows the belt on the front sprocket centered. No way I can get mine to do that!

Oh, F3 Limited but same dang adjusters.

I posted this in the other post you were talking about belt adjusting.
Wondering if you tried it at all. It certinally worked for me.

Just let it run and then crank the adjusters so its tickity boo. Then check the tension and adjust accordingly. Then run it again to check alignment. Sooner or later you should nail it.
https://www.youtube.com/watch?v=0_Ewxr7qwqo
 
I saw these pictures on the web and I thought I would post them here as clarification for how the axle adjusters work on the Spyder RT.

I am a visual kind of person and if I can visualize what I am doing while working on something then I understand what is going on and it is not just trial and error when trying to fix something.

The photos show the swing arm caps (black gizmo) and shims which are used to adjust the axle. The shims are what is inside the swingarm and the caps are what you see at the back of the swingarm.

The caps have screws which have nuts that are "captured" between the 2 flat shims (2 on each side of the swingarm). If you look closely at the pics, you can see where the nuts nest into the shims.

When you adjust the screw it will move the shim; However, the swing arm cap is part of the assembly so you can see why it is critical to keep the cap snug to the back of the swingarm at all times. If you don't then you can see that the shims can move because the screw is no longer tight to the cap and the shim and axle are free to move. This is why you need to tap the axle back and forth - those shims are fixed to the axle by the thru hole in the shim. I also take a dead blow hammer and tap on the caps to ensure that they are snug. Just a small bit of movement of those caps means the axle could move which would throw your belt adjustment off.

I suspect that the swingarm is sort of "flayed out" or "sprung" at an angle and as you torque the axle down, it actually pulls the swingarms inward and it is this inward pressure that will move the axle (shims and all). You can account for this by making sure the caps stay snug as you tighten everything down.

To adjust: With the axle loose (minimal pressure on main axle nut), turning the swing arm cap screw clockwise (tightening the screw) pulls the shim and axle backwards; Turning the screw counterclockwise (loosening the screw) will move the axle and shim forward. After any adjustment, the swingarm cap must be put back SNUG to the swingarm and remain snug as you torque the main axle nut back down to full torque spec. If you don't touch either cap when doing a tire change, you shouldn't have to do any adjustment. (I put blue or green tape over the caps and screws before starting the wheel removal process.)

Hope this helps someone.

(Normally this type of adjustment is done by a threaded rod which locks the adjustment shim into place - only BRP can tell you why they did it this way - I guess it was less expensive.)

View attachment 194961

View attachment 194962

:agree: .... AND I'm fairly certain the method BRP does the Axle adjusters on SKI-DOO's is the "threaded rod - locked in place" method .... JMHO .... Mike :thumbup:
 
Last edited by a moderator:
Back
Top