Bob Denman
New member
I went to thumbnails; let me know if this works... :thumbup:
Ann,
Yes; yes I did...
Ann,
Yes; yes I did...
Last edited:
I can see. :yikes: I can see. :clap: Looks great. :thumbup: It was a toss up for me. I went with the turn signal eyebrows. Can't wait for next years Spyderfest. nojoke Tom :spyder:
) :thumbup: hyea:
hyea:So I bit the bullet and ordered my bumpskid and it came two days later !
I am not sure how I will get it put on yet; me/friend/hire it out.
But I have a question:
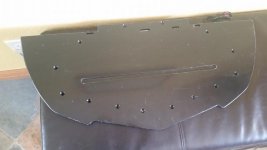
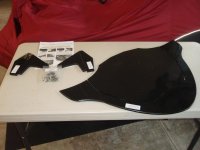
Mine came with four fairly large plastic brackets............. this adds a little confusion as with all the posts I have read there has been NO comment about installing these brackets. ????? :yikes: In addition...the photos on the instructions that came with the BSkid look like an older model Spyder. The procedures are not numbered 1, 2, 3, etc. It also says for the ST-limited you may need to remove the entire front fascia.
So.....whatz up with the brackets. It would sure be nice here to have some clear photos of an install (here on this site) on the proper model Spyder. Did you install the brackets ? Were you able to get them in without any fascia removal ? I was just surprised as there has been no comment about them. :shocked:
Thanks for any assistance ! :thumbup:
I have the ST-limited 2014
Sorry, I can't answer the bracket question.
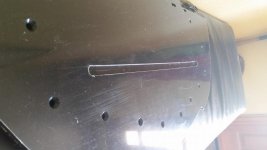
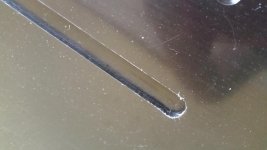
This is my 2nd bump skid and my first lighted one. I was surprised to find a huge groove routered into it. I thought I had a manufacturing error and the groove should have been on the side opposite the counter-sunk screw holes. I called and found out that the groove is routered in there for more lights because "most people who get the lighted one, want more lights". I wasn't planning on adding more lights.... so to me the big old groove is just a place for me to catch the skid on rocks or scoop up samples of road kill :barf:
I couldn't find any mention of it on SpyderPops website and if I'd had an option to get an extra groove vs smooth bottom, I would have chosen the smooth bottom.
Any ideas on what I can fill the groove with? Should I just leave it alone and hope it doesn't catch on rocks or roadkill? We haven't installed the bumpskid yet because of this.
Why not just give him a call? :dontknow:
http://www.spyderpops.com/
His Phone number is one of the first things that you'll see on his website.
Since I've got no experience with the F-3 Bumpskid; I'd say to leave the groove as it is, and just be aware of your riding conditions... :thumbup:
Do you have a picture, that you can post of it??
I tried to take a picture that showed the depth of the groove, but gave up. It's approx 1/4" deep.