• There were many reasons for the change of the site software, the biggest was security. The age of the old software also meant no server updates for certain programs. There are many benefits to the new software, one of the biggest is the mobile functionality. Ill fix up some stuff in the coming days, we'll also try to get some of the old addons back or the data imported back into the site like the garage. To create a thread or to reply with a post is basically the same as it was in the prior software. The default style of the site is light colored, but i temporarily added a darker colored style, to change you can find a link at the bottom of the site.

Teddy needs some electrical advice please. ... . thanks

CyncySpyder

Teddys favorite human
Ok, so last year we had a great little 12 volt heated pad that worked great for keep'n Teddys carrier nice n toasty, even on our 100 mile trip to Indy in 16 degree temps :thumbup: but sadly, that pad no longer works :(:(

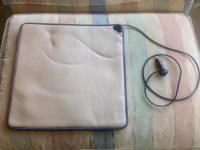
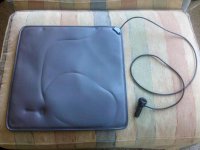
With the onset of winter starting up again, I was able to find a new 12 volt heated pad that should prove longer laster with its far infrared honeycomb design.:thumbup: :thumbup:

Here's our issue :shocked: Our previous one was wired in a wIMG_20111221_115609.jpgIMG_20111221_115548.jpgIMG_20111221_115528.jpgay that the wire leading from the plug to the pad had a disconnect in it where you could just unplug it & plug it back in mid-wire. That allowed me to drill a small hole into the inside trunk wall & run the wire through there directly to the open hole area at the bottom of the RTs seat. From there it was simple to just plug it in & go ;);)

Our new one however has no such dissconect & its just one sollid wire from the plug to the pad :( & the plug is WAY TO BIG to drill an access hole for :banghead:

I know little about dealing with electrical cords, so I need some assistance here. I thought about possibly cutting the cord & using "Posi-Taps" to reconnect them, allowing me to do as before & just drilling a small enough hole to allow for the width of the cord only
 
But, I'm not sure that would work or not :dontknow: If anyone knows if this would work, or has any other suggestions, please, speak up :pray::pray:

Teddy & I both thank all of you for help'n him keep warm & Spyder Ryde'n this winter :bowdown:
 
I had to add an extension to my trailer plug to my truck, I just cut the wire, solder a longer wire together and cover the soldered sections with shrink tube and tape. I'm old fashion so i never use crimp, clamp, or butt connexions. Never had a soldered wire pull out, or loosen and cause a intermittent connection.
 
I don't know what type or size of connector you had before, but if it was an SAE (battery charger) type, here is one source from a Google search. http://www.powerwerx.com/batteries-...um=googleShopping&utm_campaign=googleShopping

A better option might be to mount a Powerlet outlet outside the trunk. If you don't have a comm system, the place where the passenger helmet cable would go is handy. It is just the right size for a Powerlet or Gerbing outlet. You would have to change the end on your cable or use an adapter if you use the Powerlet (BMW type) outlet, though.
 
electric advice

when you cut the cord you will notice that the wire inside the insulation may be a different color than the other

or one of the wirers has a line painted on, or molded into the vinyl, this will help you to match the wires up when you solder them back together.
 
I'm not quite sure what your asking, are you trying to salvage the connectors off the old pad to install on the new and use your original drilled holes or connections? Also, is that the new one in the pictures? Not sure what the old pad wiring and connectors looked like, but if it resembles the one in the pictures, some of those have fuses in the plug or jack. Did you check to see if the components of the old pad wiring only blew a fuse? Did you use a meter to ring through the old pad to see if it had a reading of continuity or it was infact an open circuit.
 
Dave- I'd take Scotty's idea and add the SAE connector. It adds flexibility.


Sent from my iPhone7 using Tapatalk
 
I see no reason you can't use your original idea of just cutting the wire. Cut the wire in a area that it will be least exposed to the elements and allow enough cord on either side. I would put male and female quick connects on the ends of the wire that you cut providing they fit through that access hole you already have. You might have to make it slightly larger depending how big this hole you have already drilled is. Judgeing from your pic of this cord, you will not need to big of connectors. This will allow you to disconnect and remove this pad when summer gets here and only cost you a couple of dollars for the quick connects.

OR........ Cut the cord off the original pad and splice that cord onto the new one. That old cord already has the male / female disconnects on it.

Or......... use Scottys idea of adding an outlet back there on the outside.

BTW>>>>>>> Make sure the pad is unplugged prior to cutting wire. :roflblack:
 
Last edited:
Dave, Pm me your address and I'll get you a connector kit that will easily allow you to cut and add a connector to your cord with no other splices. I build police cars for a living and use these products all the time.:cheers:
 
the place where the passenger helmet cable would go is handy. It is just the right size for a Powerlet or Gerbing outlet.QUOTE]*************************************************************************************We don't have the comm system, no need for it. Where is this place your talking about that would be ideal for installing the Powerlet? Like you said, it would offer more options this way to have a constant power source readily available to the outside passenger area for Teddy's other electrical accessories, like his lighted carrier & in the summer time, his personal AC unit. Thanks Scotty
 
are you trying to salvage the connectors off the old pad to install on the new. Also, is that the new one in the pictures?
********************************************************************************The pic is of the new pad. The old pad had a wire that actually burned through a crease in the pad lining and it shorted out. I don't have it any more. threw it away once I discoverd the burn mark & it not working, so not trying to salvage anything. I'm just trying to figure the best way to go about using this new pad, without having to drill a hole the size of my fist to get the connection through the trunk wall & to the power source. I tried it yesterday, just running the wire outside the body panels and leaving the top of the trunk unlatched & directly plugging it into the outlet in the trunk, and this pad works great, heats up to 120 degrees in only 90 seconds. As I stated before, our old pad came with a connection in the middle of the cable, about the size of your pinky finger, that just plugged & unplugged from one another. This one has no such connection built in, so trying to figure a way of making it work. Thanks for your input.
 
PM sent, thank you

Dave, Pm me your address and I'll get you a connector kit that will easily allow you to cut and add a connector to your cord with no other splices. I build police cars for a living and use these products all the time.:cheers:
Teddy & I both appreciate your assistance. Happy Holidays.
 
Can I get a link to where this pad came from? I wouldnt mind having one me thinks.
 
the place where the passenger helmet cable would go is handy. It is just the right size for a Powerlet or Gerbing outlet.QUOTE]*************************************************************************************We don't have the comm system, no need for it. Where is this place your talking about that would be ideal for installing the Powerlet? Like you said, it would offer more options this way to have a constant power source readily available to the outside passenger area for Teddy's other electrical accessories, like his lighted carrier & in the summer time, his personal AC unit. Thanks Scotty
It is on the left side, inside the rear of the passenger grab rail. There is a hole with a plug in it. A Powerlet type outlet fits right in. I used a Gerbing outlet in my case, because I had it handy. That is wired to my auxiliary fuse block, but it could be wired directly to the battery. The Gerbing outlet attaches to a standard coax connector like for heated gear. It comes with a coax, fused harness.

attachment.php
 
Can I get a link to where this pad came from? I wouldnt mind having one me thinks.
The one we had last year worked well, but it was the standard type of wired heating pad, and the wires, when exposed to frequent bending and folding & heating & freezing temps, the wires broke. This new one that we got, is suppose to be designed with an interior honeycomb type of heating element that prevents this from happening.
http://www.sportsimportsltd.com/fir-infrared-heat-12-volt-car--boat--rv-heated-seat-pad.html
I can't yet give it a good or bad reccomendation, as we just got it & tried it once so far. It DID heat up quickly, if I remember correctly, they claim it should heat to somewhere around 120 degrees within 90 seconds, & when I checked it a couple minutes after plugging it in, it was warm to the touch. Once we use it more, I'll give more feedback. But it is rated & made for outdoor vehicle use, so I'm hoping Teddy will be happy & give his approval as well.

It is on the left side, inside the rear of the passenger grab rail. There is a hole with a plug in it. A Powerlet type outlet fits right in. I used a Gerbing outlet in my case, because I had it handy. That is wired to my auxiliary fuse block, but it could be wired directly to the battery. The Gerbing outlet attaches to a standard coax connector like for heated gear. It comes with a coax, fused harness.

attachment.php

Thanks Scotty, I never noticed it before, so I'll have to go & check that out. Odd, seeing as Teddy is back there all the time, he never did mention this to me.
 
If you want to reuse the old hole, cut the plug off and buy a replacement one at radio shack. They have one that allows you to install the wires with no soldering, you just push in a button, slip the stripped power sire in the hole and release the button. The plug has a + and a _ stamped on it so you just have to dentify the wires from the heating pad.

If you can open the existing plug its easy to see how they are installed but if it is sealed you can take a ohm meter, push a pin into one side of the 2 wires then touch one side of ohm meters test prongs to the button button on the existing plug. If it shows zero or close to it you know you are testing the hot wire. If not, put the pin the other side and test again-you should have a reading this time. If not repeat the process, the pin may not have made contact with the copper wiring inside of the wires insulation jacket.

If you do not have a volt/ohm meter you find digital ones for around $10 for light use around the home. Check K-mart, Wallmart or a local auto supply outlet such as O'Riellys.

Of course there is no reason you cannot splice but this way you can remove the plug easily if you want to remove or repace the pad some day.

Merry Christmas :)

Randy
 
Back
Top